Making a beautiful photo background yourself is not as difficult as it seems from the outside. The main thing is that it can be made double-sided by choosing the two most suitable colors. We will make it foldable so that it does not take up much space.
Today we will continue to develop the topic of high-quality photographs. Regardless of whether you have a lightcube or not, for beautiful photos you will need one more useful thing. It's called a photophone. It helps not only to get beautiful and impressive photographs, but also solves several other problems along the way. For example, it allows you to make your Instagram or social network account in the same style, and therefore more attractive. In addition, visitors’ attention will be focused only on the products themselves in the photo. Nowadays, countless stores offer Chinese vinyl photo backdrops, but they cannot be compared with a real wooden backdrop, with its depth and completely unique texture. Therefore, today I bring to your attention a master class on how to make a real wooden photo backdrop with your own hands. There will be two bonuses on top: firstly, it will be double-sided, and secondly, foldable!
Necessary materials
If you want to create more depth and relief, you can take another small kerosene burner to brush the boards. But this time we decided to do without fire hazardous procedures.
Stages of work
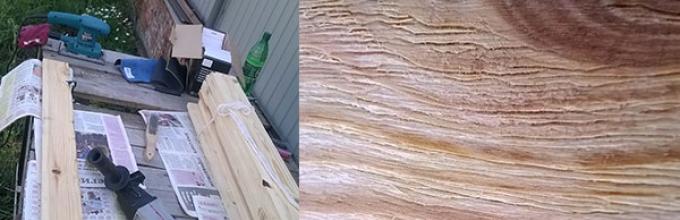
The first task is to deepen and reveal the structure of the wood on the boards as much as possible. To do this, we put a brush attachment on the drill and start working on each board with it. In this case, it is advisable to work across the fibers, otherwise there is a risk of removing too much deeply.
To prevent the board from running away, we fix it to the table with clamps.

The second stage is painting the boards with stain. A warm yellow shade of “Pine” was chosen for one side, and “Mocha” for the second. Mocha gives a nice, brown color. Photos on a brown background always attracted my attention; they seemed as natural as possible and pleasantly shaded any light objects.  The stains chosen were both natural. Aquatic. Each side will have to be coated with stain in at least two layers. First, apply a yellow tint with a brush. Then we work with the second side, applying a brown tone. The stain is perfectly absorbed into the fibers, revealing the structure of the wood.
Attention! Dark stain easily passes through the thickness of the wood and can unpleasantly stain a light background with dark spots, so you need to take a little stain onto the brush and carefully monitor the process!

I also paint the end strips with a dark stain.
After staining, you need to prime the product before varnishing it so that the varnish does not eat away the color. So, coat it with primer in one layer and wait for it to dry completely. After this, we cover the background with varnish on both sides: yellow on the light side, walnut on the dark side. The varnish must be matte!
Now you need to drill holes in the end plans and insert metal bolts there so that they stick out on one side, and on the other they are completely recessed flush into the wood. In general, do it as shown in the photo. To do this, you need to “expand” the upper part of the hole with a thicker drill. The bolts should fit tightly.
 The next stage is assembling the photophone into a single whole. We lay out the first six boards and fix them on the table. We attach the end strips on the sides with the bolts facing outwards and fasten them to each of the boards with self-tapping screws.
 We repeat the same operations with the second part of the photophone. We put on metal plates that will fix the photophone when unfolded. Voila! Ready for a double-sided photophone! You can go get your camera! Both of its parts can be easily combined with each other and installed, for example, the light side as a side panel, and the dark brown side down, and vice versa. When folded, it will not take up much space; it can be easily placed in any free niche or simply used as a table.

More ideas
The topic of photo backgrounds is still gaining momentum, and everyone approaches solving problems differently. I bring to your attention a few more interesting and fairly budget-friendly ideas on how you can diversify your backgrounds.  If you want to get a surface with a bright color that wood is not painted in nature, you can use acrylic paints. It is best to dilute them with water and apply them in a thin layer so that they do not clog the surface with an even film, muffling the fiber transitions. Here is an example of such a handmade background.
If your soul requires photographs in the spirit of vintage, shabby chic or simply “antique”, you can look for boards in the country, in old houses. In fact, photographers use everything, right down to old doors with peeling paint (the most chic!) and old tabletops. The main thing is that the tree has already had time to properly experience the effects of time. Such backgrounds are valued for their naturalness. They no longer need to be painted or brushed.
A good must-have is a light gray wooden background: it doesn't draw too much attention to itself, and it can be interestingly processed when editing a shot, easily changing the shade from light to dark.
The carpet and the festive table have not appeared in photographs from events for a long time, which is very pleasing. Their places were taken by beautiful thematic backgrounds and zones, selected dresses and suits, and high-quality photographs processed by professionals at the exit. And products have long been photographed using special devices - light boxes or backdrop systems for product photography.
All this can be rented from photo studios or from photographers, or you can do it yourself, spending a little effort, time and materials. The main criterion for selecting a background is the purpose - for a wedding and for product photography you need to use different equipment.
Background for a home photo shoot
You can make a home photo studio for a portrait or family photo shoot and the backgrounds for it yourself, using a free wall or any frame made of wood or metal. The peculiarity of filming a house is the presence of walls and the frequency of filming. For a holiday or important event, it is not necessary to construct a capital base for the background.
To attach the background, you can use ordinary paper clips and a vertical surface, a rope firmly stretched between two walls, a curtain rod in the bathroom, ordinary baguettes or a curtain rod attached to the wall, and any other device.
The main condition is that the background must be stretched, then it will look harmonious in the photo. Absolutely any material is used, as the photographer intended - a colored or plain background, an image or a thematic landscape. You can complement the image with accessories, pieces of furniture or attributes to fill the picture and create volume.

What dimensions should a background have for home use? If you plan to shoot a subject, then the volumes should be based on the size of the object; if you are shooting a child - height from 1.5 meters, width from 1 meter, the larger, the further the photographer can move away.
Again, a newborn child and a 14-year-old child require different amounts of space, this must also be taken into account. For an adult, the height of the background will be from 2 meters, and the width – from 1.5 meters.
In home photography, backdrops are required to celebrate a birthday or wedding anniversary at home or in a cafe. For the last 3-4 years, it has been popular to have a photo wall or photo area at a party that attracts the attention of guests and allows you to take memorable photos. It is necessary to take into account the number of guests in the frame at the same time - for 5-7 people, the width of the background will already be 3 meters and the structure will need to be stronger and more stable.

Background for a wedding photo shoot
On their most important day, a young family tries to take the maximum number of memorable photographs and beautiful holiday pictures. To do this, many people order photo walls or photo corners, where various accessories, paraphernalia and a background hang.
Popular themes are a wall with cut-out frames, a floral theme, the names of the newlyweds and the wedding date. Such a background is already heavier than a home one and requires more careful preparation. Typically, a wooden or metal structure is used, which is assembled and disassembled directly on the day of the holiday; fabric, film or paper with an image is attached to it.

You can also make a background for a wedding photo shoot with your own hands from dug-in pillars with a stretched rope or cable for tension. All this is decorated with flowers, ribbons, balloons, funny or beautiful pictures and creates the atmosphere of the evening.
Guests can take photos in the area. Since the wedding option involves photographing adults, it is better if it is 3 meters wide and 2 – 2.5 meters high.
Background for product photography
Another option, fundamentally different from the first two, is a homemade background for product photography. What it is used for – photography of goods, jewelry, home-made toys, photography of items for sale online. Its size directly depends on the object - for jewelry 50 x 50 cm is enough, for goods you may need 1 meter by 1 meter or more.
The peculiarity of shooting in the position of the subject and the camera is that the product lies on the background, and the light and lens are on top.

To create a background, you can use wood, paper, plastic, drywall, fabric and other materials that create the desired texture. They are decorated, painted and created the desired color and look for specific shoots or objects. All these materials are easy to process and do not require special skills. This type of design does not require fastening and can be moved to the desired location.
Another option is to create a background for the house from a section of wall or interior items. There are a lot of options - decorate the desired place, hang it with fabric or paper, or simply put the elements on the sofa or table. If filming is required frequently, then it makes sense to find a place in the house with the right light and equip a constant background there.
Portable backgrounds, on stands
The most convenient option for on-site photography is photophones on special gates. They are assembled and disassembled in a couple of minutes and consist of a metal frame on stands on which a background is attached - fabric, banner, paper. Background gates are an indispensable thing in a photographer’s arsenal; with their help, you can create a photo zone anywhere.
They are offered in different sizes, height from 2 to 4.5 meters, and width from 2 meters, optimally 3.8 - 4.1 m.
They are adjustable and can be adjusted to different sizes, they are stable, easy to assemble and light in weight. The background mounting system, such as a “gate,” is an excellent option for both home filming and outdoor trips, and it can also be used for subject photography.
In addition to the “gate”, you will need fasteners for the background - ties, wire, clamps. They are also necessary for tensioning the material, especially if fabric is used, because it tends to show kinks and shadows in photographs.
Background installation system
A more complex and expensive mechanism for photo shoots is the background installation system. It is a hanging system of gear brackets on which material is attached - fabric, film or paper.
The rollers with backgrounds can be set in motion manually, according to the principle of blinds, or automatically, using a motor and remote control. Up to 6 backgrounds can be installed on the system at the same time; they are in a curled state; if necessary, the desired one is lowered. The width of the entire structure is from 2 meters, rolls with backgrounds can be replaced.

The cost of such a system is much higher than other options, it needs to be mounted on the wall, and paper backgrounds are quickly used up because the bottom part gets dirty. Therefore, it is advisable to take it only if necessary - for a studio or photo studio.
DIY photophone on the wall
One of the simplest decor options that does not require a structure and depends only on your image is a photo wall. Decor is applied directly to a section of the wall; you can use primer, textured plaster, paint, tiles, plasterboard elements, stickers and much more. You can paint the wall with drawings, cover it with paper flowers or balloons, hang pictures or ribbons, attach letters or numbers, or drape it with fabric. This design option is suitable for a holiday or meeting guests; this principle is used to create a candy-bar - a table with treats.
DIY light box
Light-box is a special box for product photography that you can make yourself. The main idea of a light box is the absence of shadows from the object, due to the dispersion of the supplied light. The design is simple, to create it you will need:
- The base, for example, is a cardboard box of the required size. Everything unnecessary is cut off from it, the side walls are cut through to allow light to enter;
A piece of white paper, what paper is ideal. It should cover the back wall and flow smoothly without an angle to the bottom of the box.

- Scotch tape or pushpins are needed to secure all the elements to the box.
tracing paper is a translucent or white fabric with which the top and side slits are draped so that the light coming from the sources is scattered as much as possible;Light sources, the shade and power you need;
Actually, a camera that needs to be set up for subject photography and check the white balance using Whatman paper before starting.
Cyclorama - background for DIY photography
A cyclorama is essentially the same light box, but larger in size. This is a background of walls and floors without corners, which creates the impression of endless space. It can be white, black, blue or green, and is used for catalog and advertising photography, for photography and videography of people, objects, and cars.

In a home photo studio, a light-box will be enough for infrequent use, but for studio photography a cyclorama is necessary. You can create it with your own hands using the same materials, you just need to correctly calculate the corners and transitions so that the boundary between the floor and the wall is not visible.
Interior items and improvised means for creating a photo backdrop
The greatest scope for imagination is provided by the use of any available means for photography. Interior items, furniture, mirrors, household appliances, fences, doors, trees and any other objects can be used as a background. They can be decorated with decorative elements, painted and supplemented with any details.
Weddings in rustic style against the backdrop of trees, photographing pregnant women in fabric huts in the forest, children's birthday parties and filming in the courtyard, in paper balloons and ribbons and many other ideas and options. They usually do not require fastening; the most that needs to be done is to hang the swing on a branch or arrange elements, throw fabric or toys. This type of background is gaining popularity, many people take cameras and beautiful objects and go out to shoot.

Materials suitable for creating photo backdrops
Regardless of the type of fastening or its purpose, each photophone must have certain qualities: strength, ease of fastening, relative dust and dirt resistance. An important factor is the price of the background. Most often used:
- Fabric bases for the background or fabric with a printed pattern, plain fabric, the choice depends on the idea. It is durable, can be ironed, is easy to transport, easy to mount and looks very beautiful in photographs, since it does not reflect light, but scatters it.
The downside of the fabric is the need to tension it if the kinks and irregularities are not intended by the plot. This is a fairly expensive backdrop option, suitable for mounting in any way - on the wall with buttons, on the “gate” with ties, in rolls on a backdrop lifting system. Specialized stores offer a wide selection of fabric photo backdrops with various thematic designs and compositions.
.gif)
Paper backgrounds
Budget material, great for rare shooting or home use. You can make it yourself from whatman paper or rolled wallpaper. Photography stores offer a huge selection of designs for such backgrounds; they can be plain, multi-colored, textured, with thematic images, landscapes and panoramas. The paper is light, easy to store, transport and install, but not strong enough and easily soiled. If the background is also placed on the floor, then it is practically disposable, because marks and stains on the photograph will be very noticeable.

Spunbond

Plastic
- Often used as a basis for creating a background. It is durable, dense and holds heavy decorative elements well. This material is sold by the meter in plates, has a thickness from 1 mm to 7 mm and different densities, respectively. To secure it, you will need a base made of wood or metal, since ordinary paper clips or ties will not hold it.
Banner film
This is a familiar advertising material that is used on the streets. You can print almost anything on it and use it in any weather and outdoor conditions, which other materials cannot do. Banner film requires an installation frame or a banner made of metal or wood, is quickly and easily stretched and looks great in photographs.

Before choosing a background for your photo shoot, you should decide on the theme, shooting conditions, attributes and decor and choose the material according to your idea. Is it possible to attach this or that material, can it be used for decoration, will the background withstand wind, rain or a large number of guests and other points. There are numerous companies that rent or make custom photo walls and backdrops for holidays; you can order them to create a photo zone. Or make it yourself according to your own idea.
If you are interested in product or food photography, or like to shoot still lifes, then you know that one of the components of a good photo is a suitable background. By repeating from shot to shot, the background can become part of the photographer's recognizable style.
For photography, both light and uniform surfaces and textured ones are used: vintage wooden tables, various fabrics, as well as surfaces made of real or artificial marble, brick and even asphalt are used.
How to find a good background? It’s good if you already have a “textured” table in your apartment or studio (however, it’s still not very easy or pleasant to wipe off the consequences of a busy food shoot). Photographers often use real or specially made pieces of various materials, but all this wealth needs to be stored somewhere and is very inconvenient to transport.
Read the instructions on how to make a photo backdrop with your own hands at minimal cost. Such backgrounds are almost weightless, easy to move and (most importantly) very easy to clean.
Method 1. Photo printing on foam board
Printing on foam board is widely used in photography. Such prints are often hung on the wall - they are inexpensive, yet bright, light and durable. What if we use this technology for our task?
1. Find the source. There are no restrictions on what kind of image you can use for printing: a plaster wall, old wallpaper, painted old shabby chic boards, a brick wall, marble... You just need to take a photo of the surface you like or find it on one of the stock sites. Make sure the image resolution is at least 250-300 dpi.
2. Where to print. You can easily find a photo center, darkroom or printing company that offers printing services on foam board - choose the one that suits the price.
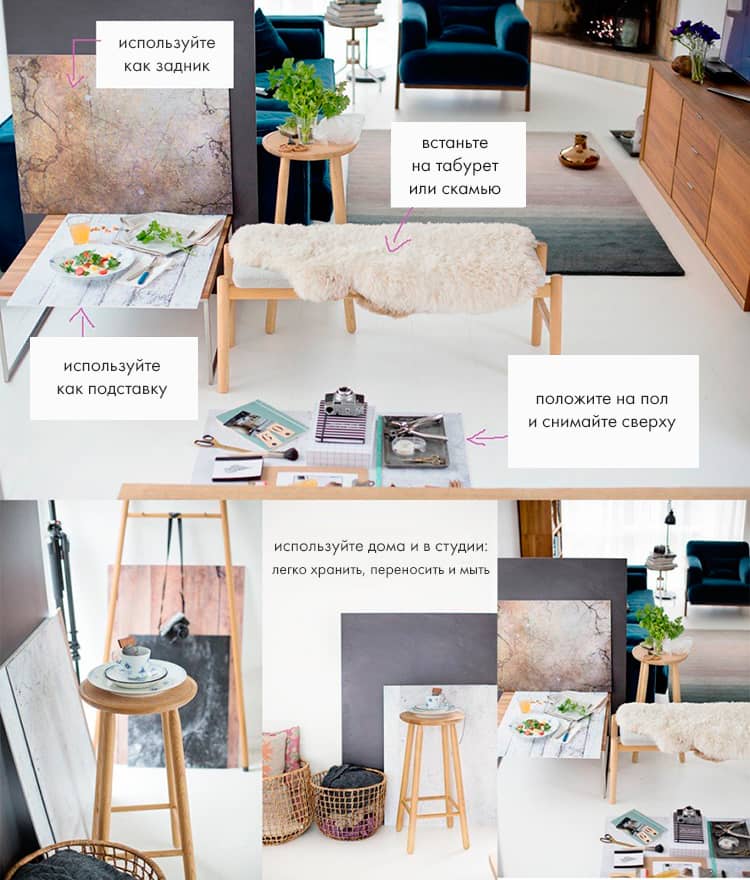
3. Select options. The thickness of the foam board must be at least 5 mm. Choose a matte print (a glossy surface will give unnecessary glare and reflections, which is not at all suitable for our purpose). Choose the appropriate size according to your taste. From experience, a size of 50x70 cm is well suited as a surface for laying out objects, and 100x120 cm can be used as a backdrop (wall).
4. Evaluate the result. Photo backdrops made in this way most often turn out really successful. Still, some prints may look unnatural. Don't be upset - just turn them over to the other side. Since the reverse is white, they can be used very effectively as reflectors. Another option is to imitate the surface of a window sill. Perfect if yours is not white enough, is still stone (hello, USSR) or is simply always filled with very necessary things.
So, it's worth a try. Be prepared that not all prints will turn out perfect, but if you do, you'll get a durable, feather-light, and easy-to-use photo backdrop.

Method 2. Vinyl wallpaper/backgrounds
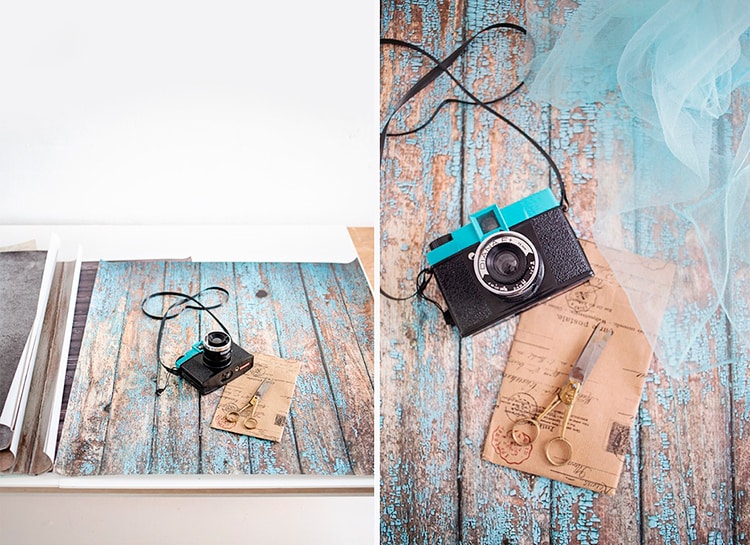
They are available in all possible colors and textures, from wood to granite - you just need to look hard in the wallpaper section of the building supermarket. The print is made on a vinyl sheet that can be easily rolled up and placed in a corner/carried away. Of course, before using such wallpaper as a background for photography, the edges need to be pressed with something, or even better, glued so that the roll does not curl.
You can also buy special vinyl photo backdrops. Companies like Swankyprints ship them all over the world. But be prepared for the fact that the quality may vary. Some have flawless printing, others not so much, and you will only find out which one you got once you unpack your parcel. And the delivery price is steep, it’s better to order several at once. In Russia there are also online stores of vinyl photophones. It may be easier and cheaper to choose their products.
Method 3. Self-adhesive film
If you are not too lazy to work with your hands, then you can create a stylish background for literally pennies. You will need the same foam board and self-adhesive film. The film is sold in construction supermarkets (here is an example of a “marble” coating for 127 rubles), and foam board is sold in stores for artists (it costs 204 rubles).
Materials:
- self-adhesive film;
- bookbinding cardboard;
- dry clean rag;
- ruler;
- pencil;
- stationery knife.

Step 1. Draw a shape of the required size on cardboard. Draw a shape of the same size on the film. Using a utility knife, cut out the shapes using a ruler.
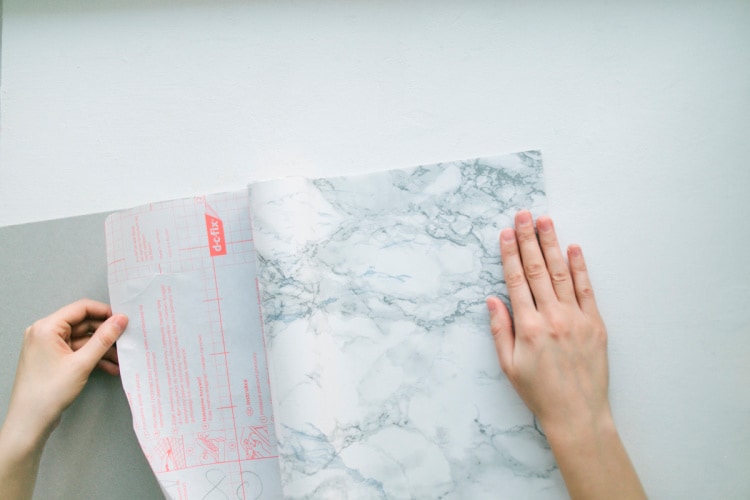
Step 2. Separate the protective film from the paper. Carefully apply the decorative pattern of the film with the adhesive side to the base and press with your palm. With one hand, continue to remove the paper from the film, and with the other hand, smooth the design using a clean, dry rag.
Step 3. After gluing, check whether bubbles have formed on the surface. If the film is glued unevenly or wrinkles appear, it can be quickly re-glued. But after an hour it will be impossible to separate the film from the base.
That's all
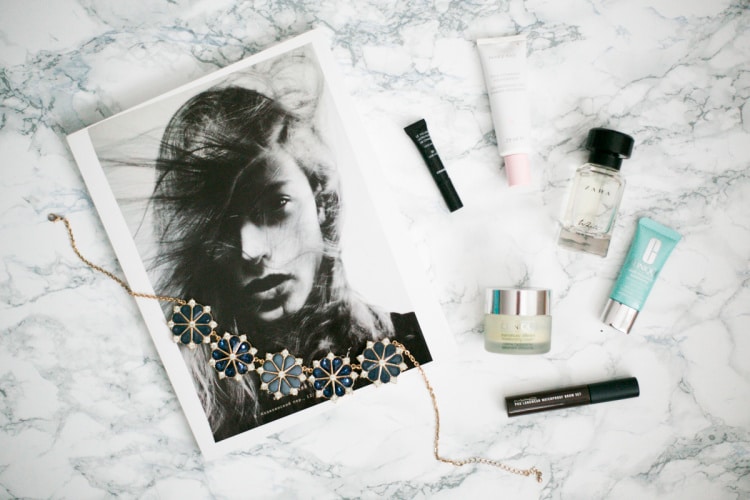
The stylish surface is ready for your photo experiments. Share in the comments which method you liked best or suggest your own option.
Food photography is all about attention to detail. Food photography requires not only expensive, high-quality equipment, but also a beautiful background for photographs. The surest way to increase your Instagram or Facebook followers is to provide readers with quality media content. If you are going to start a culinary blog or page on social networks, you need: to cook deliciously, know the basics of photography, be able to adjust the light and take beautiful photos of food.
Photos of most domestic culinary sites can be thrown into the trash without regret. To avoid such a fate, we will show you how to make a beautiful photo background from wood with your own hands in a few days. Food photography is gaining popularity. First-class food stylists work to create beautiful compositions. Have you ever seen how hamburgers are prepared for filming before commercials? At the end you need to get a juicy picture that is impossible to resist. Look at the scale with which they approach food photography in the USA.
How to Photograph Food
How to make a photo background
Materials:
- Wood planks
- Thin wooden beam
- Self-tapping screws
- Dye
- stain
- Liquid wax for wood
- Water-based paint
- Ingredients for preparing Milk Paint
Tools:
- Miter or hand saw
- Drill
- Screwdriver
- Sander
- Tassels
- Sandpaper
- Kitchen sponge
The first step is to decide on the size of the background for the photographs and cut the required number of wooden planks. We did the cutting using a miter saw; it makes a smooth, beautiful cut that requires virtually no processing. If you don't have a miter saw, a regular handsaw will do just fine.


The blanks are cut and you can proceed to the next stage - assembling the photophone base.


Before this, all the planks on the outside were marked at the points of attachment to the beams. To prevent cracking of the wood when screwing in the self-tapping screw, a hole is drilled in each plank. The open method of attaching the planks to the base using self-tapping screws provided the product with the most natural appearance.


One part of the background under the photo is ready, let's start sanding. Together with an assistant, we go over the surface of the product with an eccentric sander with 120-grit paper.


Let's brush away the small sawdust with a brush, now the photo background is ready for decorative work. Next we will need:
- stain
- Milk Paint white
- Milk Paint turquoise
Read how to make milk paint. We deviated from the instructions and used water-based paint instead of acrylic paint. Prepare white milk paint and divide it into 2 containers. Half of the paint remains white, the second part is tinted with a dye to your taste. Two colors are used to give the photo background volume and depth.

The first thing to do is set the base color for the tree. To do this, we use an inexpensive chestnut-colored stain.

After the stain has dried, you can begin applying the first layer of white milk paint.


We wait until the surface of the photo backdrop is completely dry and apply a second layer of milk paint, this time turquoise.


Milk paint dries quickly. Weather permitting, your photo backdrop will be ready to sand in 30 minutes. The final finishing is done by hand using 100-grit paper. The paint needs to be rubbed pointwise onto the piece, thereby revealing a layer of white paint and the base color of the chestnut stain. The photo below shows the result of a painted board with a photo of the background before and after grouting.

Wood background color for photos after sanding

All that remains is to apply the finishing coat. Because We are making a backdrop for food photographs, we abandoned varnish in favor of wax. Liquid wax protects the wood and gives it shine. The easiest way to apply wax is with a kitchen sponge.


The effect of covering a photophone with wax: before and after

The photo backgrounds are ready, all you have to do is learn how to take cool photos.

The photo background underwent a baptism of fire without the use of studio light. In conditions of insufficient lighting on the iPhone 5s camera, we managed to get the following photos:


Try to make a beautiful photo background with your own hands and an increase in the number of subscribers will not take long to come. Like & Share on Facebook, retweets and bookmarking links are welcome 😉
How to make a beautiful photo background from wood was last modified: June 24th, 2018 by Shim
How to make your photos stylish? Many people don’t think about it, but it is the background of the photo that plays an important role in the overall composition of the frame. Which photo backdrop should you choose? We would like to collect 12 best and budget ideas for you that can be implemented at home!
Crystal Clean
The ideal white background is a classic photo photon that will work well for 80% of shots. In addition, under the universal background, you can apply any texture you want in a photo and video editor. You can choose from the following materials:
- sheet;
- blanket;
- gauze;
- long pile wool carpet;
- painted plywood;
- laminate;
- inexpensive countertops from IKEA.
If you want to buy a photo backdrop for food photography, then plywood is not the best option. When drops of water fall on it, it absorbs everything well and tends to swell. And this doesn’t look very aesthetically beautiful in the frame.
White laminate of different sizes can be purchased at any hardware store.


Plywood
Plywood is a very interesting and lightweight material for a photo backdrop. It is a thin board with a wooden uniform texture. You can buy it at a hardware store.
The plywood itself makes an excellent backdrop for pictures. But if your photos lack some zest, you can treat the sheet with stain to give it a different shade or paint it with paint.
It is important to remember that this photo backdrop does not tolerate much humidity. You should immediately avoid taking pictures using water or splashes.
Price per sheet starts from 200 rubles.


Panels
In a hardware store, in the wallpaper department, you can find decorative panels for the ceiling made of wood or foam plastic. They can be either absolutely flat or embossed with convex patterns. Their texture is pleasant to the touch and looks great on camera. For the background you will need 4 or 9 squares.
Such a panel serves as an excellent light reflector in product photography.
Price: from 50 rubles.


Adhesive tape
Self-adhesive film with various prints and textures, which are also sold in hardware stores, can set the mood for your photographs. If you search well on Aliexpress, you can find self-adhesive paper with the effect of marble, wood, stone and other natural species. It is best to glue the film onto thick MDF paper or hardboard.
Self-adhesive film can be found in Fix Price stores.
Price: from 100 rubles.


Concrete
At first glance, it’s quite difficult to make a complex photo backdrop for a photo. And it’s better to leave it in the hands of knowledgeable people. To create a concrete background you will need cement (or cement-containing products: tile adhesive, grout) and water.
All this needs to be mixed with each other. Apply interior primer to the fiberboard and let it dry. And then, using a spatula, coat the fiberboard or plywood sheet with cement mixture (gypsum plaster). When it's all dry, you'll get the effect of real concrete. Looks pretty good!
White gypsum photon is suitable for cakes, cupcakes and other baked goods.
Price: from 250 rubles.


Kraft paper
The next photon background for photos is craft paper. Pictures with such a background turn out to be very interesting. A universal background suitable for absolutely any still life and other things. You can buy paper at any art and construction store or order it online. It is sold in rolls or comes in sheets. You can use it as a flat surface or a slightly rumpled one.
Ideal photo backdrop for manicures, nails or jewelry display.
Price: from 100 rubles.


Cardboard
A clear advantage of this material is that cardboard has a huge color palette. It is with its help that you can create original and bright photographs. But among the disadvantages, it is necessary to highlight the fact that this material does not tolerate moisture at all, absorbs everything well and forms various stains on its surface. It deteriorates quite quickly and is enough for a couple of photo shoots.
Price: from 100 rubles.
Fiberboard or fibreboard is an ideal material for a background. You can paint it or glue paper on it. Fiberboard 60*120 cm costs about 80 rubles.


Fabrics
There are no limits to imagination here. Fabrics can be chosen to suit your taste in various textures and textures, from burlap to tablecloth or from chiffon to organza. You can combine them with completely different objects to achieve the perfect composition.
In addition to fabrics, the following are suitable:
- towels;
- curtains;
- tablecloths;
- scarves;
- chunky knit sweaters;
- silk pillowcases;
- furniture covers.
Price: from 100 rubles per meter.
It looks incredibly beautiful if the fabric is slightly wrinkled and gives the background some relief.


Ceramics
Ceramic tiles or porcelain tiles are a very good photo backdrop for photos. If you have several slabs left after repairs, then you can safely use this background for your shots.
If your bathroom has good lighting and beautiful ceramic tiles, then why not? This is the perfect place to take pictures with the relaxing sound of water! As a result, you can get unusual images with amazing effects!
Photos of clothes on such a photo background will look simply amazing!


Metal shield
How to make an imitation of a metal surface at home? There is an exit! A metal shield comes to the rescue. Finding it is much easier than you think. There is no need to look for it around the area or buy it from local men for a bottle. You can find a sheet of aluminum surface at any hardware store.