When they describe their dream home, they say that it should be large, bright, affordable for construction and maintenance, functional and, of course, warm. Depending on the climate zone in which the house is located, the concept of its “warmth” may change. But the concept of “heat loss” exists for all houses, regardless of the territory and the material used in construction. Moreover, the mandatory construction of so-called “warm” houses in Russia is enshrined in law due to the catastrophic rise in energy prices.
Whatever material the house is made of, its heat loss can be reduced if insulation work is carried out correctly during the construction stage. Insulation technology largely depends on the inherent thermal conductivity properties of the building material.
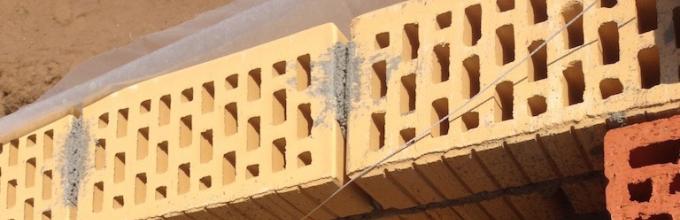
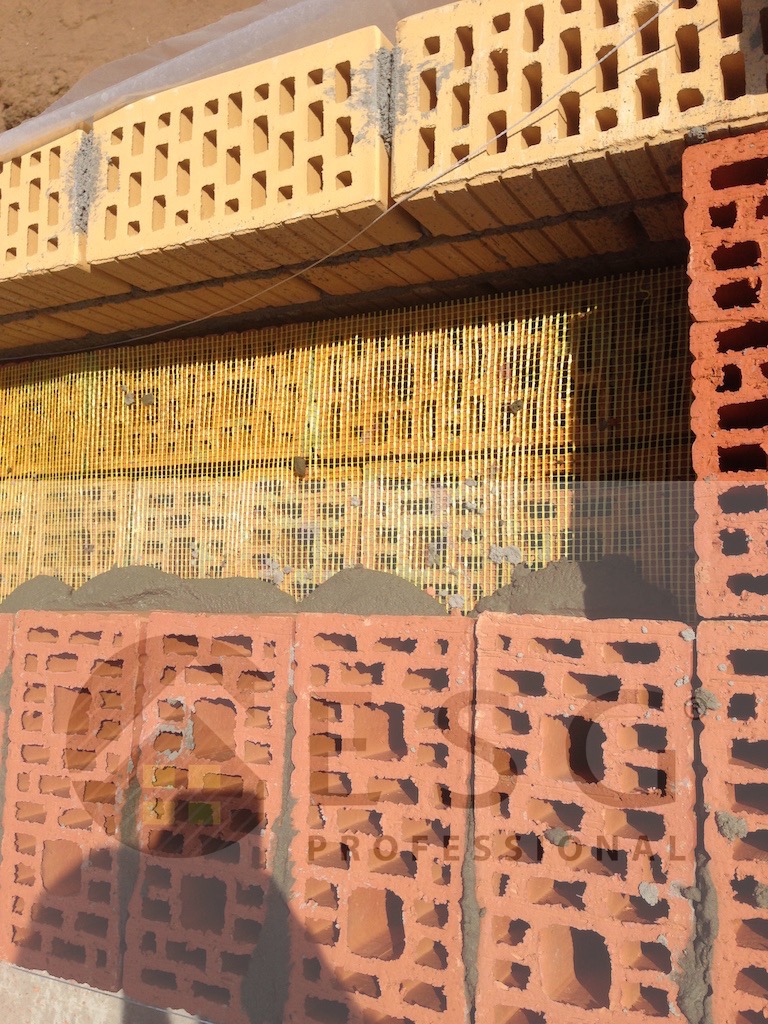
Considered to be the highest quality building material, it transmits a lot of heat without additional insulation and in a very short time. Its thermal conductivity coefficient is from 0.47 to 0.70 W/(m*K). Only concrete is higher: 1.68 W/(m*K). In addition, heat loss through the connecting cement mortar is three times greater than through the laid one. The situation can only be changed with the help of external insulation of brick walls using foam slabs reinforced with mesh and plaster. Another option is to create an insulated ventilated facade.
Significantly lower thermal conductivity coefficients for wooden houses (0.09 W/(m*K)). IN winter time wood warms up quickly and retains heat for a long time. In the summer, the house remains cool. This feature allows you to use a wooden house not only for year-round residence, but also as seasonal housing. The porous structure of wood tolerates periods of freezing and thawing of moisture in the fibers well, without leading to destruction. It is important to carefully caulk all cracks during the construction process, and to repeat the procedure periodically during operation.
The thermal conductivity coefficient ranges from 0.08 to 0.03 W/(m*K), depending on the density: the lower the density, the more air bubbles, the less heat loss. A feature of houses made of foam concrete is their unsightly appearance immediately after construction. Therefore, it is very easy to hide insulation under finishing materials.
– the cheapest and quick way construction of a house. Wooden frame sheathed with slabs made of wood-based material or sip-panels, which have the lowest thermal conductivity coefficient - 0.0022 W/(m*K). Between the slabs there are several layers of insulation, which makes it possible not to do additional external insulation of the house until it loses its properties (5-8 years depending on the material).
It is possible to achieve the legally established permissible heat loss coefficient of 0.02 W/(m*K) by externally insulating the walls. External because the heat capacity of brick and wood will not change, and the useful internal space of the house will not decrease. It is very important to choose the right insulation material and install a supply and exhaust ventilation system with enough power to eliminate moisture formed on brick or wooden walls ah after insulation. Without ventilation, moisture will penetrate the insulation and destroy it, especially if it is mineral wool and its derivatives. The exception is vapor-tight polystyrene foam. Another way to avoid the greenhouse effect is to create a ventilated façade.

In a “warm” home system important role The insulation of the attic plays a role. Where it is replaced by an attic, insulation measures are carried out using a special technology. For a “cold” attic, insulation is carried out from the inside using two layers of vapor barrier film (under and above the insulation) and a decorative coating. Waterproofing is also installed under the roofing material.

As you can see, the most unpretentious in terms of insulation is frame house. However, it is good in warm climates and until the insulation in the slabs breaks down. The further into the cold climate zone the house is located, the less suitable is a frame house, while brick, foam concrete or wood are justified and economical in energy consumption. And no matter what supporters of building houses from certain building materials say, any house needs to be insulated! Then it will be warm and cozy, regardless of the weather outside.
How often do people think about building their own home and dream about it. But looking at the cost of building materials on the market and the price for work, dreams stop and never come true. This is not an entirely correct position, since build the most cheap house himself is quite real. If you exclude the work of the team to build a house, then you will save 50% of the total cost of the constructed home on this alone.
How to build the cheapest house
If you decide to build yourself, then construction may not cost you much. Let's look at the stages of building a cheap house, and look at the necessary steps that will help us save enough money.
Let's start, the cost building a house consists of three components:
Material used for construction.
A job that can eat up most of your money because it is expensive.
A project that you cannot do without when starting construction.
As an addition to this, you can add the design of the house. If you plan to build the cheapest house yourself, then you need to take care of its structural simplicity. There should be no creative things in this house, which are often done more expensive than a building several times.
Is it possible to build a cheap house?
In order to reduce the cost of construction, you need to study the building materials market for reasonable prices. You also need to find out the cost of finishing work. Ask why, if you can build the cheapest house yourself? The answer is simple, there are some jobs when building a house that can only be performed by specialists, and this must be taken into account. Start with a constructive solution. If you decide to build a house with several rooms, for example five or six, then you will need a team of two people, since during construction you cannot do without an assistant. This will not increase the cost of construction significantly, but things will go faster. A house can be built 6x10m, this is very constructive, since with a house width of six meters there is no need to erect an additional load-bearing wall, and this significantly reduces the cost.
It is necessary to observe the ratio of useful and total area, your home should feel comfortable and cozy for all family members.
The cheapest house, what affects this?
Since we have already decided on the walls to be erected, when constructing partitions we can use plasterboard; this is the most inexpensive material. As for the roof, it is better to make it gable, since this option is easy to implement.
Construction materials and work.
You need to consider materials that can allow you to complete most of the construction and finishing work yourself. Companies that produce modern materials, they try to make it so that there are no great difficulties in installing them for the common man.
But there is an option that will allow you to build the cheapest house yourself. Let's take a closer look at it.
How to build the cheapest house yourself from straw?
We don't pay much attention to the fact that many materials for construction are under our feet. So we would like to present to you a very old, but reliable technology for building a house, which will not only be cheap, but also environmentally friendly.
In modern books on construction, there is not even a mention of the fact that you can build a clay house. Although we have heard about adobe houses more than once. Building the cheapest house yourself from clay is easy. Perhaps this is one of the natural construction methods.
Clay is very ancient construction material, in Rus' and Babylon, from clay that was not fired, they built not only outbuildings, but also at home. As for the ancient technology, it consisted of hammering wet clay into special molds, which were dried in the sun.
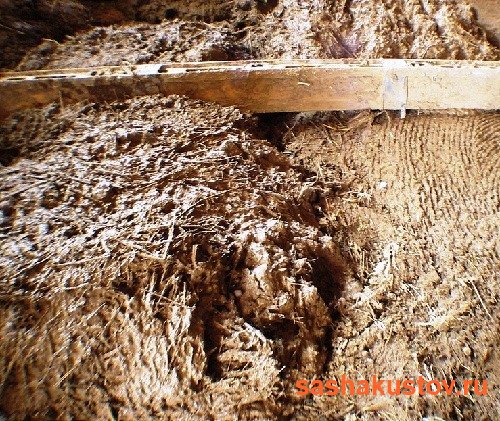
If clay is mixed with straw, the result is a lightweight, environmentally friendly reinforced material that is strong and durable. Using this technology, you can get something like batteries that will accumulate heat during the day while in the sun, and release it at night.
Many are now smiling skeptically, because they believe that it is unrealistic to build the cheapest house yourself from clay, but in vain.
So let's get started.
First you need to build a foundation. It does not have to be reinforced, since we will be building a house that is quite light in weight. So from this moment the savings begin.
To prepare the mixture, take one part clay, two parts sand and 1/6 part straw. You can mix the ingredients with your feet; to do this, dig a hole in it, put a tarpaulin in it, and fill in the ingredients, everything except straw. When mixing, raise the edges of the tarpaulin so that the mixture does not splash out. If you want to make your work a little easier, then use a concrete mixer, in which, along with sand and clay, you need to put several fairly large stones, which, when mixed, will break the clay, mixing it evenly with the sand. We add straw to the already fully mixed mixture, and use our feet to distribute it throughout the composition; from the mixer, of course, it needs to be poured into a container.
We are building a cheap house
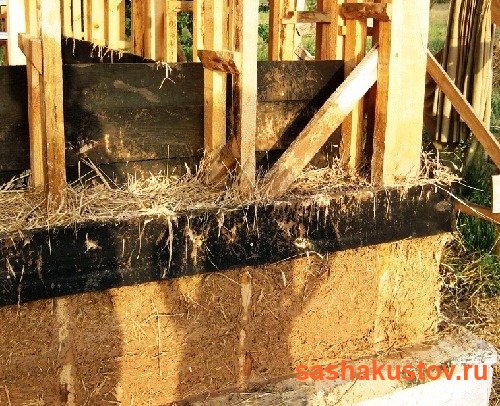
We fill the frame posts with adjustable formwork and fill it with a mixture of straw and clay. And as a result - thermally insulated walls in a frame house. After we have insulated all the walls around the perimeter, we stuff plywood or OSB, and the latter finishing material the price is much lower than plywood and good quality.
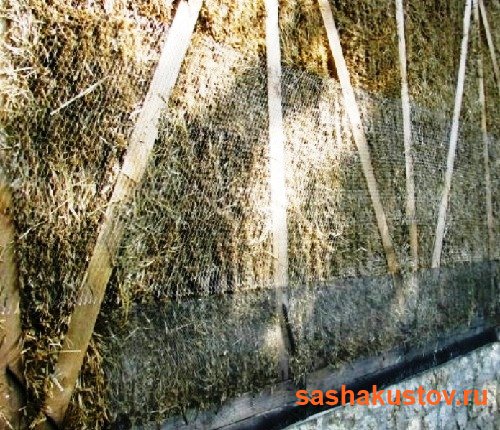
After this, you need to prepare mats from the same composition that was used to insulate the walls and use wire to secure them to the OSB - this will be additional external insulation of the house. To save money, you can plaster with a lime-cement mixture. The layer should not be less than 30 cm.
As for interior decoration, it is better to use clay plaster. To do this, take one part clay and three parts sand.
We paint the outside of the house with lime paint, for this we take six liters of water, and extinguish the lime, you should get a lime whitewash mass, to which we add salt and 10 liters of water. If this amount is not enough to obtain a working consistency, then it needs to be added. The result is white whitewash, but you can add color to it to get the desired shade.
Roof of a cheap house
You have already seen that building the cheapest house yourself is quite simple.
Now let's move on to the roof:
Our roof will be non-flammable, cheap and easy to install, but it has a drawback - weight. Therefore, the roof slope must be at least 50 degrees. Such a roof will last for thirty years. The rafters must be strong enough and massive; they must be firmly secured to the sheathing. The rafter poles should be seven centimeters thick.
To ensure that the rafters do not bend from the weight during the installation of the roof, they need to be supported; the supports are removed after the roof has completely dried.
Straw for roofing should not contain unwanted impurities. The clay should be oily. Moreover, it must be prepared in advance. The calculation of clay is carried out, thus, for 35 square meters of roofing there is one cubic meter of clay. Why should you freeze clay? Clay that has been previously frozen will get wet very easily, which is important.
We knit sheaves of straw 20 cm in diameter, the length of these sheaves should not exceed a meter. Next, the clay needs to be poured into a special hole and filled with water for six hours, you can withstand more, but you can’t wait less. After this, the clay needs to be kneaded until the consistency of sour cream. Let's do the straw test. We lower the straw into the clay, and if it does not fall, then the clay is good, but if it falls, then you need to add clay and repeat the process.
We are starting to install the roof. We lay the first row of sheaves, pressing them tightly against the thrust board. As soon as the sheaves are laid on the crate, they should be untied and leveled. Next, we lay the sheaves so that one overlaps the other, and the thickness of the roof is 15 cm. The sheaves are laid from the bottom to the ridge tightly and evenly. You need to cover the entire roof at once, otherwise there will be distortion. Moreover, this is done in two rows, first on one slope, then on the other.
As soon as four rows have been laid out, the future roof needs to be combed with a metal rake and filled with clay. After this, the solution needs to be compacted and smoothed. Do this with a shovel until a flat surface is obtained. This work is long and painstaking and therefore is carried out in stages. Before laying new rows of roofing, we recommend moistening the previous ones with water or clay solution for better adhesion.
As soon as the slopes are ready, they are leveled; if there are uneven spots or depressions, then they need to be filled with clay, but it must be very thick. Why is this being done? The answer is simple, if there are uneven spots and depressions on your roof in which water can linger, then the roof will quickly become unusable.
The advantages of the cheapest house
A house built using this technology will have a number of advantages:
Antiseptic property,
Deodorizing property
Ecologically pure,
Protects from harmful radiation,
Insulates noise well.
These are not all the advantages of this building; it will be warm in winter and cool in summer. As we see. You can build the cheapest house yourself in one season.
Let’s dwell a little on the foundation, since it can take up half of the construction budget, so we’ll try to make it as cheap as possible. Since our house is lightweight, there are no special requirements for the foundation. We dig a shallow trench, which we fill with construction waste, stones, and scrap metal. After that we fill it all in cement mortar, which won’t take much and you can prepare it yourself at home, which will naturally save you money.
As for cladding the outside of the house, you can use fairly inexpensive siding. If you want your roof to last longer, cover it with tiles. So, it turns out that if you build the cheapest house yourself, with the help of voluntary forces in the person of relatives and friends, then your house will cost half the price of a regular one, made of wood or aerated concrete.
In this case, as for windows and doors, you can install plastic or wooden euro windows - it’s at your discretion. Heating and water supply can be done as usual, as in a comfortable house, but if you want to save money, then it is better to drill your own well and put a pump there, and install a water heater in the house - the water problem is solved. The same can be done with heating; it can be done with a stove or with electricity, having previously carried out communications.
Having built the cheapest house yourself It will be a pleasure to live in this magnificent, albeit inexpensive, home.
In this article: warm house- this is a mandatory rule; characteristics brick house; wooden house - pros and cons; characteristics frame house; how to make your home really warm.
What should a really good home be like? Large enough, beautiful, relatively inexpensive and, no less important, warm - heating costs should not make a serious hole in the homeowner's budget. In equatorial countries the problem is warm home is not as acute as in our fatherland - some walls are made of reeds, some roof is made of the same material and here it is, full house. If only everything were as simple in a temperate climate... In this article, let's look at the options for construction materials and their effectiveness in creating a truly warm home.
Why does the house have to be warm?
Our cities look great at night, and regardless of the number of lampposts with working gas-discharge lamps, the houses themselves glow, however, this glow is only noticeable on the screen of a thermal imager. Every night during the warm season and around the clock during cold weather, private houses and high-rise buildings warm the atmosphere of the city in the best possible way, releasing the heat from the premises to the street. And this is one of the main reasons more high temperature urban atmosphere compared to suburban. Why did city developers in the last century not take into account such high heat losses of the buildings they erected?
Since the middle of the last century, large-scale construction began in the Union republics - cities absorbed the outskirts, new microdistricts grew. The builders were faced with the task of building as much as possible square meters living space in the shortest possible time, with minimal costs. As for the high rates of heat loss in buildings, no one thought about this in those days, because there was an abundance of cheap fuel.
Today, the situation in the fuel industry has seriously changed - the world's hydrocarbon reserves, as it turns out, are running out very quickly and against this background their prices are rising. Therefore, the construction of energy-saving " warm houses“- not a whim, but an urgent need, enshrined in legislation in the Federal Law of the Russian Federation No. 261-FZ “On Energy Saving”, which has been in force in Russia since 2009.
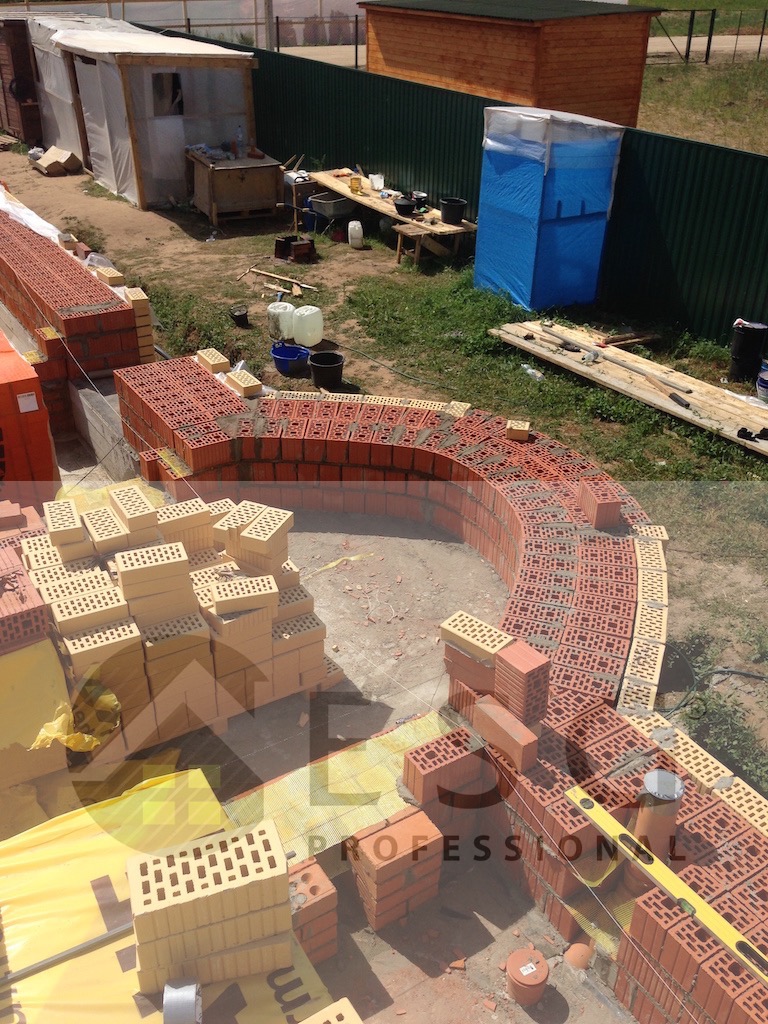
Brick house
Among other structural materials, brick is the most popular - it is with it that the concepts of “good” and “reliable” are associated; for most Russians, the authority of brick in matters of construction is indisputable, despite its rather high cost. However, brick walls without any additional insulation have high thermal conductivity coefficients: 0.56 W/(m∙K) solid ceramic brick; 0.70 W/(m∙K) sand-lime brick; 0.47 W/(m∙K) hollow ceramic brick. The thermal conductivity coefficient of brick exceeds only reinforced concrete - 1.68 W/(m∙K) - which has the least ability to retain heat.
Advantages of brick buildings:
- strong, durable walls;
- fire resistance, i.e. absolute non-flammability;
- high-quality sound insulation;
- absolutely not susceptible to rotting and insects;
- overlapping is permissible reinforced concrete slabs;
- a deep foundation makes it easier to create a basement.
Disadvantages of brick buildings:
- high cost of construction materials, rising construction costs;
- the need for a powerful foundation laid to the entire freezing depth (on average 1.5 m);
- high heat transfer, need for additional thermal insulation. Without a thermal insulation layer, the wall thickness capable of retaining heat must be at least 1.5 m;
- impossibility of periodic (seasonal) use of a brick building. Brick walls absorb heat and moisture well - in the cold season, complete warming up of a building where the owners do not visit often will take at least three days, and complete elimination of excess moisture will take at least a month.
In addition to the listed disadvantages, brick walls of 2.5 bricks will “steal” from 1/3 to 1/6 of the usable area of the premises (depending on their size); after erecting the “box” of the building, it is necessary to wait at least a year for the walls to shrink and only then begin finishing work. A thick cement-sand joint holding the brickwork together has three times the thermal conductivity coefficient compared to brick, i.e. heat loss through a masonry joint is more significant than through ceramic or sand-lime brick.
The technology of a warm brick house will require additional insulation on the outer (external) side of the walls - either with insulation slabs with mesh reinforcement on top and the application of plaster, or by installing insulation and covering it with a ventilated façade from the outside.
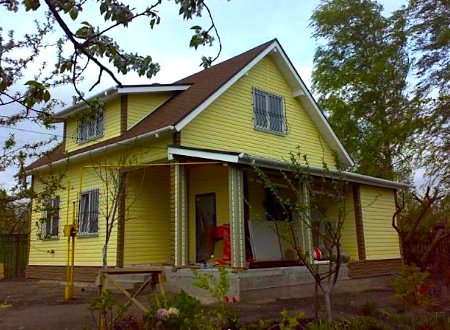
Warm house made of timber
A wooden house costs the customer much less than a brick building - most often it is the relative cheapness of a wooden house that attracts its future owners and residents. In addition, wood has a much lower thermal conductivity coefficient than brick - 0.09 W/(m∙K), i.e. it retains heat well in the house.
Positive characteristics of wooden houses:
- light weight wooden structure the house allows you to lay a lightweight foundation under it, including a columnar (pile) foundation;
- low heat capacity allows the building to be used for periodic residence;
- wooden walls create a pleasant atmosphere in the rooms, filling the air with the aroma of pine needles;
- the natural structure of wood normalizes the level of humidity in the house;
- The walls of a wooden house are able to withstand cycles of freezing and thawing many times, thereby ensuring a long service life.
Negative characteristics:
- premises in wooden houses have worse sound insulation than in brick and concrete buildings;
- difficult to create rooms large area(for example, from 60 m2) on the ground floor without additional reinforcement of the structure with pillars;
- low fire resistance. The advantage in terms of fire resistance of concrete, brick and stone buildings compared to wooden houses is obvious. The only exception is larch, the wood of which is very resistant to burning;
- susceptibility to insects and rot, which requires periodic treatment with aseptic preparations;
- the need to keep buildings for at least a year to allow the wood to settle before finishing the premises. In this case, wood settlement can amount to up to 10% of the initial volume of structural materials, which exceeds the settlement of frame and stone walls three times;
- require caulking of cracks as settlement occurs, and this work must be performed more than once.
The rigidity of floor beams in wooden houses is most often insufficient; when walking on them, deflections are noticeable. However, this unpleasant phenomenon is no longer associated with the low strength characteristics of the wood, but with the lack of professionalism of the builders.
With less heat loss compared to brick, wooden houses Still, additional insulation is required.
Warm house using frame technology
According to a number of its characteristics, a frame house looks more attractive than a stone or wooden one - its construction is much cheaper and faster, the sip panels with which the frame is sheathed have the lowest thermal conductivity coefficient among other building materials, 0.0022 W/(m∙K).
Advantages of frame houses:
- lightweight foundation, columnar (pile) is allowed;
- the construction of a frame box, the calibrated elements of which are factory-produced from dry wood, requires no more than a week;
- there is no need to wait for the wood to dry, i.e. work on the cladding and finishing of the building begins immediately after the completion of the frame assembly;
- The assembly of a frame-panel house can be done at any time of the year;
- construction equipment familiar to construction sites is not required, therefore, during the process of assembling the building, the damage caused to the natural landscape will be minimal;
- Ideal for a temporary (seasonal) home. During the cold season, its premises can be heated to the optimal temperature in just 2-3 hours;
- the building can be assembled and disassembled several times without damage to its structure.
Disadvantages of frame houses:
- practically complete absence The thermal capacity of walls requires a constant heat source that operates without long interruptions. Alternatively, you will need a massive brick stove capable of accumulating heat and releasing it within several hours after the fire stops;
- SIP panels are not able to absorb excess moisture, therefore important element The frame house design will have an effective exhaust system. However, laying ducted air ducts will not be cheap;
- flammability, with the possible release of toxic substances (depending on the nature of the insulation);
- periodic treatment of wooden structural elements with aseptics is required;
- The average lifespan of such houses is relatively short - about 50 years. The main reason for this is the wear and tear of the insulation incorporated in the design of sip panels.
Warm home technology
It is clear that only frame houses do not require any additional insulation measures, at least until the insulation in the sip panels is worn out. But all other residential buildings, which are the majority, must be insulated. External walls of any buildings erected after the adoption of federal law No. 261-FZ, i.e. after 2009-2010, they must have a thermal conductivity coefficient of no higher than 0.02 W/(m∙K) - not only reinforced concrete and brick walls, but also wooden ones should be subject to additional insulation. Let's look at exactly how you can reduce heat loss from external walls made of brick and wood.
First of all, work on insulating the external walls of a building should ideally be carried out outside the building. This is necessary for two reasons - installing insulation on the outside of the building will not affect the thermal capacity of brick and wooden walls and will not reduce the usable area of the premises. However, technologies for installing insulation on external walls and the insulation itself must be treated selectively...
As a result of the life activity of the household members of any residential building, an average of about 15 liters of water in a vapor state is produced per day - breathing, cooking, washing, visiting the shower (bath). And if in uninsulated rooms the excess moisture is somehow removed through the walls, then upon completion of the insulation work the moisture will not be removed at all. And with the onset of cold weather, the external walls will acquire a lower temperature than the air temperature in the rooms, and since steam tends to colder areas of the building, it will condense on the walls, and moisture condensation will occur continuously. As a result of moisture deposition on inside brick and wooden walls will become damp and fungus will develop. In this case, moisture will inevitably penetrate the structure of the insulation placed outside on the walls of the building, causing its compaction - mineral wool and slabs based on it will especially suffer. An exception among insulation materials in this regard will be extruded polystyrene foam - this material is almost completely vapor-proof (0.013 mg/m∙h∙Pa).
If a decision is made to use external insulation with extruded polystyrene foam, covering it with a layer of plaster after installation, then the only means of combating excess humidity in the premises will be an exhaust ventilation system. But when insulating walls with mineral wool slabs, the most correct would be to install a ventilated facade, the design of which allows you to eliminate excess moisture in the insulation due to air circulation. At the same time, a ventilated facade will be equally effective for both brick and wooden buildings.
Important: When planning and carrying out work on insulating your home, be sure to take care of creating supply and exhaust ventilation, otherwise the atmosphere of the rooms in your house will be identical to the atmosphere of a greenhouse!
An integral element of the work to create a warm home will be insulation of the attic - about 15% of heat is lost through this room in winter. Installation of insulation in the attic is carried out from the inside of the room: on the floor according to the scheme “vapor barrier film - insulation layer - decorative coating”; under the roof - “a layer of waterproofing film - insulation (between the rafters) - a layer of vapor barrier film - a decorative panel.” Ideally, the waterproofing film should be laid above the rafters, i.e. directly under the roofing.
In custody
The warmest house that does not require any additional measures to retain heat is a frame house, the outer cladding of which already contains insulation. And if the climatic zone where the house is supposed to be built is not characterized by particularly low temperatures in the cold season, or the building being built will be used by the owners only periodically, then the frame house will ideal solution. However, already in a temperate climate and when using a frame house as a permanent home, the cost of heating it will be much higher than for heating, say, a brick house insulated from the outside, because the heat capacity frame walls Absolutely none, i.e. it will have to be heated constantly.
Whether we like it or not, our houses will have to be insulated. Federal Law No. 261-FZ is a requirement of our time, taking into account the future increase in energy prices by several times and there is no way to get away from this, because the hydrocarbons we are familiar with will be exhausted in the very coming years, and completely and completely...
Rustam Abdyuzhanov, rmnt.ru
There are very few people who want to live in cramped government apartments, and many people dream of moving to their own home. And there seems to be no problem - sell the apartment and buy the much-desired building. Only, unfortunately, ready-made houses cost three times more than the largest apartment in the city center. There is no need to despair - you can build a great house with his own hand. There is nothing complicated about building a house. It is important to outline the right plan of action and you can get started.
Where to start construction?
You need to understand well that unauthorized construction must be legalized and ownership rights obtained for it. In order for these procedures to go quickly and without nerves, all work must be followed state standards. The first of these is the house and plot plan. A qualified architect can accurately and competently draw up a plan for your home. This person will correctly distribute communications, tell you what is best to build a house from and how to properly pour the foundation. With the help of his plan, you can quickly and efficiently bring the project to life. You can also determine the order that must be followed when constructing:
- The foundation is always built first after acquiring the materials necessary to build a house;
- The frame of the house, or wall, is removed after a complete check of the foundation, and its construction also takes considerable time;
- Conducting communications (electricity, gas, water, heating, sewerage) and filling the floor;
- Laying the floor is necessary in any home and is done quite simply;
- The final stage is the roofing, which must be done in spring or autumn.
Following simple rules and based on your knowledge, you can quickly and inexpensively build your own home. First you need to decide on the type of foundation and make a solid foundation for the house.
How to make an inexpensive foundation?
The first step is to determine which foundation type suitable for your soil. To do this, a hole about a meter deep is dug. If the soil consists of clay, sand and stones, and there is no water in the hole, then you can use strip foundation, which goes to a depth of 60 - 80 cm. If there is water in the hole, then the depth should be one meter or more.
After this, you need to remove the top layer of soil and make markings. Dig a trench around the perimeter, the same depth as the foundation, and level its bottom with sand.
Before pouring the foundation of the house, it is necessary to make formwork from plywood or wooden boards. Foundation mortar is made from coarse sand, crushed stone and cement. The thicker the solution, the better the base, but by standards the mixture should resemble thick sour cream. The foundation must be 20 centimeters wider than the walls and must be reinforced with metal rods.
In order for the foundation to last a long time and not begin to crack over time, it is necessary to waterproof it. It is also easy to do it yourself. Two layers of roofing felt are laid into the foundation at a level with the ground, and after that it is built to the required height.
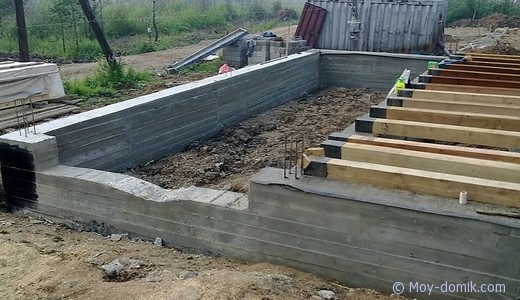
After waterproofing, the foundation is laid out of bricks or blocks. Ventilation holes must be made in opposite walls to avoid dampness in the floor. After drying, it is necessary to waterproof it again with any material. It is best to give the foundation a few months to “mix” and only then build walls.
How to build walls correctly?
There are several options for building walls . The first, more expensive and reliable option begins with the construction of reinforced columns in the corners of the future house. The reinforcement is assembled into a column and partially extends onto the future walls. The column is filled with concrete. To do this, you need to make wooden formwork around it and fill it with mortar. If it is not possible to implement this option, then when building walls you need to strengthen the corners with reinforcement.
Suitable for walls different materials- foam concrete, shell rock or brick. Foam concrete is the most cheap material, but it will not allow the house to “breathe”. The average price and most acceptable option is to build a box made of shell rock. At the corners between the material, reinforcement must be laid. Window and door openings should be reinforced with iron corners. The box must be insulated. The easiest way to do this is with brick and glass wool. Between the shell rock and brickwork An air cushion is left in which glass wool is placed. This contributes good insulation and protecting your home from rodents and bark beetles.
It is worth remembering that not all internal partitions can be built from brick or plasterboard. There must be load-bearing walls in the center of your building. Passing communications must be taken into account in all walls. You may have to leave room for them somewhere.
All internal partitions can be safely assembled from a metal profile, covered with plasterboard and finished with plaster.
Summing up communications
Any home must have running water, electricity, gas and heating. All work to carry out communications It is better to coordinate with specialists. They will guarantee safe work and help carry it out correctly.
It is better to use a gas boiler for heating in a private house. This will make it possible to significantly reduce its cost in the cold season. The main cold in the house comes from the ground, so “warm” floors have a big advantage. They are laid from metal-plastic pipes and then filled with screed. This distribution of heating can significantly reduce costs and completely heat the house. If this option seems insufficient to you, then you can install the main heating system.
Sewerage and water supply also need to be laid before pouring floors and finishing work. Decide in advance where you will have a kitchen, bathroom, washing machine, water heater and any other equipment that requires drainage and lay the pipes as planned.
When conducting electricity, you should consider the number of sockets and lighting points. It's best to leave more wire to allow room for maneuvering.
After all communications have been completed, the floor is covered with screed. Next, you can lay any covering on the floor - linoleum, laminate, carpets, tiles. Tile is considered the most practical and impact-resistant coating. It is easy to clean, and when warm floors he will never be cold. In addition, you can choose a relatively inexpensive tile option and cover it with cozy paths on top.
How to make a roof and ceilings?
To lay the beams, it is necessary to make a concrete belt on the walls. After the beams are laid, boards are placed underneath. If you are building two-storey house, then it is better to make the ceiling with concrete slabs.
To make a roof , it is necessary to assemble the facing grille. It must be assembled depending on the material with which the roof will be sheathed. Each material requires a different distance between the lattice beams. The most famous and inexpensive roofing materials are ondulin, slate, corrugated sheets and metal tiles. Any material requires additional roof insulation. This is easiest to do with glass wool.
The building is finished, what to do next?
Installing the roof is considered the last step in building a house. Now you can study interior decoration. There are many technologies and options interior renovation . Almost any design project can be brought to life with your own hands at minimal cost.
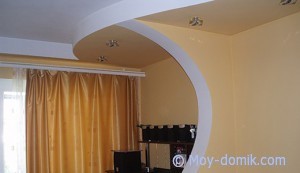
Renovating the inside of the house will depend entirely on your imagination. Look great stretch ceiling– they expand the space thanks to their glossy surface. The lighting in them is beautifully reflected and creates an extraordinary effect.
You can use decorative openings and arches in the interior, which are easily mounted using profiles and drywall. For walls, the construction industry offers textured putties and textured wallpaper for painting. Designer accessories and unusual furniture will fit perfectly into the new interior.
Building and furnishing your family nest is not an inexpensive undertaking if you put in the effort and do everything with soul and interest. After moving in, the home you made with your own hands will seem incredibly comfortable and cozy, and you will want to spend all your evenings with your family!
Video about how to build a house inexpensively