
If you have looked through a bunch of sites teaching this program, watched a lot of videos AutoCAD lessons, but still didn’t get the desired result, then this article will definitely help you!!
All videos AutoCAD lessons, training courses, all articles and publications chew on every command and function, which becomes boring and uninteresting. I propose in principle new approach To AutoCAD training. After reading this article, you can get to work and do whatever you want!
Yes, there are many things to learn. The key is you need to learn one step at a time. Learn to walk before you learn to run. First, you must be familiar with the interface. But honestly, new and casual users say they like the new interface. Find out how you can access and activate drawing tools, change tools, and any other tools.
Advertisement - This article continues below
If you don't have one, start with a sample file. Try moving around the drawing. Pan, zoom in, out and zoom in. Check out the navigation tools. Then it will be easier for you when you start learning to draw. Now you can start creating a new drawing and try to draw.
This program is intended, first of all, for making drawings, because its development started back in 1982, and the first version was a regular electronic drawing board. Further, with the development of CAD (computer-aided design) technologies and 3D modeling, 3D functions were added. And many features that have eradicated routine operations. But, as in life, before we learn to run, we need to learn to walk, and even earlier, to stand on our feet.
If you decide create a drawing in autocad with your own hands, then you must have at least a small understanding of space and geometry, at least at school level. To draw a line, you need two points. To draw a circle, you need a center and a radius. Did you know this? Then everything else will not be difficult!
You can read how to download and install AutoCAD here.
And so this wonderful beast is on your computer. Let's run it. We will work in AutoCAD 2014, almost keeping up with the times. Because at this moment there is already AutoCAD 2015. But I will tell you that starting from AutoCAD versions 2010 there are no significant differences. Therefore, having any version from 10 to 14 except for the LT versions (shortened edition), we continue.
Rule: Create a new drawing using the appropriate template. But if you don't get this concept, you will forget it the next day. The drawing tools are very easy to use. Most basic tool names describe what they do. What you need to understand is that each tool may have a different way of being used. It is difficult to remember all the steps in each tool.
To do this you need the command line. The command line is like a road sign; it will help you so you won't get lost. Try activating a drawing tool, such as a line. Especially when you use new version, try to find if there is a new option there.
The loading window looks nice and modern.
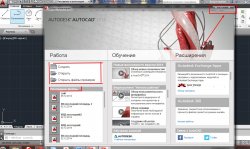
The first thing we see after launching is AutoCAD Assistant. We see extension training blocks and those that I sometimes use - the latest files, create and open, but for now we don’t need it. Let's close this window. Top right. All windows have the standard window structure: at the top right there are three buttons - close, minimize, and maximize. Sometimes there are none if there is no point in doing them for a given window. After closing the assistant we see:
After becoming familiar with using the drawing tool, you should now become familiar with entering coordinates. And your drawing is useless if it is not accurate. During this time, you learn about global and relative coordinates and then exchange tools. Once you complete this step, you will be able to draw accurately.
But just like drawing tools, the name should describe what they do. Or at least the icon will be more descriptive. You can simply leave the pointer over the icon and let the tooltip help expand and explain more. It will open a help file for the relevant topic. They then open the help file. And sometimes they can't find what they are looking for. The same rule applies here: keep watching the command line!
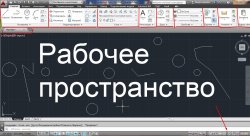
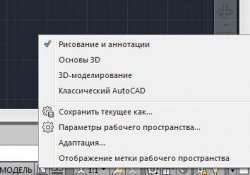
This is what the main AutoCAD window looks like. At the top is a ribbon interface, which makes it easier to work with unlike standard panel interfaces. If this is not the case for you, then in the lower right corner click on the gear icon and select “Drawing and Annotations”.
After you play with the modification tools, you should now learn about the object. You will need to select objects when changing or manipulating them. Selecting one object is a cake. But if you also need to change the pattern, you should learn more tricks.
How to change line thickness in AutoCAD
When you get to this step, you might want to. You can use noun-verb or verb-noun selection to change objects. So now you can draw, you can change your drawings. Next step: creating annotations and understanding the use of styles.
And so, now the fun part! Now you can draw!!
Decades of development of this program have made it alive in the truest sense of the word. If you are careful, he will answer all your questions himself.
To create a drawing of any complexity, about 15-25 commands are enough, which are located in three blocks in the most visible place.
Everything in your drawing is not classified as geometry. This could be text, shading, dimensions, tables, etc. Using the annotation tools should be easy once you've gone through step 1. The challenge at this point may be creating annotation styles and scales. Styles are used to define how your annotation will look. There are many options in styles, but what usually gets confusing are the options associated with the scale. What size should my measurement arrows be set to?
If you work for a company that needs to set a drawing standard, you will no longer need to set styles. Just use a template that already has all the styles and then use that. Now you need to become more productive. But your drawing should also be easy to modify. Not only you, but also your team member. You need to manage your drawing and the objects within it.

Click on the inscriptions under the ribbon blocks and get expanded functions.
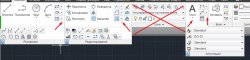
Under most buttons, there are triangles that also bring up a context menu.
We know that the world consists of molecules. Likewise, any drawing can be created from primitives. As soon as you click on any icon. A dialog with the program will appear at the bottom of the command line. Read carefully and everything will work out!!
At this point you will learn about layers, layout and can be sets of tiles if you want to go further. You can see symbols, standard parts, common objects, and more. Yes, you can copy it multiple times, but we want to be more productive.
A block is crucial to help you work with repeating objects. Not only is it reusable, but the block definition allows you to update all instances in your drawing. A block allows you to report any block properties. You can easily create a schedule.
For example, the command segment. Select the first point then the second point, all indicated on the command line.
The program is intuitive; if you hover the cursor over the button and wait a couple of seconds, a hint will appear showing how it works.
Esc-deselect, cancel action,
Del-delete the selection,
Ctrl+Z- go back a step,
Spin the wheel to zoom in, out,
Click on the wheel + move the mouse to move the drawing.
Everyone has a standard in their drawing and even you don't realize it. It's good practice to compile them in your templates. You can also use your reusable content to manage the standards of your drawings. Having a standard will make it easier for you and everyone who works with you. And you will become more productive after implementing your standard.
You will most likely collaborate with others. You may have to work with your partners in your company. It's a waste of time if they have to wait for you to finish, close your file, and then continue drawing. Or, worse, they copy your files and work separately with you. It's hard to keep track of changes if you do this.
Over the three decades of its existence, AutoCAD has become the most popular tool for creating and processing two-dimensional and three-dimensional drawings on a computer. It is used in all areas where they work with drawings.
AutoCAD is most in demand in the following industries:
Architecture and construction.
Industrial design and interior design.
Drawing 2D Objects in AutoCAD
You can work simultaneously with your partners if you split your design into separate files, then use a link or underlay. Because they are separate files, each one can be opened by a different person. File splitting will also keep your files simple, avoiding you from a "fatal error" error message. The more complex your file, the more likely it is to become corrupted.
How to open a file with a .bak extension in AutoCAD
It's a good book, but it doesn't teach how to use it in a specific industry. This may not be suitable for you who work in a different industry. It will suit you and you will become more productive. Don't stop at what your instructor teaches you; There's always something to learn.
Design bureaus.
Telecommunications companies.
Geodesy and cartography.
For some industries, taking into account their specifics, separate versions of the program are created. For example, AutoCAD Electrical is designed specifically for electrical designers.
Main features and functions of the program
AutoCAD was conceived as a complete replacement for the arsenal of the draftsman and designer. A drawing board, sheets of whatman paper, pencils, rulers, protractors, erasers, compasses and other tools migrated to the computer screen. And in addition to this, the user received hundreds of other tools developed in the digital environment.
You get better with a lot of practice. I think they will disagree with this. Don't just draw lines without meaning. Purpose of the program: The program provides students with the necessary skills to enter the field of study. Program Outcomes: Upon completion of the program, students will be able to.
Understand how to use your student portal. Connect with Penn Foster on various sites social networks. The sketches used are the basic drawing techniques used in the outside world. Size and Shape Description Orthographic projection; Points of view and descriptions of form.
The basis of work in the program is still the same as when drawing by hand. That is, the construction of drawings of any complexity using the simplest graphic elements - segments, circles, arcs. However, in addition to this, AutoCAD functionality is complemented by more than 5,000 specialized application programs developed for various industries.
Project booklet - Spatial relations. How to use your architect's scale. How to use the engineering scale. Sketch, inscriptions and lines Correctly draw lines, circles, arcs and multi-visas; sketches. Editorial equipment, media and reproduction methods. Equipment and materials used in industry; Scales; Scales and Werner machines; Media editorial staff.
Orthographic projection Size and shape of description; three regular editorial views; six main types of orthographic projection. Geometric design Pattern of parallel and perpendicular lines; Construction of bisectors; Drawing polygons, tangents and ellipses.
Advantages of AutoCAD over conventional drawings:
Absolute precision of all lines.
The ability to make adjustments to the drawing of any scale and complexity.
Unlimited workspace.
Convenience of the electronic format - the drawing can be quickly copied, prepared a modified version, and sent by e-mail.
Project booklet - applied geometry. Teaching aid: tutorial on orthographic sketching. Multiviewers and auxiliary views. Drawings with one and several images; Projection of the first and third angles. Dimensions Measuring system; correct methods tolerance.
Partitions, revolutions and ordinary breaks. Creating sectional views; Changing standard partitioning methods. Geometric tolerance Determination of basic dimensions; Determining the correct personnel for managing functions; By defining the virtual state of functions.
By working with layers, you can create complex drawings with overlaying objects - for example, master plans buildings on which various systems communications are displayed on separate layers.
The ability to use old developments - ready-made drawings and 3D models of various standard objects.
Automation of many operations when preparing drawings - for example, automatic sizing of segments, calculation of areas and volumes.
Working drawings Sets of working drawings; Preparation of engineering changes. Fine Drawings Drawing three-dimensional objects using three-dimensional coordinates; isometric, dimetric or trimetric drawings; One, two - or three-point perspective.
Structural design using basic architectural applications. Preparation of a complete set of structural drawings; drawing up a site plan. Civil registration Drawing transit lines for road layouts; drawing up plans and profiles from survey information.
Rich tools for working with three-dimensional objects - constructing isometric projections based on two-dimensional drawings, simulating illumination.
Easy integration with other Autodesk programs - 3ds Max, Corel Draw, Archicad, Inventor, Civil 3D.
Don't grab everything at once. AutoCAD has many faces, and it can take years to master all of its tools and capabilities. Therefore, at the beginning of your journey, concentrate only on universal tasks - such as creating 2D drawings, working with layers, working with ready-made templates. It makes sense to study specific tools when you know for sure that you will need them in practice.
Heating, ventilation and air conditioning. Electrical and electronic diagramming. Electrical drawings and cable assemblies; creation of a set of substation plans electrical system; Drawing up industrial electrical diagram; drawing electronic unit and schematic diagrams.
For students new to this type of software, the difficulty professional programs, such as these, usually exceed their actual needs. We have already talked about some of them. It has a very complete dynamic toolbar that hides many more features than can be seen with the naked eye.
Don't reinvent the wheel. When preparing a complex drawing or model, you often have to use various standard elements - windows, doors, furniture, architectural elements, bearings and much more. You don’t have to draw most of these elements yourself, but look for them ready-made options online, and, if necessary, adjust for your project.
The program has been translated into 20 languages, including Spanish, although only partially. As for the shortcomings that are partially understandable for version 0, this is the lack of documentation. If you click on the Help menu, you will see that there is a Manual option. Some of these issues will be resolved in version 0, which the development team is currently working on.
Usually, when we learn to use some new software, the most difficult thing is to understand the basics: how the program works, what are the different options that we have in the menu, and especially what is the operating logic in it software. If you like the tutorial, don't forget to share it with other people!
Customize the program for yourself. If you often have to make similar drawings or design them in the same style, create your own settings templates for this and specify the parameters you need in them. To avoid losing these templates, save them on a separate flash drive or in the cloud. Toolbars in the ribbon can also be easily dragged with the mouse and swapped around, placing those that you use most often in the most convenient places.
Drawing limits in AutoCAD
And if we skip learning these basic concepts, we'll find that we end up more confused than we are, and that the program does all sorts of things we never expected, and we just can't explain why it does it. So, to find out how to run the program. And later we are fully involved in studying the modeling processes. How the foundations are made, how the walls are made, how the floors are made and all the other elements necessary to complete the construction.
We explain everything with easy-to-follow videos that demonstrate the concepts. As always, if you have any doubts, you can leave them in the comments of the video and we will do our best to answer them! Technology is transforming architecture. Architectural applications have grown exponentially since the advent of smartphones, and the best of them have completely changed the way creative professionals work, both in the studio and on the jobsite.
Help is always nearby. In the upper left corner of the main program window there is a large button with the letter “A”. This is not just a program logo. Clicking on it will bring up the search bar. Useful when you forget the right command. Enter the name of the command in the line, and the program will give you a list of suitable options.
Save often. This should become your habit when working in the program. Remember to press Ctrl+S every three to five minutes, or after each series of successful operations.
Prepare drawings on sheets. AutoCAD has an unlimited working area, which is not the case with paper. But sometimes drawings need to be printed. Get used to immediately breaking large drawings into pieces standard sheets- A4, A3 and so on.
How much can you earn with AutoCAD?
Poskol Because the ability to work in this program is necessary in a variety of industries and professions, the salary level for these vacancies is also very different.
A short overview (average salaries in Russia are indicated, October 2016, data - Yandex.Work):
Project managers (construction) - 70 thousand rubles, while there are dozens of vacancies with a salary of 100-120 thousand rubles and above.
Chief engineers of projects - 55 thousand rubles, also with the prospect of 100-120 thousand rubles.
Architects - 54 thousand rubles.
VET engineers, estimators - 50 thousand rubles.
Designers - 50 thousand rubles.
Interior designers - 42 thousand rubles.
Technical specialists—38 thousand rubles.
Design engineers - 34 thousand rubles.
In Moscow and St. Petersburg, the salary level for these specialties is higher. In addition, within the categories themselves, the difference in wage levels can reach 2-3 times. But in general, the trend is clear - a person with knowledge of AutoCAD can count on a fairly high salary and career growth.
Where to learn to work in AutoCAD
Autodesk has a competent marketing policy. The company cooperates with top educational institutions around the world, offering them special free versions. Therefore, if you are going to study, for example, at the Academy of Architecture and Civil Engineering or another technical university, then AutoCAD will probably be included in the curriculum. Thus, the development company makes sure that representatives of technical specialties are familiar with their product from their student days.
If you have not received a specialized technical education, but want to master AutoCAD, there are two more options:
Self-study
To do this, you can use numerous textbooks and video courses. Many of them are posted on the Internet for free.
Pros of this approach- the fact that you work at your own rhythm, at a time convenient for you, choosing the most suitable presentation of the material for you.
Minuses — not everyone has the self-discipline to study independently.
2. Specialized courses
Here, in a short time, you will receive a set of knowledge on this product, comparable to what students of specialized technical universities receive.
Advantages of full-time courses:
The acquired knowledge is immediately consolidated with practical exercises.
You can ask your teacher for help at any time.
Working in a group - you can communicate and share experiences.
GCDPO is an authorized Autodesk training center, so our graduates receive international certificates recognized not only by Russian companies, but also abroad. The AutoCAD training course consists of 9 lessons with a total duration of 36 academic hours. The program is designed for users starting to master AutoCAD from scratch.