The basis of any structure is the foundation. The stronger and more correctly it is installed, the longer any building will last.
But to make a high-quality base, you need to spend a lot. The third part is the cost of the building - this is the average price of a good foundation.

Therefore, to save budget, many people want to know how to make a foundation with their own hands.

First you need to choose the type of foundation, because there are several types: strip foundation, columnar, pile and slab options. We will explain below how they differ from each other.
Strip foundation
The most versatile and frequently used type of building foundation is a strip foundation. It cannot be used only in permafrost and for structures “on water”.

The essence of the foundation is a closed strip - the base, stretching along the perimeter of the building and in place of the load-bearing internal walls. The photo of the foundation clearly shows that the thickness of the strip should be the same in all areas.

Such a foundation is suitable for any building and allows you to build a high-quality basement or ground floor.

The supply of housing communications at the base can be positioned as conveniently as possible for their operation.
The main disadvantage of this type of foundation is the large amount of excavation work and building materials.

Columnar foundation
For small buildings, to save materials, it is recommended to use a columnar foundation. It allows you to provide a high-quality foundation for a lightweight building with less time and effort.

The foundation for a house consists of pillars at the points of maximum load of the building (corners, on long sections with calculated steps, under load-bearing walls).

You can build supports from brick, concrete, or even wood (only rot-resistant wood - larch, for example). The depth for the pillars is selected taking into account the material and type of soil.

After installing all the supports, you need to tie them into a single system for greater strength.
The disadvantages of the foundation include the impossibility of founding a basement. The base is not suitable for heavy buildings; unstable soil types also preclude its use.

Pile foundation
The foundation of a house on stilts is similar to a columnar foundation, but it is not. The main difference is the depth of the supports. Due to their small diameter compared to the pillars, holes for piles are not dug, but drilled. This allows you to install the supports to greater depths and dig them into more stable rocks.

Otherwise, the technology for placing and tying supports is identical to the columnar foundation.

The main disadvantage of this base is the use of special equipment. However, recently piles with a screw at the end have begun to appear, which allows them to be screwed into the rock like a self-tapping screw. This is what made the piles accessible to the layman.
Note!


Slab foundation
One of the most rarely used types of foundation. Reinforced slabs are usually used more often for roads and boulevards, but some people also use them as a foundation for a house.

To create it, a gravel-sand cushion is first poured, after which reinforcement is placed and the foundation is poured. This creates a “floating” foundation for the house.

The advantage of such a basis is independence from the type of soil and its freezing in winter.

But there are many more disadvantages: the impossibility of creating a basement, the difficulty of connecting communications, the high consumption of materials, and the possibility of construction only on level ground.

Now we will tell you in detail about the creation of a strip foundation, as the most common and universal in construction.
Note!

Foundation construction plan
To build a reliable and strong foundation, a lot of calculations will be required. Knowing the future dimensions of the structure, you need to calculate the depth of the foundation and its width.

And here we will make an important clarification. It is best for a specialist to independently calculate these parameters. The fact is that the correctly calculated depth and width of the foundation determines whether the foundation of the future building, and therefore your life, will support it or not.

There will be a lot of nuances when calculating, but only professionals know them. For small buildings, if you decide to do without calculations, the depth of the building will be small and the width will be a multiple of 100 mm.

Step-by-step instructions for building a foundation
- Mark the territory.
- Carry out excavation work (dig trenches).
- Create a bed of sand and gravel.
- Make formwork for the foundation.
- Lay the future foundation with a reinforcement belt.
- Provide ventilation (if necessary) using pipe sections.
- Pour concrete.
- Smooth the surface until it hardens.
- After a week, remove the formwork.
- After another 3 weeks, the concrete will completely harden and waterproofing can be done using roofing felt and hot bitumen.
- Lay a brick plinth on top of the concrete and waterproof it.

The foundation is ready!

DIY foundation photo


Note!


Building a house from scratch yourself is a difficult task, but it can be done. Careful calculations, competent selection of building materials and high-quality execution of each process will help you cope without the involvement of specialists. The most critical stage is laying the foundation, because the durability and reliability of any building depends on the strength of the foundation. It will take about 2-3 months to make the foundation for a house with your own hands.
For the construction of residential buildings, strip foundations are most often used. It can be shallow if the house is one-story and of small area, or standard - laid at a depth of 1.8-2 m. The width of the base tape is usually 40 cm, but can be increased depending on the specific load of the building. When designing a house, you should immediately take into account possible extensions and arrangement of basements and semi-basements. The presence of a common base will significantly simplify the installation of a veranda or other structures that may be needed later.

In order not to make a mistake with the foundation parameters, you need to carefully calculate the total load per square meter of soil and compare it with the permissible values.

When calculating the load, the following factors are taken into account:

Calculations are made using special tables, for each factor separately. After this, all loads are summed up, which determines the depth of the foundation in this area and the permissible width of the base.
Marking the base

To mark the area for the foundation you will need pegs, a strong thin rope and a tape measure. First, remove everything that could interfere with the marking - stones, bushes, dry stumps, etc. Determine the line of the facade of the house relative to the site and mark it with a rope stretched between the pegs. The distance from one beacon to another should be 30-40 cm greater than the width of the facade. Mark the location of the corners of the house on a rope, and draw 2 perpendicular lines through these points, slightly longer than the length of the side walls.

Now measure the distance from the corner of the facade to the corner of the back wall and mark points on both lines, and then pull another rope parallel to the first. The intersections of the ropes form the corners of the building, and it is from these points that the diagonals of the resulting rectangle need to be measured. If the diagonals are equal, the marking is done correctly. After this, the internal boundaries of the foundation strip are marked, departing from the marking lines 40 cm inside the perimeter. The pegs should be located outside the perimeter - this will allow you to more accurately indicate the corners of the base. The last ones to mark are the internal load-bearing walls, the base for the veranda or porch.
When the markings are ready, they begin to dig trenches for the foundation. This can be done with shovels or using special equipment, which will be much faster and more convenient. For a shallow foundation, the depth of the trenches is 60-70 cm, for a conventional foundation - from 1.8 m, depending on the level of soil freezing. The bottom of the trench should be at least 20 cm below this level. The depth is measured from the lowest marking point.

The walls of the trenches must be leveled vertically; if the soil crumbles, supports are installed. After excavating the soil, be sure to check the bottom relative to the horizontal, cut off any irregularities with a shovel, and remove excess soil. The location and width of the trenches must fully comply with the design. The next stage is the installation of a sand and gravel cushion, designed to reduce the load from the building on the base of the soil.
The arrangement of the sand and gravel layer has the following order:
- the bottom of the trenches along the perimeter is covered with a thin layer of river coarse sand;
- spill the sand with water and compact it thoroughly;
- pour another layer of sand and compact it again;
- pour fine gravel and level it with a layer of 15 cm;
- compact the surface.
For shallow foundations, the inner surface of the trenches is lined with geotextiles before filling with sand. This material protects the sand cushion from erosion by groundwater and siltation.
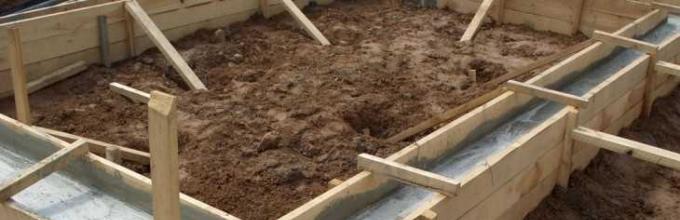
Installation of formwork
The foundation of a residential building must rise above the ground surface by at least 15 cm. In flooded areas, the height of the above-ground part of the foundation can reach 50-70 cm. The formwork is assembled taking into account the required height, using available materials. Installation of foundation formwork

When installing the formwork you will need:

The boards are fastened into rectangular panels, secured with transverse bars on the outside. Self-tapping screws are screwed in from the inside to make dismantling the formwork more convenient. For the same reason, it is recommended to use screws rather than nails. When assembling, you should consider the location of the sewer holes and make cuts of the appropriate diameter in the boards. Finally, the boards are covered with a film that will not allow the wood to absorb water from the solution.
The formwork is installed in parts on both sides of the trenches, and then reinforced with transverse bars every half meter. The boards are placed strictly vertically, maintaining the same distance between opposite sides along the entire length of the perimeter. From the outside, the formwork is supported by spacers made of timber. There should be no gaps between the bottom edge of the shields and the top edge of the trenches, otherwise the solution will leak out.

The presence of a reinforcing frame in the thickness of the foundation allows you to strengthen the foundation and extend its service life several times. For the manufacture of the frame, steel reinforcement with a cross section of 10-16 mm is usually used. It is very important to tie the rods correctly in order to distribute the load evenly over the entire area.

To work you will additionally need:
- knitting wire;
- building level;
- Bulgarian;
- plastic pipe scraps;
- roulette.
The reinforcement is cut with a grinder to the length and width of the trenches, after which a lattice with cells from 30 cm is knitted from it. To do this, 4-5 longitudinal rods are fastened with transverse sections every 30 cm.

It is strictly not recommended to use welding for connections, since it weakens the fastening points and promotes corrosion of the rods. The frame must be voluminous, so horizontal gratings are placed on 3-4 levels, tied with vertical rods.

Additional fastenings should be made at each corner of the foundation and at the intersections of load-bearing internal walls. You can lower the frame into the trenches in parts, and already connect them together inside. To avoid corrosion as much as possible, the reinforcement cannot be laid directly on the sand: take an old plastic pipe, cut it into rings 4-5 cm wide and place it under the grate in the corners and every 50-60 cm along the trenches. Approximately 5 cm should be left between the side walls and the edges of the frame, the same applies to the upper edge of the reinforcement.

When the grid is fixed inside the formwork, the level of concrete pouring is indicated on the inside of the panels. You can do this using fishing line: small nails are stuffed at the ends of the formwork and a fishing line stretched strictly horizontally is secured to them. It should be located 5 cm above the edges of the reinforcement grid and run along the entire perimeter at the same horizontal level.

It is recommended to pour the solution at a time, but not with the total mass, but in layers. Each layer should be no thicker than 20 cm; this will allow it to be evenly distributed between the reinforcement cells and reduce the number of air voids. To make the mixture, use cement M400 or M500, fine crushed stone and coarse river sand.

It is very important to correctly observe the proportions when mixing, otherwise the quality of the solution will be below normal. For 1 bucket of cement, 3 buckets of sifted sand and 5 buckets of crushed stone are required. You need to take about half of the total volume of water, add it portionwise so as not to overdo it. The solution should not be too liquid or too thick: high-quality concrete has a uniform consistency, and when the shovel is turned over, it slowly slides down as a whole.
After pouring the first portion, the solution is leveled with a shovel and pierced along the entire length of the trenches with a piece of reinforcement to release the air that has accumulated in the solution during mixing. It is very effective to compact concrete with a vibrator; it increases the strength of the monolith several times. The remaining layers are poured in the same way until the surface of the concrete is level with the stretched line. The formwork is tapped with a hammer, after which the top of the mortar is leveled with a rule or trowel.

It takes about a month to strengthen the foundation. To prevent the surface from cracking, it is constantly moistened and covered with polyethylene from rain. In hot weather, concrete should also be protected from direct sunlight to avoid cracking. The formwork can be dismantled 10-15 days after pouring, and construction work can continue after 28-30 days.
Video - Do-it-yourself foundation for a house
The most popular type of foundation in private construction is considered to be a strip foundation. This is due not only to its excellent technical characteristics (high load-bearing capacity, mechanical strength, reliability, durability, etc.), but also to its much lower cost compared to other types of foundations for low-rise buildings. Another significant advantage of such structures is that you can build them yourself, saving a certain amount of money on the services of a construction team. Let's look at building a strip foundation with your own hands - step-by-step instructions, photos and diagrams.
Design and types of strip foundations
The strip base is a reinforced concrete strip of a certain thickness and height, which is installed along the perimeter of the future building, as well as under all internal walls (Fig. 1). The poured foundation is made from a concrete mixture of grade B22.5, for mixing which M200 cement, coarse sand and gravel are used in a ratio of 1: 2: 2.5, respectively. To give the structure the required strength and reliability, reinforcement is made along the entire perimeter with steel rods with a diameter of 8-12 mm (Fig. 2).
When planning to build a private house with your own hands, you need to take a responsible approach to choosing the type of strip foundation.
The following parameters are taken into account:
- expected loads on the future foundation;
- soil characteristics at the construction site;
- groundwater level;
- freezing depth.

According to the type of connection between concrete and soil, strip foundations are divided into:
- shallow;
- deep;
- pile-tape.
The first type is used in the construction of one-story buildings on stable soils. Shallow foundations– an ideal solution in terms of price and quality when building a log house. The main feature of such foundations is that they are located much above the soil freezing level. The advantages of shallow foundations include their low cost and ease of excavation work. The disadvantage is that it cannot be used on many soils and for the construction of two-story buildings.
Deep foundations are considered more durable and reliable, since they are not subject to seasonal swelling. However, filling them requires more time, effort and money. Such foundations are perfect for the construction of large brick houses.
When choosing the depth of the strip foundation, take into account the nature of the soil at the construction site. On heaving soil, it is recommended to use a pile-strip foundation.
Pile-strip foundations In addition to reinforced concrete strips, they are additionally equipped with screw, bored or driven piles. This design makes it possible to improve the mechanical properties of the base and increase its adhesion to the ground. This type is the optimal solution for private construction on heaving soil.
Stages of construction of a strip foundation
The entire process of creating a strip foundation can be divided into several stages:
- marking the work site;
- excavation;
- formwork design;
- reinforcement;
- pouring concrete.
Marking the site and digging a trench
Before proceeding directly to pouring the base, it is necessary to properly prepare the work site. It is cleared of trees, roots, bushes, large stones and other obstacles. Then, according to the existing house plan, markings for the foundation are applied to the site using stakes and a cord. The marking of the work area should be done carefully, since even small deviations from the plan can lead to distortion of the future structure, additional costs and other unpleasant moments.
If the work site is level, then there should be no difficulties with marking. If you have complex terrain, it is advisable to have a laser level on hand. Be careful when marking the corners, they must be strictly straight.
Once the markings are completed, you can begin excavation work. Digging a trench is done manually or with the help of heavy equipment. It all depends on your budget.
When choosing the width of the tape, you should take into account the type of future structure and soil characteristics. Thus, for the construction of a bathhouse or utility building on solid ground, the minimum permissible foundation width is 25 cm, and for silty or sandy soil - 50 cm. For the construction of one-story houses, it is necessary to pour a strip foundation with a width of at least 40 cm for hard soil and more than 80 cm for silty soils.
If you plan to make a shallow foundation, then the depth of the trench should be about 60 cm. The depth of a deep foundation is selected 25-35 cm more for the depth of soil freezing. At the same time, it is allowed to build a foundation of less depth under internal walls and partitions.
After the trench is dug, its bottom and walls are checked for horizontal and vertical evenness using a building level. Next, a gravel or sand cushion is installed at the bottom of the pit and carefully compacted.
The recommended thickness of this ball is 15-20 cm. A ball of waterproofing material (thick polyethylene film, roofing felt, etc.) is placed on top of the pillow. This helps protect the foundation from groundwater and reduce the loss of moisture from the concrete during setting.
Formwork for strip foundations

The formwork for a strip foundation (photo above) can be assembled from boards more than 4 cm thick, as well as from wooden, metal panels or polystyrene foam boards. Which formwork option to choose depends only on you. To fasten the boards together, wooden beams with a cross-section of 5 cm are used. Screws or nails must be screwed in from the inside of the structure so that the heads are recessed into the wood.
To give the formwork the required rigidity, the walls from the outside are additionally fixed with supports, and between themselves - with vertical jumpers in increments of 50-100 cm (Fig. 3). To prevent concrete from penetrating through the cracks between the boards, the inside of the formwork is covered with a layer of waterproofing material. The formwork should be 0.3-0.4 m above ground level. The above-ground part will be the base of the house. When assembling the formwork, you need to immediately cut holes in the boards and lay drain pipes, since this will be difficult to do after pouring the concrete.
Reinforcement and pouring of concrete

Reinforcement of a strip foundation is a mandatory procedure, the correct implementation of which determines the strength characteristics of the entire structure. Metal rods 8-12 mm thick are used as reinforcement. They are cut into pieces of the required length and laid along and across the foundation. If the depth of the base is more than 40 cm, then the rods must also be mounted vertically (Fig. 4).
It is not recommended to use welding to connect reinforcement, because such connections are hotbeds of corrosion.
The rods are attached to the formwork and connected to each other with steel wire. It is not recommended to use a welded connection, as this will eventually lead to corrosion of the metal and deterioration of the mechanical properties of the base. After the reinforcement is finished, you can begin mixing and pouring the concrete solution. To remove bubbles from it, use a vibrating machine or compact the poured mixture with a wooden block. The top layer of the mixture is leveled with a rule or trowel.
10-15 days after completion of the work, the wooden formwork is dismantled, after which the outer walls of the foundation are treated with liquid or film waterproofing. This will protect the foundation from the destructive effects of groundwater. At the last stage of the work, backfilling is carried out using sand.
Features of a do-it-yourself pile-strip foundation

Pile-strip foundation is one of the types of strip foundation. It consists of a continuous shallow structure, on which the walls of the building rest during operation, and piles installed in the ground below the freezing depth (Fig. 5). This design allows not only to reduce the cost of building a foundation, but also to increase its adhesion to the ground.
Below is a step-by-step instruction for a do-it-yourself pile-strip foundation:
- Site preparation. As in the case of a strip-type reinforced concrete foundation, the construction site is cleared of debris, leveled and marked.
- Land works. A trench is dug under the tape up to 50 cm deep. The bottom of the trench is filled with gravel or sand and compacted. Then, holes for piles are drilled in the corners of the future structure, at the junctions of the walls and every 200 cm. The depth of the wells should be 30-40 cm greater than the freezing depth. The cross-section of the holes is chosen so that the piles fit into them without much effort.
- Installation of piles. Metal or asbestos-cement pipes are installed in the prepared wells, after which they are reinforced and concrete mixture is poured into them.
- Formwork design, reinforcement and concrete pouring. This stage is performed in almost the same way as for the strip base. The only difference is that the reinforcement of the piles is necessarily connected to the reinforcement of the grillage.
When constructing any structure, the first step is to lay the foundation - the foundation of the building.
Foundation construction diagram.
How to make a foundation correctly is an important and difficult question, the solution of which determines the further reliability of the building under construction and its operation. Naturally, the calculation of the necessary materials and work also directly depends on the chosen method of laying the foundation and its type. As you know, there are several types of foundations for the construction of buildings and structures, which are used for different purposes and carry different loads. The following types of foundation can be distinguished:
- slab;
- tape;
- monolithic;
- pile;
- shallow;
- boring;
- rubble;
- brick;
- from tires;
- from cinder block;
- from asbestos-cement pipes.
One of the most popular types of foundations for individual house buildings are strip foundations. This is usually a rigid reinforced concrete frame that is poured under the load-bearing walls of the building. However, there are also structures where the grillage (the lower part of the base of the foundation of the structure, which distributes the load on the base) serves as a frame for the pillars of the foundation support.
If the soil conditions at a construction site do not allow the use of traditional solutions, then pile and columnar foundations can be used. The technology for installing these load-bearing structures is considered the cheapest and simplest. But this does not limit the entire choice of foundations for future buildings. We will try to analyze it in more detail on a reliable and cost-effective basis.
Foundation of the house
The foundation of a house is the foundation that is created to redistribute the load from the walls and roof of the building to the ground. Therefore, the choice of the structure itself before construction should include a number of factors, such as the characteristics of the soil of the construction site, the topography of the site, and the future loads of the house on its foundation.
Tape bases are one of the most reliable universal bases, while being relatively simple to manufacture. This type of structure is a fairly common support for a variety of objects, from fences to individual buildings. Such a foundation is a reinforced concrete installed around the perimeter of the object being built, which serves to distribute the load on the ground. You can construct the foundation yourself, although the process itself is quite labor-intensive; in addition, you will have to sacrifice a considerable amount of time and be sure to follow all construction recommendations.
Strip foundation
Any construction work begins with an analysis of the site where the house is supposed to be installed, or more precisely, its soil. Moreover, it makes no difference whether we build a house with several floors or only up to a fence to enclose the territory. Specialized organizations involved in geological research provide data on the basis of which soil analysis can be carried out at the site of the planned construction. But such information is not always available, and most often you have to study the soil yourself.
At a new construction site, there is usually no source of uninterrupted water supply, therefore, to ensure the normal progress of construction work, a well is being developed, during drilling of which it will be possible to take soil samples at various depths. If there is a water supply on the site, then it will be necessary to dig a hole 50-70 cm deeper than the freezing point of the soil. Another important step is to measure the depth of the bulk and soil layers.
It is impossible to install a strip base on top of these layers, so they are removed, leaving only layers of soil: sand, clay, hidden under the top layer of soil. By analyzing the soil, it will be clear what characteristics it has and what is the estimated area of its base. Often, when it is necessary to work on soil that swells, such a layer is replaced with a layer of gravel or sand, which is subsequently moistened and compacted tightly.
Instead of strip foundations, columnar strip foundations are also erected, combining the advantages of 2 types of foundations. Particular attention must be paid to the groundwater level. If the level is high, it is necessary to create a drainage system that will serve to drain the water. After meeting all the above requirements, it may not be possible on your site, but it will be necessary to construct a pile foundation.
Calculation for construction
Before you start constructing strip foundations with your own hands for any structure, you need to find out the depth of its foundation and its total area. Based on the characteristics of the object being built and the quality indicators of the soil, the depth of the foundation is calculated. Thus, if the building is, for example, a two-story brick house, then the strip foundation should be buried to the freezing line of the soil. A part of the foundation is made 300 mm above the zero level.
Thus, the total strip foundation for heavy buildings and difficult soils will be: soil freezing depth (SFD) plus 600 mm. For light structures, such as wooden houses, bathhouses, or when a strip foundation is made to fence an area, the depth can be only 500 mm. It is assumed that in this case, the swelling of the soil will proceed evenly and will not affect the integrity of the structure. Calculating the area of the base of a foundation built with your own hands is necessary in order to determine the optimal area at which the object under construction will be stable.
During seasonal freezing, the building will be pushed out by swollen soils, in addition, the soil will be pushed through due to high loads. Both of these can lead to the destruction of a house built with your own hands. The formula for calculating the area of the foundation base is as follows: S > kн*F/kс*R, where:
- kн – reliability coefficient, usually equal to 1.2 (margin S is 20%);
- R – design soil resistance;
- ks – operating conditions coefficient. Its value is usually used from 1 – for rigid structures with stone walls and plastic clay to 1.4 for non-rigid structures and coarse sand;
- F – total design load on the soil foundation. The total load includes the load from the structure of the house itself, from its foundation, payload, and so on. All these loads contribute to increased pressure on the strip foundation.
Strip foundation: types
When building houses, the most commonly used foundation is strip foundation. But this does not mean that installing this type of house foundation with your own hands is easy. This task is far from simple, and often in the future, serious problems arise due to errors made at the construction stage. We will now analyze the procedure for building such a support for your future home.
Strip foundations can be divided into 2 main types: prefabricated and monolithic. More technologically advanced is the construction of a monolithic base, which has recently become widespread, but this type of work requires higher qualifications during construction and special skills. Prefabricated foundations are somewhat easier to assemble with your own hands, and more liberties are allowed when constructing them. They can be made from both large blocks and small ones. Artificial and natural stones can be used for their construction, the main thing is that they are durable and insensitive to moisture.
The strip base itself consists of 2 parts: the pillow and the walls. However, often on strong soils and for small structures and buildings, a cushion, which is an expanded bottom of the foundation, is not made.
Monolithic base
First, we will consider the monolithic type of foundations, since it is more complex to manufacture; in addition, even when installing prefabricated foundations, there is a need to install sections and lintels. Moreover, they impress with their high technology and performance characteristics. If there is still a need to install a pillow, in this case, the strip foundation with your own hands begins with it, and then the foundation walls are built on the finished pillow.
If the excavation work was carried out correctly, the installation of the cushion can be done without formwork, filling the entire width of the trench with concrete. It can also be done with the same width of the foundation, that is, without a pillow. In this case, formwork is installed to construct the base, and then, basically, 1 board 20 cm wide is enough. It is important to prepare the earthen walls very well in order to do without formwork. The quality of work must be especially high when preparing the bottom of the trench, which directly affects the reliability of future construction.
First of all, the bottom of the trench is leveled, that is, in construction language, the bottom is leveled. The height difference of the subgrade should not exceed 1.5-2 cm horizontally. The main purpose of the leveling is to remove loosened soil.
After preparing the bottom, you should compact it with crushed stone yourself as follows: pour a layer of crushed stone 2 times the size of the largest fraction of stones. Let's give an example: crushed stone, the minimum particle size of which is 5 mm, the maximum is 20 mm (fraction 5-20); the layer thickness should not exceed 40 mm. Crushed stone is driven or compacted until a dense layer is created that will prevent clogging of the concrete mixture laid with soil particles.
Reinforcing layer
After the earthen foundation is ready, we lay the reinforcing mesh with our own hands, since the construction of a strip monolithic foundation requires reinforcement. The mesh should be located at the bottom of the pillow, while the larger-diameter, working reinforcement is placed across it. Mounting along the same length, the main function of which is to provide a given location for the working rods.
If the number of storeys of a house does not exceed 3 floors on soil of average bearing capacity, it is quite sufficient to use reinforcement with a diameter of 10-12 mm A-II or A-III in increments of 20 cm. BP-5 wire with a diameter of 5 mm is used as connecting mounting fittings or brand reinforcement A-I. With a cushion width of 800 mm, 3-4 mounting reinforcement rods are laid. The covering reinforcement must be at least 30 mm thick. To create a protective layer, we lay the mesh on the pads with our own hands; in this case, fragments of ceramic bricks or pieces of gravel are quite suitable. Then we pour the concrete.
For low-rise buildings, it is worth using low-strength concrete, M 250 is more than suitable. Concrete is poured in parts, in separate sections so that the completed section corresponds to the finished structure in terms of geometric characteristics. Layer-by-layer laying of concrete is not permitted.
Distances between reinforcement bars in a strip foundation.
If it so happens that for some area there is not enough concrete to maintain the required height, concreting should be continued no later than after 12 hours. During this time, the concrete of the cushion will “set” and you can already walk on it. Now it's time to install the formwork for building walls yourself.
For brick walls of 2 bricks, which is 510 mm, the foundation is 450-500 mm wide. On soft soils, vertical reinforcement of walls with spatial reinforcement frames is provided. In this case, the longitudinal arrangement of the working reinforcement, which seems obvious, is erroneous. It will be sufficient to use 10 mm diameter reinforcement A-II or A-III with a pitch of 40-50 cm.
Combined and prefabricated options
The construction of this type of foundation can be made using a variety of materials. The base, when installed from large blocks, is prepared in the same way as for monolithic foundations. The only difference is that the soil is not compacted; a sand cushion up to 100 mm thick is simply installed. In addition, you can use waste from crushed stone production, screenings or small crushed stone with a fraction of 5-10 mm.
Foundation blocks for walls are used, marked in accordance with GOST "FBS" with numbers that indicate the length, width and height of the block in decimeters. Let's give an example, the FBS 24-5-6 brand has the following values: wall foundation block, length - 2.4 m; width – 0.5 m; height – 0.6 m.
If there is no need to widen the base, the bottom row of blocks is mounted directly on a sand bed, and a layer of cement mortar is applied under the subsequent rows. When constructing foundations from large blocks, it is enough to use a mixture of M 50 mortar. Before installation, the mounting loops of the blocks of the next row are bent using a sledgehammer.
The end joints between the foundation blocks are filled with concrete made from fine crushed stone or simply with a cement-based mortar. Laying foundations is similar to laying ordinary walls. Therefore, the brand of mortar matters, since the masonry seams take the load along with the masonry stones. Masonry made of brick, concrete stones, broken stone is used using a mortar of a grade not lower than M 100.
Often, to increase the reliability of the foundation, a monolithic belt is made on top of the last row of blocks. Such a belt must be around the entire perimeter of the building without breaks. Reinforcement is performed with a spatial frame, where the working reinforcement is placed lengthwise. An A-II with a diameter of 10-12 mm, 3-4 rods at the bottom and at the top, which we connect with our own hands using wire rod clamps, will be enough.
Tools and materials
We have already found out that first of all we will need to carry out excavation work, and for this purpose the following tools will be needed:
- Pickaxe – for loosening hard soil.
- A pointed shovel is for removing hard soil, but such a shovel is not suitable for leveling surfaces.
- A shovel with a cutting part - for removing soil and then leveling the surfaces.
- A spade with a flat bottom - for mixing mortars during construction.
- Spade with cutting part.
Layout of a strip foundation.
For masonry and concrete work you will need the following tools:
- hammer;
- mason's brush and brush;
- trowel;
- concrete mixer;
- tamping;
- graters;
- jointing;
- rule;
- mites;
- mortar box;
- rake;
- water barrel, bucket, watering can;
- chisels;
- hose level - to determine points on the same straight line. You can make this level yourself using a simple garden hose.
In addition, you will need instrumentation:
- plumb line;
- square;
- roulette;
- folding m.
We have considered the main points for constructing a strip foundation; it would not hurt to mention that the connection of reinforcement rods is carried out using electric welding, and in case of limitations with electricity, using wire twists of iron wire 1-1.5 mm in diameter.