Tell your friends about this:
DREAMING OF LEARNING TO WEAVE BASKETS, I FIRST MASTERED MAKING THEM FROM WIRE. TODAY I PROPOSE TO CREATE A SPHERICAL SHAPE WALLET.


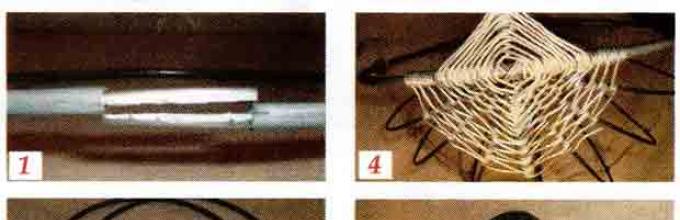
The base of the product consists of two hoops. To make each, we take a piece of single-core aluminum wire d 7 mm, length 1150 mm. We cut the ends of the workpiece in a section 45 mm long lengthwise in half with a hacksaw. We cut one half of the wire along each split, as in photo 1. We join the hoop with the cut ends, wrap them with thin wire (photo 2)
To create a frame, we place one rim horizontally, the second
insert it vertically. Where the hoops intersect, we braid the frame with aluminum wire d 2 mm (photo 3, fig. on page 15) Having laid 10-11 turns of fastening on both sides of the basket, insert three stiffeners of steel wire d 3 mm 540 long into the bottom between the hoops mm (photo 4). To prevent the frame from deforming during weaving, we secure it from the bottom center with wire - we wrap it around each edge once (photo 5). Next we braid them in a spiral,
making two or three turns around the ribs. Having reached the top hoop, we wrap it six or seven times with wire and turn the work in the opposite direction. On the opposite side of the handle we braid the bottom of the basket in the same way - towards the center.
Lastly, we wrap the handle of the product with aluminum wire in PVC braid d 2-3 mm (photo 6)
I want to talk about an unusual weaving of baskets from ordinary cross-connecting wire, wire and telephone cable. Crossing is a thin flexible wire that makes up a cable. It is bright, colorful, and products made from it are also colorful and cute.You can get such material without problems.

With a large basket you can go to the forest to pick mushrooms, or go to the country.


To work you will need a cross cable, a thick cable, a telephone cable, pliers, an awl or a thick large needle.

Any basket begins with weaving the bottom.

The bottom can be oval or round. A thick cable must first be folded evenly 3 times or started to be twisted into a spiral, depending on the shape of the future product.


This is why pliers come in handy to straighten a thick cable; it should lie neatly, evenly and tightly. We immediately begin to braid it with cross-linking, the picture shows how.

The ends of the crossover can be cleaned and twisted into a spiral so that it holds firmly and it is not noticeable how the ends of the two crossovers are connected. (Probably most of you immediately remembered how you braided rods in childhood at school). After weaving the bottom, we move on to the walls of the product; a thicker wire is braided with a thinner cross-link, and the cross-over is inserted under the weaving of the previous row. For this, an awl or a thick needle is useful to make it easier to insert the wire.


The product always ends with a braided thicker cable. Colored wire is wound tightly in a spiral around the wire, handles are also made for large baskets. Or you can leave the cable unbraided.

For large baskets, it is better to weave the walls from telephone cable; the product will be lighter.
For many, hand-made things are of great value because they help create an atmosphere of comfort.
The decor becomes more original, original details appear that bring individual features to the interior.

Modern stores have a very large selection of interior accessories. Various useful little things can be quite expensive, especially when you need not 2-3 things, but a whole set of baskets, vases, paintings, etc.

For this reason, many people choose the option where they can decorate the house themselves.
You can get many advantages from such an idea - the thing will turn out beautiful and exactly what you need - it will be easy to use and fit into the overall interior. At the same time, you won’t need to spend a lot of money on it, or it will be completely free if all the materials are available.

Storage systems will always be useful in the home. Wicker baskets perform such functions perfectly. The process itself can even turn into a hobby that you can engage your family and friends with.

Paper basket
You will need not just plain paper, but wrapping paper. She could stay in the house, but if not, then she is not expensive and can be bought in large quantities. You can find it in hypermarkets, flower shops or shops with similar small items.
Brown paper looks good on curves and has a nice color. As a last resort, you can use wallpaper instead of paper; they have a similar texture.

To work you will need a machine, paper clips and glue. The paper needs to be cut into even strips and folded several times. The denser our blanks turn out to be, the more reliable our paper basket will be.

To make it more convenient to work and the product to look more aesthetically pleasing, the edges of the tape are stitched with thread. Indentations are made in the region of 5 mm. The color of the thread is chosen to match the overall color of the room. You can take black threads, they will look good with any color scheme.


In order to further secure the product, the strips are coated with glue. Silicone is best; it sets quickly.

Newspaper basket
You can make your own basket from either paper or newspapers. The principle will be approximately the same. Even decorators often use this method of decoration. Black and white stripes look quite original and bright.

Newspapers are still quite relevant today, despite digital technologies. People value them just like books—for the ability to touch and smell the print.
Many people have large stacks of old publications at home that have nowhere to be identified. It is quite possible to make a dense product out of them - it could be a fruit basket or a container for storing small items.

We will need scissors and glue. As with paper, we make a lot of blanks in the form of smooth ribbons and weave them together. To make the basket more reliable, it is lined with thick tape of any color.

Fabric baskets
Old fabric can be used to make a good laundry basket. You can also store children's toys, magazines and newspapers in it, and even use it as a cover for flower pots.
Note!


For work you will need plain and decorative fabric and threads. From decorative and plain material you need to cut out 2 blanks - a circle and a rectangle. They must be the same length.

Then you need to fold 2 circles and 2 rectangles with the wrong side and stitch them. After that, we sew everything together and you're done.

Perhaps the first works will not look like a master class on how to make a basket, but with practice, you can make quite decent products that will not only be free, but also beautiful and functional.
Many housewives will agree that sometimes some things simply have nowhere to go. This is especially true for small things that seem to be very necessary in the household, but get in the way or are not always at hand. At the same time, finding a suitable option in a store can be quite difficult.

In the photo of the baskets, you can see options that are easy to make at home, completely free or for little money.

Note!

DIY basket photo


Note!


We bring to your attention an excellent master class on weaving a mini-basket with your own hands from waxed thread.
To weave such a mini-basket you will need:
Shape (bottle cap)
Wire for frame + brown paint;
Waxed thread;
Plastic/thick cardboard for the bottom;
Ruler with circles;
Glue, a piece of plastic;
Tools: wire cutters, awl, tweezers, drill.
Basket weaving step by step:
Paint the wire with brown paint (Figure 3). In order to weave a basket you will need a mold (in this case 2.5 cm high), you can take a regular cap from a bottle of hairspray (Figure 4).

Attach the cap to the plastic and trace along the contour with a pencil, cut out a circle that will become the bottom of the future basket (Figure 6). Next, you will need the tools shown in Figure 8.

Prepare the wire using wire cutters. You will need 16 pieces. about 2.5 cm long and one 10 cm long for the handle (Fig. 9). Using an awl, mark the location for drilling (Figure 10). Drill a small hole (Figure 11). Take a wire (10 cm), coat one side with glue and insert it into the drilled hole (Fig. 12).

Roughly mark on the circle where you will have the wire (basket frame) (Fig. 13). Then mark with an awl and drill holes. Insert the wire after lubricating it with glue (Figure 14-16).

Then paint the resulting shape brown (Figure 17-18). Bend the wire into shape (Figure 19-20).

Start weaving using waxed rope (Figure 21). This is followed by the second row (Fig. 22), etc. (Figure 23-25).

Check the evenness of the weaving, if necessary (somewhere below or above), correct with tweezers (Fig. 26).

Trim off excess waxed thread and remove excess wire with wire cutters.
For the rim, use painted wire (Figure 30). Wrap the wire around the mold (Figure 31). Bite off the excess with wire cutters, leaving a small margin (Fig. 32).

Then straighten the wire and wrap it with dyed thread (Figure 33-34). Bend the already wrapped wire around the mold again (Figure 35).

Place the form into the cart. Coat the upper part of the basket with glue (Figure 36).
You can buy wrapping paper or use leftover wallpaper. Cut a large piece to a width of 76.2 cm, fold the edges inward and fold the paper into strips 10 times. Sew both sides of the resulting blank on a sewing machine, retreating 0.5 cm. Make 8 such blanks from the stitched strips.
Intertwine them and get a large mesh, gluing the strips at the points of contact. Bend the free ends inward and secure with hot glue. If desired, to add beauty, decorate the finished craft at your discretion.

Creating a laundry basket
Having gained experience, you can work on a new material - fabric, making a laundry basket out of it with your own hands. Buy a piece of metal mesh and shape it into a basket by connecting the edges and screwing them with wire. For the cover, select a piece of plain fabric 62 by 102 cm. Turn it facing inward and sew it on a machine. Make a circle with a diameter of 32 cm from the same fabric.

Stitch it together with a fabric cover, put it on the mesh, and carefully fold the upper end inward. We are preparing the same cover from elegant fabric to match your bathroom. We put it on the lower cover and decorate it with elements - lace, braid, pom-poms.

Fruit basket
You can use veneer for a fruit basket; it is easy to weave. Pre-soak the veneer in water at room temperature for one hour and hang it to dry. We cut the dried material into equal strips. We lay one part on a flat surface and fix it so that it does not move. We begin the weaving process according to the usual pattern until we obtain a square.

Align the remaining ends by weaving strips along the entire length. Then there are two more of the same kind. Align the intersection lines. We finish each side of the square with three long strips until the desired length is obtained. We fix the ends inward. It makes an excellent basket made of dense material.

Toy basket
If you want to make a basket for toys yourself, you need to take into account the height of the baby. It should be convenient for him to put toys in and take them out. Be sure to choose natural materials. We create a mesh frame (as in the previous work), cut out rectangles from two pieces of fabric according to the size of the sides of the frame, and prepare a circle for the bottom.

We sew the rectangles into the pipes and attach the bottom. We insert a metal mesh inside the cover. We stitch or hand sew the edge. You can put toys together with your baby.

Waste basket
The basket is called so because it is made from unnecessary things. Old denim trousers, fabric with a beautiful pattern, the remaining piece of linoleum, a piece of padding polyester of the same size, or batting will do. We create a base from linoleum, fastening it along the edges with a stapler.

We sew two fabrics - the inner one from old trousers and the outer one from a nice fabric, sew on the round bottom. We prepare the same bases from thick materials, put them inside a double cover, and sew the edges tightly with strong thread.

Wicker
The oldest type of basket is made of twigs. They are selected by bending. If they don't break, the rod is ready. They are first soaked in cold water for at least 14 days, changing the water every day. You can soak it in boiling water: pour it over the rods and boil for two hours. The result will be beautiful material, bright and shiny vines. Weave a basket, starting from the base, according to the old grandfather’s method.

By starting to create baskets for your home, you can solve problems with laundry and toys, save money, get rid of old things, giving them a new life, and get positive emotions from the results of your work.