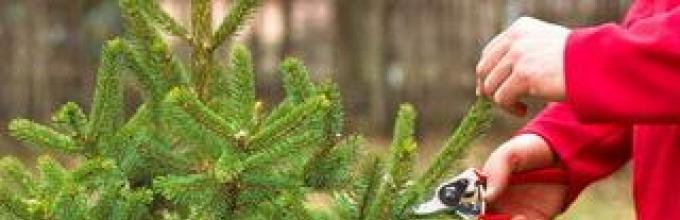
Midori-tsumi– pinching the growth point. By shortening the shoot, you provoke the laying of new buds below the pinching site, thus obtaining dense paws with many branches. Depending on what type of tree you are working with, the work time varies:
- for deciduous trees - pinching begins during the period of active growth of shoots and lasts until mid-summer. The remaining branch has 2-3 leaves (buds). They finish work at the end of July so that the regrown branches are prepared for winter;
- for conifers - pinching begins when the branch is in the “candle” mode, but the needles have already moved away from it at an angle of 45 °.

Kiri-modoshi– pruning all shoots from last year to form dense clusters. It is produced at the beginning of sap flow, before the buds open.

Hamu-siri– thinning of needles – used only for pine trees. All the needles from the previous year are plucked out, and the remains are thinned by half or less (depending on how many shoots you want to get).
Fuse-zukuri– special techniques for changing the shape and direction of shoot growth.
For these purposes, the branches are bent in the desired direction to the required angle and fixed.


When bending, the main task is not to damage the tree, so if there is the slightest crack, the bend is reduced and the branch is fixed. Bamboo spacers, soft copper wire, twine, and burlap are used to protect the branches from damage. Care must be taken to ensure that the strapping does not grow into the bark - as soon as the branches thicken, they are tied up. Complete fixation of the branch occurs after 2-3 seasons.
Shitate– trunk bending technique. Such Niwaki styles, like mogi, kengai, shakai, require that the barrel is not located in a vertical plane. To give shape, spacers, tension, bending to the ground, followed by fixation with pegs are used.

You can form a trunk in two ways:
- setting the desired direction for a young seedling from year to year (for example, planting a plant at an angle);
- changing the shape of the rootstock in a mature tree (usually used to strengthen existing bends).
There is a risk that the unnatural position of the trunk may lead to the root system not holding it, so the guy wires are installed as follows:
Where to start?
We advise a beginning bonsai artist to first practice on the trees and shrubs growing on the site. You can form nivaki from either a young or a long-growing tree. They begin work in early spring, before the buds open. At this time, the shape of the tree, natural bends, strong and weak shoots are clearly visible. For bonsai, choose a healthy plant that can survive the stress caused by drastic interference in its life.
Operating procedure:
- cut off all diseased, broken and dry branches of a tree or bush;
- choose the style in which the nivaki will be formed, paying special attention to the age of the tree and the natural shape of the trunk;
- decide where the front side of the composition will be, mark the branches of the first order (bases) and the topmost branch crowning the nivkai.
Skeletal branches should emphasize the levels as much as possible - for this they are placed in a plane parallel to the ground, using the techniques described above.
After this, all excess shoots are removed, leaving on the skeletal branches those that will later form the crown. If necessary, install stretch marks to direct the growth of shoots in the desired direction.
The next stage begins only next year:
Examples of elementary niwaki
Jasmine. The shrub produces abundant growth, and without corrective pruning, after a few years it has an unsightly, neglected appearance. What can be done? Remove all excess growth, leaving a few of the strongest vertical shoots. Pull them together with soft wire - at the top you will get a compact “cap”, which in the spring will turn into a wonderful white cloud with a delicate aroma.

Spirea. The wildly blooming “Rich Bride” is an excellent material for bonsai. Leaving a few skeletal branches, intertwine them with each other, and cut off all excess to the root. Give the stems the desired height, form the side shoots into a ball.


Lilac. An ordinary bush can become a masterpiece of a garden barefoot, if you work a little:
- cut out all the shoots and remove the taproot branches at the root, leaving one, the strongest or most twisted shoot;
- cut it to a height of no more than 1.5 m;
- using the fuse-zukuri technique, form a crown from young shoots in the form of a bowl, shell or cap at the top of the main branch;
- try to direct the growth of young upper shoots parallel to the ground by tying a load to them;
- be sure to remove all excess growth at the root and correct the upper growth point.

After flowering, be sure to remove all dry candles - this stimulates an increase in flower stalks for the next year.
Norway maple. The bright red leaves of this plant are beautiful on their own. But if you give the tree the desired shape, you will get a unique composition that will decorate the shore artificial reservoir or alpine slide. Plant two young seedlings next to each other, which can later be intertwined with each other, or you can grow a tree in the “Sokan” style - with a forked trunk.

Don't be afraid to experiment! For a passionate person, there is no plant that cannot be turned into a masterpiece that will be the envy of all neighbors.
Bonsai is a special art when an exact copy of a tree is grown in miniature. The ancient Japanese came up with the idea of growing miniature trees, turning this process into an entire art. Bonsai is a tree in a pot or translated as “growing on a tray.” Artificial bonsai is still popular today.
Artificial Bonsai Tree: What is it?
Usually work on creating such a tree begins by looking for a good branch for the trunk. Sometimes the branch is a slow-growing plant that, for example, no longer develops. Due to improper growth conditions, the plant acquired an not entirely correct shape - thickening, unevenness, curvature. And these defects can, paradoxically as it sounds, be turned into art.
 The crown for bonsai is the most interesting thing. The use of juniper, foamiran, and azalea is widespread
The base is a container that must be filled with clay, plaster, even plasticine. In a word, something that will hold the mini-tree.
Artificial bonsai: history (video)
How to make an artificial bonsai with your own hands: step-by-step instructions
Any master class begins with a list of materials and tools that will be needed for the work. If you take the standard manual, you get a kind of universal list of traditional bonsai.
Materials for making bonsai:
- Flowerpot or plate (ceramic);
- A fragment of driftwood or, alternatively, a three-core wire;
- Gypsum;
- Glue gun;
- PVA glue;
- Acrylic paints for finishing decor;
- Artificial greenery divided into inflorescences.
 This is the basis, that is, the list can be large
For beginners, the best option is a tree with a small amount of materials and fairly simple instructions.
The Art of Bonsai: The Ultimate Guide
So, why three-wire wire? It is not always possible to find the right snag or branch, and the wire is malleable to manipulation. At one end this wire needs to be stripped to get future branches.
 You need to do this procedure with three wires that form the trunk
Now you need to secure the barrel on a plate or in a flower pot. You will need a heat gun and hot glue.
After fixing, the entire structure is coated with PVA glue. Then you can start diluting the gypsum.
- Dilute the gypsum according to the instructions, adding it to PVA, the solution should look like thick sour cream;
- The solution is applied to the tree frame, with its help form the structure of the trunk and branches;
- Leave the structure to dry for a day;
- After 24 hours, you need to coat the entire trunk back with PVA glue;
- When the glue dries well, it can be painted brown;
- Attention, the paint is also mixed with PVA glue (one part glue to three parts paint);
- The paint is applied not with a brush, but with a sponge;
- Many craftsmen prefer to paint the top of the trunk with ocher;
- It dries for two hours, and then you can make a crown;
 The leaves will be attached to the branches with a heat gun (artificial leaves can be purchased at craft stores)
It's just a matter of the stand. Use the following method to decorate the stand: mix the same PVA glue and semolina in a 2:1 ratio, and add green paint there. This mixture is usually placed on the bottom of the plate with a cocktail spoon, creating beautiful irregularities.
 At the foot of the tree you can leave a few coffee beans that will imitate pebbles
Bonsai: how to make it (video MK)
How to make a pine bonsai: decorating the area
Pine bonsai is a garden bonsai. That is, a tree that will delight you not in the house, but on the site. This bonsai cannot be called completely artificial; nevertheless, real pine seedlings are taken. But there are a lot of manipulations, since you yourself regulate the growth and development of the plant.
 Pine bonsai is a living copy of a coniferous tree in a reduced form
The main stages of growing pine bonsai:
- Several pine seedlings should be provided with good drainage and lighting, and should not be subjected to any special manipulations in the first year;
- In the second year, the seedlings are already pruned to 12 cm, while the remaining shoot should have good needles that cannot be pruned;
- Pruning is done at the end of March, at an angle of 45 degrees.
Pruned plants will thicken. If the needles are too lush, you can thin them out. Then a wire frame is placed on the seedling to give the plant the required shape. When the wire cuts into the trunk, it will be removed.
Pine bonsai: planting seeds (video)
DIY New Year's bonsai: artful decor for the long-awaited holiday
New Year's bonsai is the same artificial leaves or needles, which is more appropriate, only snow-covered. The question is how to make snow. Take into account how other crafts are made. There may be snow from broken polystyrene foam, snow from PVA glue and sea salt, beads, white sequins, etc.
 A New Year's bonsai can be made from any small tree, decorating it with Christmas tree decorations
But you can make a New Year’s tree in another way: for example, create a bonsai from a money tree with your own hands. Since the money tree is grown for financial well-being, this will be the best wish for the New Year. Well, the New Year's atmosphere will be created by festive decor - tinsel, pine cones, decorations.
How to make a bonsai from plastic bottles: a collection of ideas
And in this case, there are many variations on how to use plastic as decoration.
The two most common options:
- Leaves from plastic bottles. Leaves from a green bottle are cut out and melted over a flame, taking the desired shape. Many such leaves form the crown.
- Squares made from plastic bottles. Small squares or rectangles are cut, which subsequently need to be placed on the wire. These pieces are also heat treated. The wire is folded in half to form branches. It's not a quick job, but this way you can imitate a coniferous tree.
 A similar DIY topiary bonsai looks good if you successfully decorate the trunk and stand
DIY bonsai in an aquarium
And you can place an artificial mini bonsai in the aquarium, which, by the way, looks healthy. The important step here is to choose the right driftwood. It has to be cooked.
Features of making bonsai in an aquarium:
- Take a whole bucket of water, throw in at least ten tablespoons of salt, put the water on the fire;
- Throw a snag into this water;
- You need to boil the driftwood for five hours, and then keep it in a bucket of cold water for another two days;
- Plant the dried driftwood “head down” in a clay flower pot;
- Place several large stones around the resulting trunk; pebbles and sand will also be needed;
- Java moss, disassembled into pieces, should be placed on the branches of the tree, and they should be carefully secured with a thin fishing line;
- You also need to put moss at the very base of such a tree.
 Instead of driftwood, you can make a trunk from Crassula; such a plant often vegetates on windowsills
The tree can be placed in the center of the aquarium. There are instructions that describe all the manipulations in more detail, but a lot is thought out by the master himself right in the process. For example, you can make a mountain out of sand and pebbles right in an aquarium, where a tree will grow, it looks exotic and very Japanese.
Bonsai in an aquarium (video)
Bonsai is an oriental decor that has long been loved in our latitudes. Such a tree will decorate a greenhouse, living room, office, loggia. If you love Japanese culture, then a mini bonsai will harmoniously complement your bookshelf with volumes of Japanese authors.
Bonsai is a type of gardening art. This art form originated in China between the 8th and 10th centuries. Its essence is that trees that grow in nature and become large enough over time are planted in pots and various kinds of stands. Due to constant pruning of the crown and the fact that the root system becomes flat, dwarf trees like these are obtained.


In order to grow a pine bonsai, it will take a lot of time and effort, but the result is worth it.

You should start by collecting seedlings. It is best to take more than one, so that during the process of their growth you can choose the tree you like best, and it is easier to conduct experiments with the crown on several samples. An important point when growing pine bonsai is that it has 2 growth phases per year: late summer and late spring.
In the first year of bonsai growth, there is no particular hassle with it, since the tree is just beginning to take root and buds appear, that is, there is no need to trim anything. In late spring, in the first phase of growth, the branches of the pine tree lengthen, but at the end of summer, in the second phase, the branches of the tree become thicker and the roots begin to accumulate substances necessary for growth. Therefore, the roots of the tree should not be trimmed during the second phase. Another important detail is that young pine seedlings require a lot of light, as well as good drainage, otherwise the roots will simply begin to rot. The pot with pine should be placed away from drafts, as the plant is very afraid of wind.
In the second year of growth, first of all, the seedlings are cut off by 7-12 cm, but it is very important to ensure that healthy needles remain on the shoot after this, which should not be damaged under any circumstances. Pruning should be done at an angle of 45° and always at the end of March. Before you get a finished bonsai, its root system needs to be trimmed every year.


But if suddenly the needles of your tree grow above the required level, then it is better not to touch anything for now, and come up with another way to grow the bonsai crown.
After cutting the shoot, the pine trunk will begin to thicken. Also, the needles can become very lush, so you need to thin them out so that each needle receives sunlight. The main thing is not to overdo it. For pruning, you need to purchase a special pruning shears, which will cause much less harm to the plant.

After these manipulations, wire is placed on the seedling to form the shape of the trunk. The main thing is to ensure that the frame does not grow into the trunk, since as it thickens it will cut into the trunk, and as soon as this begins to happen, the wire should be removed and replaced. During this period, the tips of the branches are pinched, then they begin to branch better.

The tree will now grow the way you want by guiding it with the wire. During this period, you need to regularly shorten the young shoots, then it will remain the correct shape and will continue to branch.

Then you need to continue in the same direction, but without the wire. All that is necessary is to regularly monitor the formation of the crown, removing excess. Now the tree can be transplanted into a permanent bowl, decorating it to your liking.
Your bonsai is ready!


Bonsai is a wonderful decoration for your home, but as you know, it takes a lot of time to create such beauty. But you want to decorate your home with a decorative tree in this style now. Of course, such a problem can be solved within a day - buy it, but it’s much more pleasant to create such a tree with your own hands. This is where numerous ways to create such a decorative item from artificial materials come to the rescue.
Material we need for work
- Any ceramic plate or flowerpot will become a tree stand.
- Three-core wire, three pieces, 40 cm each. It will be needed to form the frame of the trunk and branches of the future bonsai.
- Glue gun.
- Gypsum, which will be needed to form the trunk and branches on the frame.
- PVA glue.
- Acrylic paints for the final design of the work.
- Artificial greenery, which will need to be divided into inflorescences.
Creating a trunk and branches
Take a three-core wire and strip 10-12 cm from one end; future branches will be on this side. Do the same with the other two.

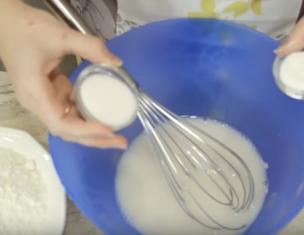
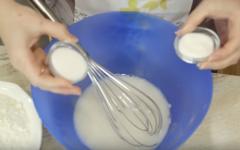
Now secure all three wires to the future stand using a heat gun. Connect them together and also fasten them with hot glue, then coat the entire structure with PVA glue.

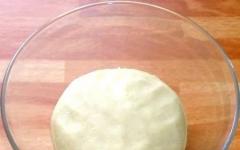
Next, you need to dilute the plaster as indicated on the package, also add PVA to the mixture. The consistency of the solution should be like thick sour cream. Apply to the tree frame and form the trunk and branches. Leave the tree for a day, it should dry thoroughly.

After a day has passed, take PVA glue and coat the entire tree again. Once the glue is dry, paint the trunk brown. The paint must be mixed with PVA in a ratio of 3:1 and applied with a sponge. After this, ocher can be applied on top. You need to wait two hours to dry.

Creating a tree crown and its design
After the trunk has completely dried, you can begin to attach the leaves to the branches. This is done using a heat gun.

Now the last step remains - to decorate the stand beautifully. To create grass on it, take semolina and PVA glue and mix in a 2:1 ratio, add green paint to this mixture until the shade you want appears. You can apply the mixture to the bottom of the stand with a cocktail spoon; this method will help create natural unevenness and relief. Then glue coffee beans at the base of the trunk - these will be pebbles. And finally, attach any toy in the shape of an animal or whatever you like to the grass. Leave it all to dry again for a day.

Everything is ready, and using this master class, you have created a bonsai that looks lifelike in record time.

And for those who want to see more clearly how to create an artificial bonsai and grow a real one, there are video tutorials:
The ancient Japanese came up with the idea of growing miniature trees, turning this process into an art. Bonsai is a tree in a pot or translated as “growing on a tray.” Artificial bonsai is still popular today.
Usually work on creating such a tree begins by looking for a good branch for the trunk. Sometimes the branch is a slow-growing plant that, for example, no longer develops. Due to improper growth conditions, the plant acquired an not entirely correct shape - thickening, unevenness, curvature. And these defects can, paradoxically as it sounds, be turned into art.

The base is a container that must be filled with clay, plaster, even plasticine. In a word, something that will hold the mini-tree.
Artificial bonsai: history (video)
How to make an artificial bonsai with your own hands: step-by-step instructions
Any master class begins with a list of materials and tools that will be needed for the work. If you take the standard manual, you get a kind of universal list of traditional bonsai.
Materials for making bonsai:
- Flowerpot or plate (ceramic);
- A fragment of driftwood or, alternatively, a three-core wire;
- Gypsum;
- Glue gun;
- PVA glue;
- Acrylic paints for finishing decor;
- Artificial greenery divided into inflorescences.
For beginners, the best option is a tree with a small amount of materials and fairly simple instructions.
The Art of Bonsai: The Ultimate Guide
So, why three-wire wire? It is not always possible to find the right snag or branch, and the wire is malleable to manipulation. At one end this wire needs to be stripped to get future branches.

Now you need to secure the barrel on a plate or in a flower pot. You will need a heat gun and hot glue.
After fixing, the entire structure is coated with PVA glue. Then you can start diluting the gypsum.
Bonsai step by step:
- Dilute the gypsum according to the instructions, adding it to PVA, the solution should look like thick sour cream;
- The solution is applied to the tree frame, with its help form the structure of the trunk and branches;
- Leave the structure to dry for a day;
- After 24 hours, you need to coat the entire trunk back with PVA glue;
- When the glue dries well, it can be painted brown;
- Attention, the paint is also mixed with PVA glue (one part glue to three parts paint);
- The paint is applied not with a brush, but with a sponge;
- Many craftsmen prefer to paint the top of the trunk with ocher;
- It dries for two hours, and then you can make a crown;

It's just a matter of the stand. Use the following method to decorate the stand: mix the same PVA glue and semolina in a 2:1 ratio, and add green paint there. This mixture is usually placed on the bottom of the plate with a cocktail spoon, creating beautiful irregularities.

Bonsai: how to make it (video MK)
How to make a pine bonsai: decorating the area
Pine bonsai is a garden bonsai. That is, a tree that will delight you not in the house, but on the site. This bonsai cannot be called completely artificial; nevertheless, real pine seedlings are taken. But there are a lot of manipulations, since you yourself regulate the growth and development of the plant.

The main stages of growing pine bonsai:
- Several pine seedlings should be provided with good drainage and lighting, and should not be subjected to any special manipulations in the first year;
- In the second year, the seedlings are already pruned to 12 cm, while the remaining shoot should have good needles that cannot be pruned;
- Pruning is done at the end of March, at an angle of 45 degrees.
Pruned plants will thicken. If the needles are too lush, you can thin them out. Then a wire frame is placed on the seedling to give the plant the required shape. When the wire cuts into the trunk, it will be removed.
Pine bonsai: planting seeds (video)
DIY New Year's bonsai: artful decor for the long-awaited holiday
New Year's bonsai is the same artificial leaves or needles, which is more appropriate, only snow-covered. The question is how to make snow. Take into account how other crafts are made. There may be snow from broken polystyrene foam, snow from PVA glue and sea salt, beads, white sequins, etc.

But you can make a New Year’s tree in another way: for example, create a bonsai from a money tree with your own hands. Since the money tree is grown for financial well-being, this will be the best wish for the New Year. Well, the New Year's atmosphere will be created by festive decor - tinsel, pine cones, decorations.
How to make a bonsai from plastic bottles: a collection of ideas
And in this case, there are many variations on how to use plastic as decoration.
The two most common options:
- Leaves from plastic bottles. Leaves from a green bottle are cut out and melted over a flame, taking the desired shape. Many such leaves form the crown.
- Squares made from plastic bottles. Small squares or rectangles are cut, which subsequently need to be placed on the wire. These pieces are also heat treated. The wire is folded in half to form branches. It's not a quick job, but this way you can imitate a coniferous tree.

DIY bonsai in an aquarium
And you can place an artificial mini bonsai in the aquarium, which, by the way, looks healthy. The important step here is to choose the right driftwood. It has to be cooked.
Features of making bonsai in an aquarium:
- Take a whole bucket of water, throw in at least ten tablespoons of salt, put the water on the fire;
- Throw a snag into this water;
- You need to boil the driftwood for five hours, and then keep it in a bucket of cold water for another two days;
- Plant the dried driftwood “head down” in a clay flower pot;
- Place several large stones around the resulting trunk; pebbles and sand will also be needed;
- Java moss, disassembled into pieces, should be placed on the branches of the tree, and they should be carefully secured with a thin fishing line;
- You also need to put moss at the very base of such a tree.

The tree can be placed in the center of the aquarium. There are instructions that describe all the manipulations in more detail, but a lot is thought out by the master himself right in the process. For example, you can make a mountain out of sand and pebbles right in an aquarium, where a tree will grow, it looks exotic and very Japanese.
Bonsai in an aquarium (video)
Bonsai is an oriental decor that has long been loved in our latitudes. Such a tree will decorate a greenhouse, living room, office, loggia. If you love Japanese culture, then a mini bonsai will harmoniously complement your bookshelf with volumes of Japanese authors.
Artificial bonsai (photo)


Artificial trees will create beauty and comfort in your home.
When planning the design of your home, it is impossible to do without original little things. It is unusual crafts that bring a special charm, emphasizing any style or theme of design. Artificial trees are luxurious decorative elements, the role of which in the interior is difficult to overestimate
In addition to a subtle eco-friendly note, they are a good alternative to living plants and do not require careful care, creation of a microclimate or special conditions. There are many ways to make artificial trees with your own hands: bonsai, topiary, and many other creative ideas. Stylish hand-made crafts will help not only make the interior of rooms more comfortable, but also add fresh, informal notes to the design of a strict institution or office.
Advantages of ornamental trees
In the old days, people said that a craftsman and a craftsman brings joy to himself and others. Unique handmade items are always a valuable and welcome gift. Creating ornamental trees is a special art, thanks to which bright gardens bloom in lush colors all year round. Decorating your design with unusual crafts has many advantages:
- With the help of original details, you can breathe new life into your home interior and refresh it without any special financial costs.
- Artificial trees will retain their original beauty for a long time without requiring special care. They do not depend on weather conditions and delight the eye with their beauty.
- Decorative details will help harmoniously complement the stylish modern design even in a simple office space.
 Decorative trees will breathe new life into your home interior
Looking at the skillful ornamental plants presented in stores, it is difficult to believe that you can make them yourself. Don't rush to spend money on designer crafts. We will reveal the secrets of this work, offer several original ideas, as well as simple master classes, during which you can “grow” many wonderful trees with your own hands.
We create bonsai
The tradition of creating bonsai was born in Ancient China more than two thousand years ago. The name “bonsai” is written in two hieroglyphs, which mean “bowl” and “tree”. Later, already in Japan, the unusual method was actively developed and rose to the rank of fine art. It was the Japanese who brought the method to perfection, creating a special system of canons and proposing rules for exposure. Miniature trees are an aesthetic pleasure for perfectionists. Many people claim that looking at an elegant bonsai, they are overcome by an extraordinary feeling of calm, tranquility, and anxiety goes away, as if by magic. Decorate the world around you, try your hand at creating amazingly beautiful products.
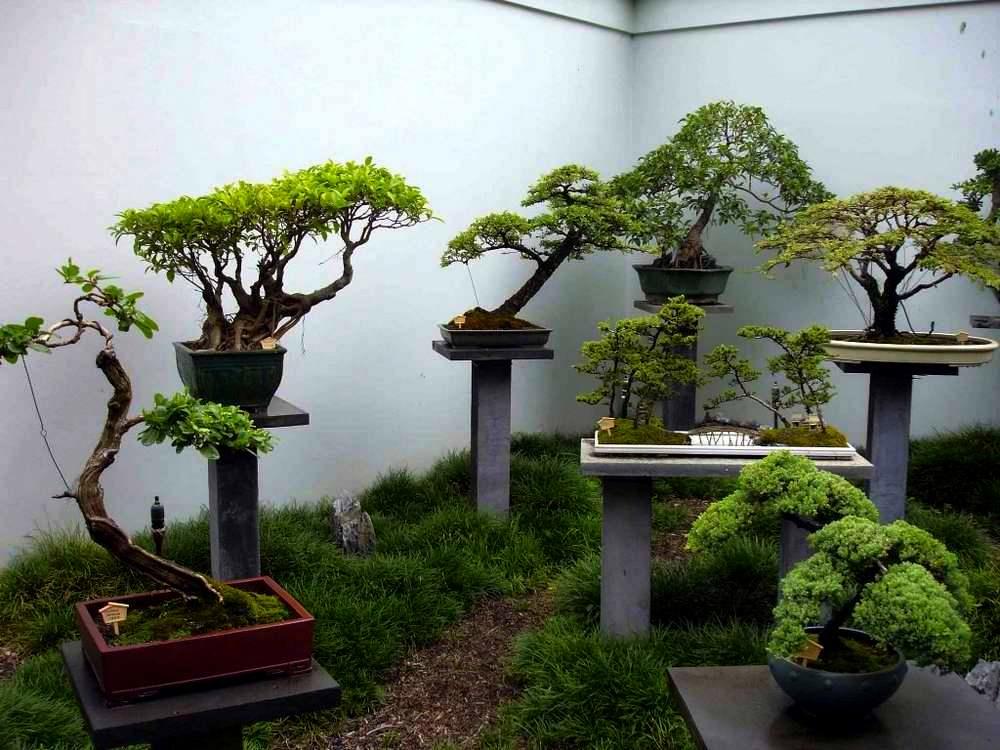
Bonsai varieties


Bonsai
Do you want to create a luxurious miniature garden at home that does not require special care? Then an interesting master class will help beginners in creating a bonsai tree with their own hands. Step-by-step instruction:
- We select materials for work. Any gifts of generous nature will be needed: intricately curved twigs, driftwood, juniper, spruce or pine branches, moss, reindeer moss.
- We preserve the branches. For processing, we will prepare a special solution consisting of denatured alcohol, acetone, and glycerin. We take everything in the exact proportion 1:1:2.
Important: The solution for preserving natural materials should be stored in a tightly closed container, as it has a pronounced chemical odor.
Initially, we wash the branches under cold water, thoroughly cleaning them from dust and dirt, then place them in the solution for at least a week.
- Next, dry the decorative material and paint it if necessary. Let's reveal a little secret: before painting, you need to dip the branches in hot paraffin, the treatment will help to apply the paint evenly to the surface.
- Let's start making a decorative bonsai tree. Cut the branches to the required length and carefully glue each one to the base. To prevent the structure from falling apart, we will wrap the individual elements with wire; after gluing, it can be removed.
- We decorate individual areas with moss, reindeer moss, white sand or decorative pebbles. In our work, we will definitely designate the center of gravity of the structure in order to give the craft greater stability.
Creating a bonsai tree with your own hands
After completing the painstaking work, a unique live composition will open to your eyes. An eco-style bonsai will delight the eye for a long time; all that remains is to occasionally brush off the dust from the elegant creation.
Bonsai in a pot
We offer another way to easily make an artificial bonsai tree with your own hands. The operating algorithm is simple:
- We select the container. A ceramic flower pot with holes for draining water is ideal.
- Fill the pot with soil. The soil should not be collected from the yard. It’s better not to save money and buy a ready-made mixture at a flower shop. Why is this necessary if the tree is still artificial? We will be growing moss or lawn on top, so good soil is essential.
- For the trunk of a decorative tree, we select a branch that is thick enough and intricately curved to resemble a spreading plant.
- We attach decor to the branches of the wooden frame. It can be made from matte paper, fabric, satin ribbons or any material. The more original the decor, the more spectacular the final result.
- We plant the lawn mixture in the ground and water it generously daily. Very little time will pass, and under the original tree a bright and lush summer lawn will spread out.
 Original decorative tree
By combining natural and synthetic materials, you can achieve unprecedented results in the art of bonsai, turning your favorite hobby into a successful business.
Many-faced topiary
The art of topiary is no less ancient, its origins go back centuries, when people came up with the idea of “playing” with nature, giving shrubs and trees in gardens a variety of shapes. Modern topiary is a stylish solution for budget but exclusive interior design. Skilled craftswomen are constantly looking for new ideas for creating decorative trees. A large flowering garden made with your own hands is a wonderful gift not only for yourself, but also for loved ones, friends, and colleagues. Cute gifts are very symbolic. Using this or that decor, you can create amazing things with your own hands.
 Bright floral topiary - will be an excellent gift
Fragrant big baobab
Coffee trees are a separate “fragrant” caste in the art of topiary. There are several variations on this theme, but we offer a lesson on how to easily make a large tree with your own hands. To work, you will need several small foam spheres, a package of coffee beans, thick linen yarn, a pot stand, glue, and scissors.
If you don’t have a ready-made base at hand, you can make it yourself using the papier-mâché method. Work algorithm:
- Let's prepare 7 small base balls, generously coat each of them with glue. We begin to attach the grains with the flat side down. We move arbitrarily, in a circle, horizontally, vertically. The main thing is that there are no gaps between the elements. When the first layer has dried, repeat the process, but with the flat side of the grains facing up.
- Making a trunk for a spreading baobab. Let's take a strong, thick wire, and tape branches of thin wire to it with tape. We bend it beautifully, giving the plant a bizarre shape.
- We carefully wrap the branches and trunk with twine on top, making sure that each turn lies tightly to each other. To ensure that the rope holds firmly and does not slide down the smooth trunk, we coat the wire with glue.
- We string coffee balls onto the branches, greasing the holes with superglue.
- In a pot, mix gypsum with water until it reaches the consistency of thick sour cream, insert wood, and let the mixture “set.”
Important: For topiary, you need to choose a base ball of light weight so that the thin trunk holds the entire structure. A plastic hollow ball or Christmas tree toy is ideal.
DIY fragrant baobab
When the plaster has completely dried, we decorate the stand. You can put coins, decorate with moss or use floral sisal. For a thick and rich aroma, decorate the tree with cinnamon sticks and spicy star anise stars. The coffee tree is not only beautiful, but also symbolic: seven wonders of the world, seven days a week, seven colors of the rainbow - all this is not by chance! An original gift will definitely bring good luck, family and financial well-being to your home.
A child can make a simple but beautiful craft from pistachio shells and wire.
 Original pistachio tree
Work algorithm:
- We make a hole in each pistachio shell with a gypsy needle.
- We cut thin copper wire into several small pieces, 15-20 centimeters long.
- We string a shell onto each branch, make a loop, and twist it. We fasten small branches together, 3-5 pieces each. The more such blanks you make, the more magnificent the crown of the decorative tree will be.
- We wrap the branches one by one to the trunk, securing them with construction tape or FUM tape.
- In order to give the product splendor and luxury, we will cover the entire surface with spray paint in gold or bronze color.
- Let's prepare the base. Add a mixture of alabaster and water to the pot, carefully insert the tree, and let the structure dry.
- Let's cover the alabaster with a layer of beautiful pebbles, golden beads or coins.
DIY pistachio tree
This beautiful souvenir will be a wonderful gift for all lovers of eclectic handmade products.To create your own large, ever-blooming garden, you only need imagination and a little skill. As Fyodor Mikhailovich Dostoevsky liked to say, fantasy is a natural force in every person, without giving it quenching, we do not allow it to grow and develop. Create, share your successes, because the world of creativity is a bottomless ocean of creative ideas.
Many-faced topiary