Every business owner wants to see his land holdings well-maintained, beautiful, and pleasing to the eye. He hatches ideas to implement them in any free time. Some people turn to the Internet and spend a long time wandering through its pages in search of the most suitable option. landscape design And . It is impossible to consider all the options, but here we will offer the easiest free editors for beginner designers, as well as quite complex software materials for specialist designers.
An example of a program interface for creating landscape design
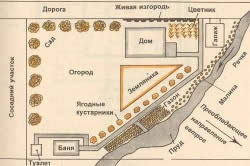
Usually, before the design begins, the garden plot already contains the necessary set of elements: trees, bushes, hills. When they are boring in their natural form and do not suit the owner, then they can be easily changed and given a comfortable appearance. If this is still flat, bare land, and the owner wants to have a luxurious garden, then he will have to fork out money to purchase the necessary components, and develop landscape project start with a blank page.
With their mastery, an inexperienced landscape designer should begin developing a design with his own hands. These editors, as a rule, are Russified and contain video materials containing lessons. 
Users are invited to download for beginners, the development of which does not require special skills. However, it is not so easy to compare programs in terms of complexity and the range of functions provided online.
It is better to evaluate them taking into account your own financial capabilities and the time required to develop them. Purchasing a pirated version may result in without considering the results in the 3D version, and moreover, it does not always guarantee trouble-free use.
If the owner of the estate has a great desire to create a wonderful garden with his own hands, then he should consider and download the materials " Landscape art» for designing projects, offered to inexperienced designers. Or buy a set of disks containing programs in this series, which are freely sold on the market in Russian.

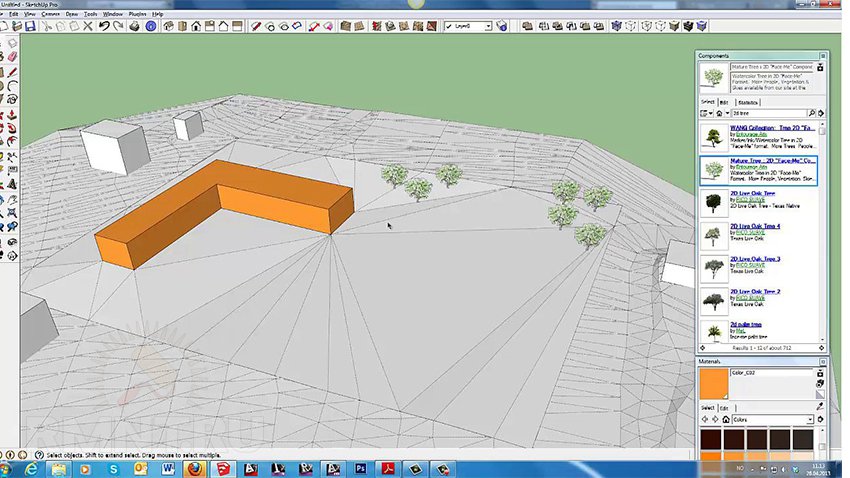
Program interface Google SketchUp for designing landscape design on the site
They will help the novice designer in developing the following elements:
- lawns, flower beds;
- reservoirs, fountains;
- paved paths;
- stone decor in the garden.
Landscape art offers two ways to frame a design: designing from scratch, from a blank page, or using a real photograph. The implementation of the latter option is convenient when there is already a house and other buildings on the site, and a garden with trees and flower beds has also been grown. This technology involves pre-loading a photograph of a site with ready-made buildings, and then introducing the desired ones there landscape elements and designs.
Computer options allow you to enter into the developed design:

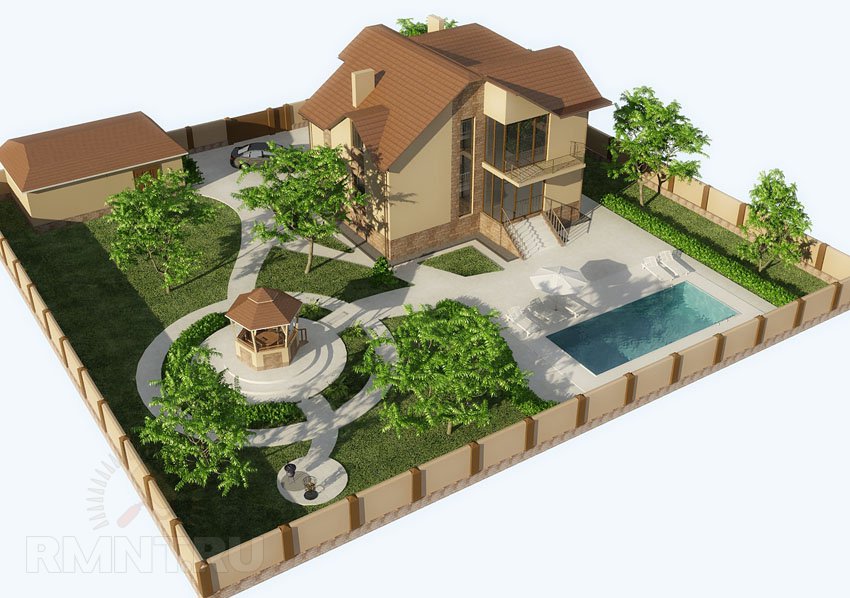
An example of landscape design created in the Planner program
- paths;
- gazebos;
- fountains, small ponds;
- gates;
- fences;
- flower beds;
- lanterns
All of these design objects contain built-in libraries or can be created by the designer himself. dacha project. After its completion, you can experiment with the lighting settings for day and night. It is recommended to develop two or more design versions of the site, consider them in two-dimensional images and 3D, in order to select the most suitable one when comparing good option. Viewings can show what the garden will look like today, as well as in a few years from now. The working version of design from scratch begins with the arrangement of the terrain. Adjusting existing hills, slides, and slopes is very simple. 
To do this, the design object to be changed should be outlined to apply the appropriate transformations: raise, lower, increase, decrease.
Professional packages
They are not distributed free of charge, and, as a rule:
- expensive;
- for studying is labor intensive; difficult to use;
- have options.
However, among them there are programs that are easy to learn. It would be a good idea to read the training manual before using them. Their language is usually English or Russian, or both.
Our Garden 10_4 Crystal
Professionals call this software in Russian for creating landscapes an encyclopedia. It consists of a set of programs with a simple interface and ease of management. No prior training required, readily used by professionals landscape design to fulfill orders from their clients and demonstrate completed projects in 3D.

An example of landscape design development in the Our Garden program
Provides the following DIY design capabilities:
- change the terrain of the site;
- place lawns, fences, paths, plants, ponds;
- see what the plot and garden will look like after a few years;
- view the final result in 3D format.
The user does not require special computer knowledge or additional training. The editor allows you to solve the simplest tasks of creating your own landscape summer cottages and develop complex design projects for estates and mansions with an area of up to 500 m. 
At the beginning of the design, it is necessary to use a hand-drawn site plan. Then it is filled with photographs of existing buildings, gazebos, fountains, paved paths, or ready-made decorative elements from the database are included. Looks very attractive with a hedge. The final project can be easily adjusted to indicate distances to objects, and the final result can be viewed from a perspective perspective, as well as in animation and 3D mode.
Software Contents
For professional work The program includes editors:
- borders;
- fences;
- relief;
- stairs;
- paving;
- structures;
- ground cover plants;
- 3D view;
- changing photos.
In addition, there is a calculator with the help of which a working version of the estimate is developed in order to set a price for each object of the plan and show the client the geometric parameters of its calculation, such as units of length, area, etc. The creation of catalogs of price indicators, as well as their updating, is done manually. And a summary table of the cost of the entire project is calculated automatically. The name of each editor reveals its purpose. Together they cover the variety of designs used in landscape design.

Various elements for landscape design
They allow you to demonstrate created projects, show how shadows, the color of leaves, and lawns change at a specific time of day, month, or season. Even snow cover can be displayed on all design elements. The software's arsenal includes information on more than 7 thousand ornamental plants with photographs and detailed descriptions. It can be downloaded to your computer.
Trees, flowers, shrubs that will fill the designed garden are filtered during selection according to parameters such as size, soil for planting, time of flowering and replanting, life span, as well as many other characteristics.
The program includes an encyclopedia containing all kinds of plant diseases and pests. It also allows them to be identified by specific characteristics and suggests ways to prevent the harm they cause. 
There are also free tables of agrotechnical regimes for caring for flora, as well as for controlling weeds, which will definitely visit a landscaped garden. Such a rich arsenal of software functions should not scare off a novice designer, because they are not difficult to understand, especially if the user is obsessed with the idea of designing his site in the highest class.
This program, designed for landscape design, cannot be called simple. The full version on disk is sold in the store, but you can download it from the Internet only for a fee. The procedure for working with it is approximately this: a photo of a specific land plot, and then the necessary landscape components are added to it. To plan from scratch, it is better to use a grid, which helps to place the elements of the landscape plan with high accuracy. 
IN software Several programs are provided that can only be downloaded as a bundle. They are required to perform the following actions:
- Viewing the results of design development in 3D format.
- Creation and adjustment of architectural elements.
- Modifications to design components available in the database.
- Analysis of the building materials and vegetation used to prepare cost estimates.
- View the finished product using the lighting and shadow tools.
Contains more than 350 design elements and 2 thousand plant species.

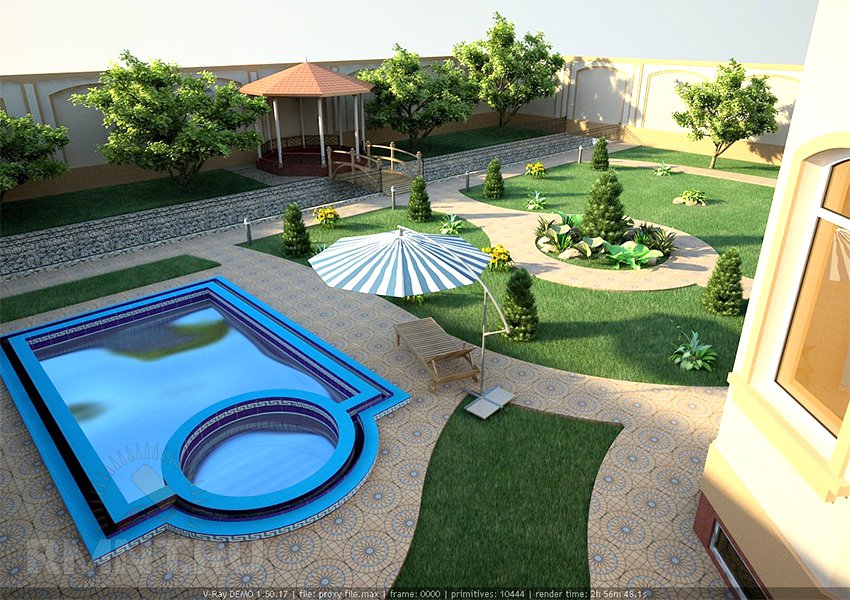
An example of a landscape design developed in the Complete Landscape Designer program
The biological properties of each plant component are described in detail in the database, which can be replenished independently by adding scanned small forms of architecture, trees, bushes, paths and ponds. For this purpose, a special editor is included in the kit.
Advantages: high quality; the realism of the resulting images of the site; a rich database of architectural and plant elements, which can be replenished independently; detailed description Help.
Disadvantages: files are saved and opened only in Punch formats; English language.
You can create a design project around it without downloading any landscape editors. There are programs that will help you develop a home landscape project without downloading in online conditions - connecting your computer to the Internet. And for beginner designers, the World Wide Web is full of training courses, which are replete with photographs and videos for developing a full-fledged design option for the design of the territory.
Do right choice design style is possible after studying the terrain, the presence of slopes, hills, in order to use them when arranging the site with paths, steps, etc. If there are trees or bushes, then you should determine how well they fit into the new landscape. Some vegetation may have to be removed in order for new vegetation to be planted on the site. 
Final planning stage
Having decided on the style, plans and drawings with dimensions are drawn up based on the information received. The area depicted on the monitor screen is filled with elements and objects invented or from an existing library.
You should know that rounded shapes evoke a feeling of security, an abundance of vertical lines can create anxiety, and a predominance of horizontal lines has a calming effect.
And then the territory is examined in a three-dimensional image. Some programs allow you to see the landscape as the shadow changes throughout the day, and green spaces during the summer and winter seasons. Using this feature, errors can be detected so that they can be corrected at the design stage.  Layout option summer cottage There are software packages that ultimately allow you to calculate the work and determine the total costs of implementing the developed project. This process is made easier by the fact that the interface of most of them is in Russian. There are also foreign language, but you will have to look for the crack on the Internet.
Programs
If the owner of the site decided to design it on his own, taking into account his own preferences, then the planning program will be his best assistant. He can use it online or download it to his computer to use it completely independently and for free. Moreover, he can do it quite well without special knowledge of design or programming.
- The first stage in planning a summer cottage
- Style and comfort
- Creating a garden structure
- 3D design
It can rightfully be considered real art. Creating a garden area project is a rather painstaking task that requires not only free time, but also some creative abilities. The layout and design of a garden can, of course, be entrusted to professionals, but this is very expensive. And the result does not always satisfy the customer.
The garden plot should contain neatly and harmoniously arranged garden elements.
It is much more interesting to create a garden plot yourself, on your own.
Everyone's tastes are different, there are countless styles that intertwine, creating inimitable and original projects. Experience shows that when people plan or create something themselves, they like it more. This article will talk about how to organize design garden plot without the help of professional designers.
Having your own garden plot gives you room for creativity to fly.
Design personal plot impossible to accomplish without certain preparatory steps:
- landscape plan;
- design design;
- landscape works.
The first stage in planning a summer cottage
To begin with, all your ideas should be transferred to paper. All you need is paper and a pen. By learning to plan well on paper, you can confidently design your own garden.
Try to create a list of your wishes. This way you can focus on what you really want. If you're planning a garden from scratch, make a list of things you'd like to plant or build. If you want to redesign an existing garden, first of all decide what you want to keep, and only then what to bring in.
Plan your garden according to your own wishes, according to your tastes. Be bold and combine styles.
Drawing up a list of requirements for the site.
Now you can move on to planning the garden. This stage is quite important. We'll have to concentrate and make the most full list requirements, wishes and preferences in relation to the garden. There are often more than enough such wishes, and sometimes they simply contradict each other. It happens that the size of the land plot is simply not enough for all the wishes. Now is the time to decide how much time and effort you will devote to your garden. Much depends on the purpose of creation (arriving at the dacha once a week or permanent residence), and on the capabilities of the creators (time, effort, money). At this stage, many wishes from the previous list are eliminated. After all, almost everyone agrees that the garden should be beautiful, original, but not take up a lot of time. The last point forces you to think about your entire list and approach it critically, weeding out everything unnecessary.
Return to contents
Style and comfort

The next stage of designing a personal plot will be determining the style direction of the garden. There are only two main styles for garden plots: regular and landscape. The more common one is landscape, as it is a freer style, unlike the regular one. You should start drawing up a project for a site with the issue of its improvement. A garden should be easy to use - this is its main purpose. You should not overload the garden with decorative elements, no matter how you feel about such things. The main object on the site is the house. If it has not yet been built, it is worthwhile to place it wisely on the plan. And if it has already been built, then you should adapt your garden plan to its location.
It is worth noting the lowest and highest points of the area. If such points are not taken into account, drainage problems may arise. If the house has not yet been built, it is better to place it at the highest point with north side. You should consider which side offers the most and least beautiful views. Considering such details, you can take advantage of the location features of your site, so that with your garden you will either emphasize and enhance them, or cover them up and make them nondescript.
Return to contents
Creating a garden structure
Now let's move on to creating the structure of the garden, that is, dividing it into zones. Rarely can a garden consist of one zone. Rather, it is not a garden, but simply a jumble of green spaces. But a well-planned garden can be easily distinguished from such a clutter by good structuring. Several areas of such zones can be distinguished: economic zone, gardening zone, recreation area, sports area, etc.
To correctly place all these zones, you should analyze your site and choose which part of it best suits the required zone. For example, it would be most logical for a recreation area to be located in the most beautiful part of the territory, but it would be better to place a garden area on the south side. Choosing a place for certain areas, you will be able to make the most efficient use of your site.

Paths.
Having designed and placed zones on the site, it is worth connecting them with each other, as well as with other buildings on the site or with exits from the site - paths. Such paths should be designed in advance and put on the plan. It is worth considering the use of paved areas, patios and more. It is preferable to use rounded paths that do not have right angles. It is better to make the width of the paths at least one meter so that two people can walk along it freely.
Plants.
A network of paths and paths can become a very convenient coordinate grid to which it is easy to attach functional and decorative elements of the garden. You can put the desired plants on the plan: trees and shrubs. They are usually applied in the form of circles. The main thing to remember is that moderation is perhaps the basic rule for a novice gardener. After all, excessive clutter can ruin any, even the best undertakings. It is worth considering the fact that plants do not stop growing after planting and can sometimes reach enormous sizes. It's best to factor this into your plan by leaving room for trees or shrubs to grow. For large trees, this distance can be more than 5 m, and for shrubs about 2 m. However, if you plan to create a hedge, then a closer arrangement is allowed. Next, you need to decide what plants you want to see on your site. you can even label the circles on your plan by giving them names. Considering the low prices for planting material for the garden, this stage must be approached very responsibly.
When developing a design project for a personal plot, it is very important to have a visual representation at the different stages of its preparation. Landscaping, garden accessories, paths and ponds - all this can be organically and simply arranged using landscape design programs. Let's look at free apps.
Common to all: what to look for when choosing
When developing design projects, you should be guided by the principle “the simpler, the better.” If a certain software product satisfies the requirements in the context of a specific project, there is no point in chasing advanced tools for creating high-level graphics.
Most design visualization programs have primarily a presentational purpose. This is important when doing custom work, but if the development is carried out for yourself, mastering complex CAD mechanisms will result in an ineffective waste of time.

In the practical development of landscape design, you should always leave room for imagination. It is unlikely that you will be able to fill the one-to-one scene in the foreseeable future with the same elements that will take place in the real physical world. Therefore, the primitivism of objects in the virtual environment and the low degree of detail are more of a benefit than a disadvantage. They make it possible to evaluate the general, global side of the design without being distracted by minor details.
Considering the above, we recommend paying attention to software marked “for beginners”. Also of great importance is free access to educational literature authored by the creators of the program or the developers using it.
It is worth noting that the lack of a Russified version of the software usually does not become an obstacle to development simple projects gardening and landscape design. Also keep in mind that the concept of free for this kind of software is very conditional: even professional tools have a trial period, during which it is quite possible to develop your own project, but you will not be able to use a paid program for commercial purposes.
Working with Content Libraries
The basis for working with most landscape design programs is the use of ready-made elements from standard set. You simply create a scene of the required dimensions, and then place the necessary content on it: lawns, paths, buildings, trees and decorative paraphernalia.
One of the most popular free products, Sierra Land Designer, contains several modules with the ability to freely import projects between them. Strength This kit contains an impressive library of garden plants, supplemented with recommendations for climate suitability, features of planting, care and life cycle. The program suffers weak remedy visualization: the garden planner has a two-dimensional top view, but after layout the project can be viewed in a rather modest 3D visualization module.

A developed community of users plays an important role in working with landscape design. SketchUp, for example, although it was not designed as a program for detailed design of personal plots, has an extensive library three-dimensional models, which were previously created and used by other users. Sketchup does not have a built-in encyclopedia of plants, but it allows you to create a visual environment with a high degree of detail and variety.
The golden mean in terms of libraries and display quality is FloorPlan 3D. The program has a developed set of components and design templates, both ready-made and third-party. And this doesn't come at the expense of usability or graphics.

User Interface Differences
Almost all programs differ in their individual layout of controls. This directly determines ease of use, speed of development and completion of the project.
For example: SketchUp has a very wide range of tools for editing and moving objects. They are located on two panels in different parts of the screen and can be customized individually. The same feature distinguishes most CAD programs (Autocad, ArchiCad, etc.): everything that should be at hand is located on the main editing screen, and all additional modules, such as setting the parameters of individual models, relationships between them and tools visual display are located in additional internal windows.

A slightly different organization scheme is used in programs that are specifically aimed at garden and landscape design. In Sierra Home&Land Designer 3D and 3D Home Architect Design Suite Deluxe, working with the project and its components is divided into stages, each of which has a separate module with its own tab. Switching between them is absolutely free; at any time you can go back and, say, reconfigure the global parameters of the scene or the properties of a group of objects.

Visual environment
Free programs Most of them do not pretend to produce high-quality graphics with good realism. But in their segment, they still differ from each other in the method of visual presentation and the degree of image elaboration.
The most simple programs, such as Expert Landscape Design or Garden Planner 3, are designed to efficiently arrange objects on a site plan. 2D overhead views, purely schematic displays and, with rare exceptions, the inability to set up and film a scene for presentation are the hallmarks of programs designed for low-level design.

There is a special class of landscape design tools that use photographs to construct scenes by collaging them or rendering pseudo-3D. This group includes Realtime Landscaping Architect and 3D Home Landscape Designer. They allow you to walk around the site in three-dimensional mode and have the opportunity to film the project scene from unique angles or simulate conditions of changing weather and time of day. The main function of such programs is to automate the manual processing of photographic materials in graphic editors.

The best detail and photorealistic rendering are used by such 3D modeling “monsters” as Autodesk 3ds Max, Maya, Punch Home Design and SketchUp. These programs do not have (with the exception of special plugins) tools for working specifically with landscape and park design, but they allow you to work with sources of natural and artificial lighting, fully support shadows. This is possible due to the rendering included in a separate program module, therefore, with some effort, you can take incredibly realistic pictures of your virtual site. Unfortunately, such opportunities are quite expensive: programs have high system requirements and require time to master.
User level
The potential complexity of interacting with a program can be assessed by the range of its capabilities. Placing elements of a standard library on a plan using Expert Landscape Design does not require any preparation at all, while setting up a high-quality display in Sierra Home&Land Design can require several hours of attention and a number of unsuccessful attempts.
Don't forget that in the long run it's better to start with mid-level programs such as SketchUp or the more specific Complete Landscape Designer in order to master the full range of basic CAD capabilities for landscape design.

Help in this matter will be free and paid literature on developing projects in a specific program, various thematic forums and communities. For almost all of the programs described, there are series of videos with examples of work, from which you can evaluate the capabilities and control scheme of the program in a matter of hours.
Recommended sequence for developing your own project
Finally, we will suggest the optimal sequence of actions that will allow you to master most of the software’s potential in two or three evenings and quickly develop your own project. When you decide on the choice of program, study 3-5 lessons demonstrating work with both individual models and their groups and entire scenes, explaining the very concept of development.

When creating your project, start by designing and setting up your global scene. Remember that objects can be grouped and hidden once you've finished working on them, so you can focus on specific areas of the scene. When individual details have been worked out, start arranging them globally.
At the final stage, work is carried out with the special capabilities of the program: setting up materials, textures, lighting, simulation different conditions and angles. Obviously, the project will not gain physical implementation in one day, so you should return to the virtual plan of your site from time to time to look at it with fresh eyes and finalize small details.