Takes ~4 minutes to read
Ventilation in the kitchen with a hood is a fairly simple, but at the same time necessary thing. This is the most effective way to “renew” the air in the room. Without such a system, odors enter other living rooms, creating an uncomfortable atmosphere in the apartment. For a kitchen with a gas stove, a hood is a must. It helps to collect fat on itself, preventing it from appearing on walls, furniture, and equipment.
Why do you need ventilation in the kitchen?
The main function is to maintain normal air composition. It cannot be performed by other devices: humidifiers, air purifiers, etc. During operation, the air in the room undergoes changes:
- increasing the concentration of harmful substances emitted by decoration, furniture and any other objects;
- as a result of gas exchange in a person’s lungs, carbon dioxide accumulates in the room, and the percentage of oxygen decreases (the same thing happens when burners burn);
- heating devices also affect the quality of air;
- microscopic lint from textile and wool products, particles of the epithelium of pets constantly fly in the air, which is harmful to health;
- condensation formation.
These changes in the air do not mean that you should give up keeping pets, fabrics, etc. in the house. A negative effect is created only when the concentration of harmful substances is critically exceeded. Therefore, it is important to create an outflow of dirty air and an influx of clean air. This is the function of the air duct in the kitchen.
Standards and requirements for kitchen exhaust systems and installation
Exhaust systems, like any other equipment, are subject to installation requirements and technical characteristics:
- Match the size of the exhaust system and the gas stove underneath for maximum efficiency in removing odors.
- The hood must be installed no less than 50-60 cm from the stove. This is done for ease of use. In addition, if the hood is lowered too low, there is a high probability that the fat accumulated on it will ignite.
- The capacity of the hood should replace air at least 10 times per hour. To calculate how much volume the exhaust system should process, you need to take into account the area and height of the ceilings in the kitchen. Calculate using the formula: V = S * h * 10 * 1.3, where S and h are the area and height of the room, respectively, 12 is the minimum air treatment rate in 60 minutes, 1.3 is the correction factor.
- If there is no veterinary duct in the kitchen, then it is better to install the hood with the ability to adjust the performance and recirculation. If you connect a flow hood to natural ventilation, this will lead to disruption of the latter. Also, you should not turn on such devices for a long time.
- Craftsmen must strictly follow the instructions in the equipment passport.
- The hood is leveled.
- Turns at an obtuse angle are not allowed; any turns should be as few as possible.
- If the length of the route exceeds 300 cm, then a second exhaust fan is required.
- There is no need to choose equipment with high power, it makes a lot of noise, and it is not intended for residential premises.

Save
Save
How to make a kitchen hood correctly
Making ventilation in the kitchen in an apartment will not be difficult. The installation process is not complicated, but requires certain knowledge. For example, the size of the vent in the kitchen is different from that in the bathroom. A huge role in the proper functioning of the system will be played by properly selected equipment.
Preparatory work for installing a hood in the kitchen
In order for the hood to work correctly and reliably, the outlet is made to the outside. To do this, you need to lay an exhaust duct of the shortest length in the kitchen. Ideal option: round cross-section and no more than two turns. To prevent leakage and freezing, check valves must be installed. Before actual installation, you should obtain information about the dimensions and placement of the exhaust system.
Equipment location and dimensions
When placing a ventilation system in the kitchen, the position of the stove and the area of the room are taken into account. It's good if the room has high ceilings. Even very simple equipment will not harm the interior. Depending on the configuration, the following types of hoods are distinguished:
- Corner. When choosing this type of hood, a person has the opportunity to save space and make the hob more accessible, which is important for small kitchens.
- Wall-mounted. One side of the dome is adjacent to the wall, and the other is located above the hob.
- Ostrovnaya. Happy owners of spacious kitchens can afford to install an island-type structure. Then the hood will be placed in the middle of the room - where the entire work surface is located in island kitchens.
The shapes of the hoods also differ (oblique, flat).
Ventilation and a gas stove in the kitchen must work together. Accordingly, the size must be selected to match the existing slab. They either coincide, or the width and length of the hood increase by about 5 cm. You should not choose a hood that is too wide. Although it will cope with its function perfectly, it will become inconvenient to work in the kitchen.
The socket is usually hidden in (under) a wall cabinet, sometimes in a casing that masks the air duct. Distance from the floor – 1.9 m.
Selection of exhaust duct materials
At the stage of selecting a suitable exhaust duct that will pass through the wall, you need to take into account several points. The first is the thickness of the wall, the second is the material in the wall through which the wiring will be carried out.
The best option is round galvanization. It can be used both as a channel hidden in the wall and as a hidden air duct. Any insulation will be suitable for such a pipe. The insulating material must be of good quality and not allow water to pass through. You can give preference to one of the following materials:
- polypropylene;
- polyethene;
- polyurethane.
Plastic products are easy to install and have an affordable price. That is why it is most often chosen as a material for the exhaust duct in the kitchen.
Creating and preparing a ventilation hole in the wall
The first step is to draw up a diagram on the wall. Next, holes are made in order to later secure the tool frame. A dowel is driven into the hole and a pin is screwed in to secure it. The frame is fixed to the wall, and final measurements are taken.
Drilling the wall takes place in several stages:
- First, the inner layer is destroyed, and the wood concrete cylinder is pulled out from the crown so that it does not interfere with further installation.
- Then the inside of the façade slab is drilled and the cylinder is removed again.
- At the final stage, the outer tile layer is drilled. The tool and frame are dismantled.
Installation of the hood body
A flat-type hood is mounted to the bottom of wall-mounted furniture or to the wall.
If there is a corner strip, then the hood body is built into the wall cabinet. It happens that installation is difficult due to the gas pipe or protrusions. In this case, plumbing screws and studs are used, screwed into the wall as dowels. The hood itself is mounted at some distance from the wall. When installed correctly, the system maintains optimal traction. Channel turns reduce the “strength” of the equipment by 10%.
After installing the check valve, you need to seal it from the outside of the wall. Next, an insulated pipe is inserted. It is sealed from the inside of the wall and secured with a square element with four dowels.
Air duct laying
Another task is to lay the air duct to the hole. It is necessary to prepare a plastic or plasterboard box (easy to process). The box must support not only its own weight, but also the weight of the air duct. To secure the frame you need to use dowels. Silicone sealant helps to achieve maximum tightness at the joint of the air duct.
Sequencing:
- Marking the location of elements.
- Drilling a hole, fixing metal hangers with dowels.
- Step-by-step installation of air duct elements.
- Sealing of connections.
To make a kitchen hood correctly, like a real professional, we must not forget about soundproofing the air duct. This will neutralize unnecessary noise.
Creating a box to mask the air duct
The air duct is a bulky structure, so it is required cover it with a box. There are several ways to do this:
- use a plastic box (it is rigid and light, easy to install) - place it under the ceiling or above hanging furniture;
- use a plasterboard box (it is possible to equip it with lamps) - a metal profile frame is required.
Before masking the air duct, you need to make sure there are no leaks.
Sequencing:
- Performing markings. Mark the location of the third profile.
- Drilling holes for self-tapping screws (the easiest way is through the profile).
- Inserting dowels.
- Fastening profiles with self-tapping screws.
- Decoration of a corner with perforated metal for the corners of the hood.
- Connecting profiles with cross-sections.
- Fastening plasterboard sheets to a metal profile frame. The outer corner of the sheet is covered with a decorative corner.
All that remains is the final finishing.
Installation of inlet valve
- If the ventilation in the kitchen in the apartment works for a long time, the reserves of air masses dry up. Installation of a supply valve is required. It can supply the system with air in the amount of 40-60 cubic meters per hour. There are several varieties of this device: independent and additional. The first is installed on the wall, the second - on plastic window frames.
- First you need to mark the outline. Then drill a hole (sloping down). If this is an independent supply valve, then the diameter of the hole should be 4.5 cm. After which the sleeve is inserted.
- The valve pipe requires mandatory winding with insulating material. In this form, it is placed in the prepared hole (normally it protrudes slightly). The supply valve body is fixed with dowels. At the final stage, filters are added to the system, which protect the room from dust and other small debris.
- The strength of the air flow can be controlled using a damper.
Connecting the hood to ventilation and power supply
If the apartment has a grounding circuit and European sockets, then the wire must be connected to the grounding terminal (designation: three strips of different lengths). If there is no grounded connector, you will have to make it yourself - screw the wire to a metal body.
There may also be no European socket. In this case, the system is grounded when connected to the blanked neutral of the electrical panel. There is a bus with a ready-made pin, and a grounded yellow-green wire is thrown over it. Additional grounding is added to this mount, and the wire is pulled into the kitchen.
Cable cross-section (copper, stranded) – at least 2.5 mm2. The new wire is placed over the old one. The exhaust system is turned on via a circuit breaker with a current of 6 A.
The system should be cleaned 2 times a year. Ventilation grilles for hoods in the kitchen are removed and cleaned of smoke. This helps prevent fire. But if there is no experience and knowledge on how to make a hood in the kitchen, it is better to invite an electrician to the apartment. Moreover, it can clearly show how to clean.


Everyone knows that good ventilation in the kitchen is an integral element of a healthy microclimate in an apartment or private house. To assist the traditional natural ventilation system duct located under the ceiling, today it is customary to install a kitchen hood above the stove and/or a kitchen exhaust fan duct opening. However, not everyone understands that ill-designed forced exhaust can not only fail to give the desired effect, but also significantly worsen the functioning of the natural ventilation system. Let's look at how to make a hood in the kitchen of an apartment or house effective and safe.
During the cooking process, various harmful substances are released into the air. They can be divided into two groups: deadly and simply very harmful.
Comfortable ventilation in the apartment in general and in the kitchen in particular is the key to cleanliness and well-being
Dangerous "kitchen" pollution
- Carbon monoxide (carbon monoxide, CO) is a toxic substance that in high concentrations leads first to poisoning and then to death. Owners of electric stoves have nothing to worry about; such equipment is not a source of CO2.
Carbon monoxide is produced when natural gas or biogas is burned or cooked in a traditional wood stove. Carbon monoxide is especially dangerous because it has no odor, a person may not feel its presence and accumulation in the room. Carbon monoxide is not absorbed by carbon filters, and the hood turned on in air filtration mode is useless in the fight against CO.

Carbon monoxide poisoning is very dangerous. More people die from it in their homes than from fires, tsunamis, floods and earthquakes combined
- Every time you turn on a gas burner or water heater, a small amount of unburned natural gas enters the room. A normally functioning natural ventilation system is designed for a similar level of gas emissions and copes with it quite well.
It’s a different matter if there is a leak from gas equipment or pipelines. Household gas itself has no odor, but a “smelly” fragrance is added to it - ethyl mercaptan. If you smell gas, you should immediately open the windows and call emergency services.
The installation of gas leakage and CO detectors will help to significantly increase the safety of people when using gas equipment. In case of danger, the sensors can emit a piercing signal or control a servo drive, which automatically turns off the gas supply from the main and notifies the emergency service about the problem.

The gas leak sensor is capable of promptly detecting a dangerous concentration of natural gas, propane or butane in the air and signaling it
Harmful contaminants in the kitchen
- Kitchen fumes released when frying foods. It consists of volatile particles suspended in the air, mainly oils and fats. After strong heating in a frying pan, harmless food substances acquire properties harmful to humans, even carcinogenic. At best, dirt and grime settle on walls, furniture and dishes, at worst - in our lungs.
- Cooking also produces water vapor. It is, of course, practically harmless compared to other types of pollution. But there is no benefit from evaporation; excess moisture does not improve the microclimate in the room.

The fumes generated during cooking are not beneficial to the body.
From the above we can conclude that effective, constantly functioning kitchen ventilation is extremely important. If for owners of electric stoves this is a matter of hygiene and cleanliness in the room, then for those who use a gas stove (stove, wood-burning oven) indoors for cooking, this is a matter of safety.
Owners of gas stoves should pay close attention to the performance of the ventilation system and periodically check the presence of draft in the ventilation duct. If in the kitchen, in addition to the stove, a gas water heater or heating boiler is installed, the normal functioning of natural exhaust ventilation becomes even more important.
Kitchen ventilation systems: natural or forced
Many consumers are wondering: which kitchen hood is better, natural or forced? We answer: both are better. Natural and forced exhaust, although they serve a common purpose, do not replace one another. A natural ventilation system is mandatory for a kitchen in an apartment or private house. Let us repeat, the presence and functionality of a natural ventilation system is of particular importance for rooms with gas appliances.
Forced exhaust ventilation for the kitchen is a good thing, even very good. But optional. It can be argued that natural ventilation provides greater safety, while forced ventilation provides comfort.

Ventilation in the kitchen with a hood is an element of the overall ventilation system in an apartment or house
Let's take a closer look at the capabilities of different types of ventilation, their design, advantages and disadvantages.
Natural ventilation in the kitchen
The natural ventilation system is well known to all apartment owners through the channels in the kitchen and bathroom walls leading to the roof of the house. Harmful gases and polluted air are removed through the ventilation duct, fresh air enters through cracks in the windows or special ventilation valves in the walls or window frames. Warm air heated on the stove, due to its lower density, naturally tends to evaporate from the room upward, to the street, where the temperature is lower.

Natural ventilation in a private house in the kitchen, bathroom, and furnace removes polluted air through vertical channels to the roof. Fresh comes from the street through windows or valves in the walls
Properly designed ventilation with natural draft removes a relatively small volume of air per unit of time, but does so constantly. The ventilation duct located under the ceiling can cope with even a small leak of natural gas, which is lighter than air and rises to the ceiling.
Carbon monoxide, which is formed in relatively small quantities from the working burners of a gas stove, is also quite successfully removed by natural ventilation. Natural ventilation is somewhat less effective at removing kitchen odors and excess moisture during moderate-intensity cooking.
It is necessary to periodically, at least once a month, check for sufficient draft in the ventilation duct. You can check this without special instruments: if a sheet of paper “sticks” to the hole, there is traction.
What is good and what is bad in such a system:
Advantages of a natural ventilation system
- Ventilation with natural draft functions constantly with rare exceptions (see below, in the “cons”).
- Provides general ventilation of the home in combination with ventilation ducts in the bathrooms.
- Copes with the main types of hazardous contaminants released during cooking. Provides safety in the event of a small gas leak. Natural ventilation adequately removes kitchen odors and excess moisture during moderate-intensity cooking.
- Natural ventilation is “free”. In an apartment or private house built in accordance with building codes, it is available by default. There is no equipment that requires repair. No electricity required.
- Quiet operation.
Disadvantages of natural ventilation
- In hot weather and in the off-season, when the outside air suddenly warms up after prolonged cold weather, the efficiency of the natural ventilation system drops sharply. Under unfavorable circumstances, a reverse movement of air may occur: it will begin to flow through the channel from the street into the room. For a kitchen with a gas stove installed, this can be very dangerous, especially if there is a gas water heater. In hot weather and during a sudden thaw, it is recommended to ventilate the room through open windows.
- Natural ventilation removes a relatively small volume of air per unit time. If the owners decide to fry a frying pan full of cracklings, the ventilation system will not cope and the persistent kitchen “aroma” will instantly spread throughout all the rooms.
- Ventilation works normally only if there is a sufficient volume of air flow from outside. Modern plastic windows, adjusted “for winter,” are practically airtight when fully closed. To ensure the outflow of air into the channel, you should open the windows slightly during cooking, at least in micro ventilation mode.
- The ventilation duct may be clogged with snow and debris. Selfish and technically illiterate neighbors above can block the ventilation of the lower residents by creating a niche for the refrigerator in their kitchen by removing the ventilation shaft or part of it.
- It is necessary to regularly check the draft and, if necessary, clean the ventilation ducts.
How to properly create natural ventilation in the kitchen
There is ventilation for the kitchen in an apartment built in accordance with the standards; you just need to check its functionality. But how to properly make natural ventilation in a private house? Ventilation ducts should be located in “dirty” rooms: kitchen, toilet, bathroom, furnace, utility room, bathhouse. In order to ventilate the entire house, and not just the kitchen, the air flow must come from “clean” rooms: living room, dining room, bedrooms.
Ventilation design, if everything is done in accordance with construction and hygiene standards, involves the calculation of many system parameters. When determining the cross-section of ventilation ducts, the type of installed equipment, volume of premises, building design, and climatic conditions of the area are taken into account.
The calculation is difficult for a non-specialist; those who want to delve into the topic can study SP 60.13330.2012, 54.13330.2011, 62.13330.2012, 131.13330.2012, 7.13130.2011 and SanPiN 2.1.2.2645-10. We will give only basic recommendations, which, in our opinion, are sufficient for installing natural ventilation in most private houses:
- If there are four burners, the volume of air removed must be at least 90 m3/h. To do this, it is enough to bring to the roof a vertical exhaust duct with a cross-section of at least 0.02 m2. This corresponds to a round channel with a diameter of 16 cm or a square one with a size of 14x14 cm (half a brick). More is possible, less is not possible.
- The entrance to the channel should be located on the wall at a distance of 15-30 cm from the ceiling or on the ceiling itself. The last option can be implemented in a private house.
- In order for the natural draft to be sufficiently stable, the channel must be relatively high. Optimal traction is ensured when the channel height is at least 5 meters. Moreover, it should not be cold. In a channel located outside the building and not insulated, during the cold season the draft will be weak or not at all. In a private house, it is best to place ventilation ducts in the center of the house, closer to the ridge.
Forced exhaust ventilation
A ventilation system where contaminated air is removed using a fan is called forced. Kitchen exhaust fans can be installed in various ways:
- Mount directly onto the existing vertical natural exhaust ventilation duct leading to the roof.
- Make a hole in the outer wall where the exhaust fan will exhaust polluted air directly from the room.

Modern equipment allows you to drill holes of the required section in external walls quickly and without dust
- You can hang a wall-mounted kitchen hood with a built-in fan above the stove. Route the air duct from the hood into an existing ventilation duct or into an additional hole in the wall.
- Insert a fan into the window vent of a “Soviet-style” window and you will get a simple and cheap window hood.
Advantages and disadvantages of forced ventilation
- When properly designed, forced draft ventilation has high performance and is potentially capable of quickly removing significant volumes of contaminated air during intensive cooking.
- A kitchen hood installed directly above the stove will remove most of the dirt before it enters the room. As a result, cleaning the kitchen will become much easier.
- Polluted air is removed only while the kitchen hood fan is running.
- A forced system costs money: a kitchen fan or a hood with a fan, their maintenance and wasted electricity have their price.
How to properly install an exhaust fan on a natural ventilation duct
When installing the fan, the following points must be taken into account:
- If your kitchen exhaust fan has a check valve that prevents air from the duct from flowing into the room when the fan is not running, the check valve must be removed. Otherwise, the operation of natural exhaust will be disrupted.
- A typical cheap household fan of an axial design is not designed to remove air from a vertical duct. The performance indicated in the passport (the volume of air removed per unit of time) will be realized only if the fan removes air from a horizontal channel, and even then it is not very long.
When connected to a natural exhaust fan, it will be difficult for an inexpensive fan to overcome the resistance of friction and the air column, and its performance will noticeably drop in comparison with the declared one. The higher the channel, the greater the fall.

The axial fan is structurally simple and cheap
- There are special household fans of centrifugal design designed to operate in vertical channels. The drop in productivity depending on the height of the channel is not as great for them as for axial ones. Actual performance when working in a vertical channel will be close to the declared one.
Centrifugal exhaust fans for the kitchen can be built-in or overhead. Disadvantages of centrifugal fans: high price (they are five times more expensive than axial analogues) and relatively large dimensions.

The centrifugal exhaust fan in the kitchen has a more complex design than the axial version. An impeller with multiple blades rotated relative to its axis is capable of creating significant air pressure, which makes it possible to overcome resistance when removing air into a high vertical channel with small losses in performance. The maximum performance of centrifugal fans is lower than that of axial fans with a motor of similar power. But in difficult working conditions their capabilities are more fully realized
So, an axial fan is cheap, but it is of little use when installed on a natural ventilation duct. Centrifugal is effective, but expensive. A suitable alternative is to install the fan in a horizontal duct leading through an outside wall. In this case, you can use a cheap axial exhaust fan without compromising its performance.

Graph of the performance of household fans with motors of similar power depending on the pressure (height of the vertical channel). On the left is an axial fan, on the right is a centrifugal fan. As can be seen from the graphs, when overcoming a pressure of 40 Pa (approximately corresponding to a channel with a height of 25 m), the performance of an axial fan will drop by 80%, and a centrifugal one by only 20%. That is, in these specific conditions (the second floor of a “nine-story building”), the “centrifugal” is four times more efficient than the “axial”
When ducting through a wall, it is necessary to install a check valve at the outlet from the outside. Unfortunately, it is not always possible to drill a hole in the wall if we are talking about a city apartment. But this is not a problem in a private home.
Features of installing a kitchen hood
We won’t talk about how to install a kitchen hood; this should be described in detail in the instructions for it. Let us only remind you that it is necessary to strictly observe the specified height of its placement relative to the table top. We also note that using a hood in recirculation mode (without removing air) coupled with a carbon filter will clean the air only from a portion of aerosol particles, mainly fats. Gas combustion products will remain in the room. In addition, a carbon filter that costs some money gets clogged quite quickly and requires replacement.

The hood should be placed higher over a gas stove than over an electric one.
Let's name the main features that should be taken into account when choosing and connecting a kitchen hood:
- A kitchen hood fan, like a household fan installed on a duct, can also have an axial or centrifugal design. Expensive hoods that use centrifugal fans remove air well through a vertical channel; the loss in performance is tolerable.
In cheap hoods, axial fans are often installed; when connected to a vertical duct, they are ineffective. Full operation of a hood with an axial fan is achieved only when air is exhausted through a short horizontal duct through the outer wall.
- When connecting the hood to a vertical natural ventilation duct, it is recommended to remove the check valve on it, if any. In a horizontal channel, the valve is required at the outlet to the outside. It is better to leave it on the hood.
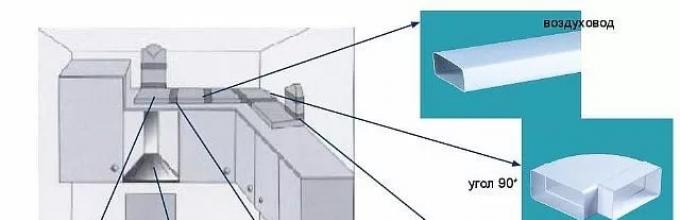
- The cross-section of the ventilation duct should not be less than the cross-section of the hood outlet. You can switch from round pipes to rectangular ones, the main thing is not to narrow the cross-section.

It doesn’t matter what shape the air ducts for connecting the hood will have, the main thing is not to reduce the cross-section of the duct
- When connecting the hood to a vertical duct, it should not interfere with the normal operation of natural ventilation. By the way, many people do not take this requirement into account and, unfortunately, most hoods in our homes are installed incorrectly. We will devote the next section to the question of how to properly connect the hood to the ventilation in the kitchen.
How to properly connect a pipe from a kitchen hood to a natural ventilation duct
From the outlet of the kitchen hood, we need to stretch a pipe of the appropriate cross-section and insert it into the hole in the wall leading into the vertical channel of the natural ventilation system. In practice this is done in different ways:
Sometimes only the pipe supplying air from the hood is connected to the vertical duct, completely closing the opening from the room. It is absolutely forbidden to do this, because the operation of natural ventilation will be disrupted.

An example of how you should never connect a kitchen hood: a room with a gas stove lacks normal natural ventilation. Even if you remember to remove the check valve on the hood, the natural air suction above the stove will be weakened due to the additional resistance to air movement that has arisen. In addition, harmful gases accumulating near the ceiling will not be removed at all.
Many sellers of building materials and finishers recommend connecting the hood to the natural ventilation system through an adapter plate with two holes. One of them is designed to connect the hood, the second opens from the duct into the room. It seems that an exhaust hood was provided and natural ventilation was preserved. Actually this is not true. Firstly, when the hood is operating, almost all of the removed air is returned back into the room. It is much easier for him to exit back through the nearby hole than to go up the channel.

A frequently used connection is the air duct from the hood (1) to the natural ventilation duct (3) through an adapter with two holes. While the hood is not working, air outflows from the room through the second hole (2). But when the hood is turned on, most of the air it removes returns to the room
Secondly, the cross-section of the hole for natural exhaust decreases, unless it is specially expanded. Connection via a two-hole adapter is widely used, but we consider it incorrect due to its very low efficiency.

A widespread but ineffective design for connecting a hood to the duct of a natural ventilation system
In order for both natural and forced ventilation from the hood to function fully, two requirements must be met:
- While the hood is operating, the second hole must be closed so that the exhaust air is not thrown back into the room.
- The total cross-section of the grid openings for natural ventilation should not be less than the cross-section of the vertical channel.
This can be achieved by increasing the area of the natural ventilation grille and installing a check valve behind it so that it closes after turning on the hood. The valve must be installed in such a way that the supporting air flow from the hood closes it, and when the hood is turned off, the valve opens automatically.

A check valve (5) was installed on the hole in the wall in the natural ventilation channel (4), which opens with slight air movement, but closes against a noticeable air flow. When you turn on the hood, it blocks the air from escaping back into the room and you have to climb up the vertical duct to the roof
How to select and install an air check valve when connecting a hood to a duct
For our purposes, of the many types of ventilation valves, only one is suitable - without a drive, without a spring, with a damper that is not divided into segments and is shifted relative to the center of symmetry by its axis of rotation.

Of the three air valves shown, only the one on the left is suitable for our purposes.
After we have selected and purchased the valve, we will have to tinker with installing it in the desired position. In normal mode, the air valve should work like this: there is no air movement - the damper is closed, the air flow opens it. We need to get the opposite result: while the hood is not working, the valve must be completely open. When the hood is turned on, the air pressure from inside the duct should close it. The relatively weak natural movement of air from the room into the duct should not affect the operation of the valve.

The principle of operation of a check valve when connecting a hood to a natural ventilation duct. The illustration shows a spring-loaded valve with a two-piece flapper. Theoretically, this type of valve can be used for our purposes, but in practice it is not easy to select it so that the closing force and air pressure coincide
In the standard position, such a valve is positioned in a horizontal channel in such a way that the damper mounting axis is positioned horizontally, and the larger (and heavier) segment of the curtain “looks” down. In this case, the valve, if there is no air pressure, will be closed. We need to achieve the opposite, the valve must be open. This can be achieved in two ways:
- Install the valve strictly horizontally so that the mounting axis is rotated at an angle of 5-60º to the vertical, while the larger damper sector should be at the top. The angle of inclination at which the damper will be fully open when the hood is not working will have to be selected experimentally. The force to pull the damper and close the valve must be sufficient; a low-power hood may not provide it.

Option for installing an air valve with an inclination of the damper rotation axis

Once the valve is installed and adjusted, the vent can be covered with a grille.
- Position the valve axis strictly vertically, but tilt the valve itself slightly (about 5º) towards the entrance to the natural ventilation channel. The larger segment of the damper should “look” towards the channel. In this case, it will outweigh and the damper will open under its own weight, just as crookedly hung doors open by themselves. The required force to close the valve will be small; you can use a hood of any power.

The axis of rotation of the air valve is set strictly vertically, but it itself is slightly tilted towards the channel. Notice how the valve was hidden in the cabinet for the built-in hood. Air will enter the cabinet from the hole in the top shelf
From the following video you will learn how to use a non-return air valve to connect a kitchen hood to an existing vertical duct, ensuring its maximum performance and without disturbing natural ventilation:
Centralized forced ventilation systems
It is worth mentioning centralized ventilation systems. Office buildings and hotel complexes often have a single ventilation system serving all areas of the building. In housing, as a rule, ventilation is combined within an apartment or private house.
Centralized forced ventilation can be exhaust, supply and exhaust and supply and exhaust with heat recovery. We are convinced that only the last option is suitable for the domestic cold climate.
A supply and exhaust system with heat recovery is not cheap, but it provides real benefits in the form of savings on heating costs and a favorable microclimate. Options without recovery at lower costs are ineffective in our cold climate.
In the supply and exhaust system, air is removed from “dirty” rooms and supplied to “clean” rooms through a system of ventilation ducts. Exhaust and fresh air “meet” in the recuperator, where thermal energy from the heated air being removed is transferred to the cold air coming from the street. In this case, the air flows do not mix.

Operating principle of a ventilation unit with a plate heat exchanger. Warm exhaust air and cold fresh air pass in opposite directions through a heat exchanger consisting of many plates made of a material with good heat transfer. Warm air, without direct contact with cold air, gives it thermal energy
A properly designed and installed ventilation system with heat recovery ensures the transfer of up to 90% of thermal energy from warm air to cold air, which can significantly reduce heating costs and supply air at a comfortable temperature to the premises.
Supply and exhaust recuperative ventilation systems are best suited for modern energy-efficient houses. In Scandinavian countries, this type of ventilation has been mandatory for buildings under construction for many years now, replacing natural exhaust hood.

Installation of a centralized supply and exhaust ventilation system with heat recovery. The exhaust air is collected in “dirty” rooms, and fresh air heated in the heat exchanger is supplied to “clean” rooms.
It is problematic to combine centralized ventilation systems with gas stoves. For a gas stove, you will still have to provide natural ventilation from the room or install complex emergency automation. It is difficult to adequately combine two different ventilation systems (with an exhaust hood - three) in one room. An electric stove does not create such problems.
Local forced ventilation devices (room ventilators)
Local ventilation devices with heat recovery (room ventilator) also deserve mention. Their operating principle is similar to central systems: the outgoing air heats the incoming air. The ventilator provides ventilation in one separate room.

Some models resemble the internal units of split air conditioners in shape and dimensions. The illustration shows a MitsubishiElectricLossnay room ventilator. The circulation fan is located on the right side of the case, the paper heat exchanger is on the left. To install it in the outer wall, you need to drill two holes with a diameter of 8 cm
Equipping a house or apartment with local forced ventilation with heat recovery is several times cheaper than installing a centralized system. And the level of comfort obtained is not much lower.
Local ventilation with recovery is very good for living rooms. A ventilator in the kitchen wouldn’t hurt either, but natural ventilation and a powerful hood vented horizontally into the wall would be more useful. When choosing local ventilation devices, preference should be given to those models in which the volume of supplied air exceeds the volume of air removed.

A popular and relatively inexpensive “breathing” room ventilator, where the removal and supply of air occurs alternately through one channel. A ceramic recuperator accumulates heat while warm air passes through it and then releases it to cold air

The procedure for changing the ventilation cycles of a “breathing” ventilator. This device is well suited for living rooms, but not for the kitchen
What type of ventilation to choose for the kitchen in a house or apartment
Those who are building a solid country house or furnishing an elite apartment, or constructing an energy-saving building using “passive house” technology, should pay attention to an expensive, but comfortable and economical system of forced supply and exhaust ventilation with heat recovery. In the kitchen you should install a powerful hood with outlet to the wall; it is better (and healthier) to use an electric stove. If the house has a gas boiler, the room where it is installed must be equipped with natural exhaust and independent air flow.
For those who are building their own house on a more modest scale and have a limited budget, we advise that you definitely provide vertical channels for natural ventilation in the kitchen, bathrooms, furnace room, bathhouse, utility room and hallway if clothes are dried there.
Ventilation in a private house in the kitchen should be supplemented by a hood above the stove with a separate air duct. It is best to route the duct for removing air from the hood not to the roof, but through the outer wall to the street. A check valve should be installed outside to prevent cold air from entering inside. A fan on the natural ventilation channel should be installed in the toilet and bathroom; in the kitchen, if there is a hood, this is not particularly necessary.

It is best to route the air duct from the hood outside through the outer wall
For an apartment, we recommend a similar option: natural ventilation (available by default), a good exhaust hood above the stove, a fan in the bathroom. It is advisable to vent the hood through the wall; if this does not work, use the scheme described above with a check valve. In our opinion, an additional kitchen fan is not needed.
Finally, we would like to remind you once again that a properly selected and installed kitchen hood and fan will add comfort, but will not replace the natural ventilation system. And incorrect connection of the hood may not only not improve, but also significantly worsen the performance of ventilation. We recommend that you pay special attention to the issue of room ventilation, entrust its design and installation, and the connection of the hood only to competent craftsmen.
A kitchen hood is a type of household appliance that eliminates unpleasant odors and removes combustion products, grease and other particles from the air.
Often, when renovating and remodeling a kitchen, the old hood is no longer suitable in size or appearance. In this case, a homemade hood can help, which anyone can do.
What you need to know before work
Before you start developing a homemade kitchen hood, you need to understand exactly how such a device functions, look at photos of ready-made models online to choose the best option for yourself.
Not everyone knows that there are types of devices that do not simply extract exhaust air, but process it with special filters, releasing it back in a purified form. Some models simply remove the air mixture from the kitchen through the ventilation system to which they are connected.
Therefore, the first thing you need to do before developing hoods with your own hands is to make sure that the ventilation system in the house is working properly.
If the ventilation is dirty, the draft force will be reduced or may even be absent altogether. As a result, the hood will not be able to perform its functions. Therefore, before starting all work, it is important to clean the air mixture exhaust system from the kitchen.
When plastic window structures with high tightness are used in the kitchen, special ventilation valves should be installed on them, otherwise the operation of the hood will be low in efficiency.
A DIY kitchen hood can be one of two types:
- active;
- passive.
Passive-type models remove the air mixture from the room only due to upward draft, since they do not have any fans or electric motors. As a result, a self-made hood of this type can only work if the ventilation is in excellent condition.
Active hoods operate thanks to an installed electric motor. Such models are highly efficient, but consume a lot of electricity.
Required materials and tools used
The next stage of the process, the result of which will be a do-it-yourself kitchen hood, is preparing or purchasing all the required tools along with materials. Among them:
- sheets of plasterboard, characterized by increased resistance to moisture;
- profiles with galvanized surface;
- perforated corner;
- corrugated pipe;
- fasteners;
- insulating material for corrugation;
- paint and putty, spatula and brushes;
- hammer drill and screwdriver;
- corner covers.
Sequence of work

After preparing all the required materials along with the tools, you can begin to carry out the necessary work. Their first stage is marking the future device and its air duct on the walls of the room. The simplest option is when the ventilation hole is located directly above the hob. If it is somewhere to the side, it is also necessary to develop a box for decorating the corrugation.
If the kitchen ceiling is finished with plasterboard, the air duct can be partially decorated with it.
The next step requires making a frame to accommodate the air duct using galvanized metal profiles. They are mounted where the air duct will pass in the future, using anchors. If the pipe is not straight, the profile will need to be installed with bends in the required places. The initial profile - the starting one - is installed downwards in several parts, securing them with self-tapping screws.
The next stage is the completion of the arrangement of the plasterboard box. To do this, a second panel is installed on the already finished parts. Upon completion of the development of the lower part, transverse strips are installed on top of it, later they will be sheathed with sheets of plasterboard.
At the fourth stage, you need to make the body of the future hood. Above the stove, the lower part of the exhaust device, made of a profile, is installed on the wall. The task will be greatly facilitated when a niche is provided for the device. If it is not there, then the lower side of the hood should also be attached to the sides from the sides. The main components of the hood are made from a profile, attaching them to the bottom. To give the structure greater rigidity, it can be reinforced with jumpers, which are also made from a profile.

To prevent unnecessary noise during operation of the hood, the pipe must be wrapped in high-quality soundproofing material.
The last stage is finishing the device. To do this, the hood body and the duct with the air duct are sheathed with sheets of plasterboard. Next, a layer of putty is applied to it, which will hide the seams between the sheets and fasteners. After this, all that remains is to paint the hood and the box; you can also decorate them instead.
This type of design is suitable for both passive and active exhaust devices. In the second case, an electric motor must also be installed inside the device body, connected to a grounded outlet. It will create a strong draft that will quickly remove waste air from the kitchen.
Features of frame development

To make the appearance of the finished device attractive, you will need to perform the following work.
Assemble the main body of the device, installing a grille and, if necessary, an electric motor on its lower part. If at the initial stages of work the structure does not look very attractive, do not worry - the cladding will qualitatively hide any unevenness.
Next, the frame is attached to the base; everyone chooses its shape independently, depending on their own preferences. The main thing is that the air duct pipe must be placed inside. In this case, you can look at ready-made ideas in photos from the Internet or do everything yourself.
Finishing parts are cut out from the selected material and used to cover the frame. After the glue has dried, the surface of the material is sanded and a layer of putty is applied to it. After it dries, all that remains is to paint the finished hood, made by yourself, in the desired color.
Having done everything correctly, you will make a high-quality and functional hood with your own hands, which will not only do its job perfectly, but also have an attractive appearance.
Thus, the process of developing a hood with your own hands does not imply anything complicated, so anyone can do it themselves. The result is a functional exhaust device that will have a completely original appearance.
In this article you can learn how to make a kitchen hood yourself in several not very difficult steps.
Materials and tools used by the author to create a kitchen hood:
-thin furniture plywood 4 mm thick
- wooden blocks with square, rectangular and round sections
-baguette and corner strips
-decorative wooden lattice
-PVA glue
- putty and primer for wood
-serpyanka construction
- self-tapping screws
-grout and tile adhesive
-matte white paint
-electric jigsaw
-hacksaw
-screwdriver
-wood drills
-various sandpaper
- carpentry clamps
-brushes and paint roller
-roulette
-pencil
-cardboard
-large steel square
-construction stapler
- Phillips screwdriver
-knife
Detailed description of making a kitchen hood:
The author was faced with the following problem: when ordering a new kitchen unit, the space for the hood was calculated disproportionately to it. It would be possible to buy a new hood, but basically they all have standardized sizes and were either a little larger or a little smaller than needed. But the biggest disadvantage is that even if you find a hood of the right size, it is not a fact that it will look harmonious with the rest of the kitchen set.
Therefore, it was decided to make a kitchen hood ourselves. Thus, immediately solving the problem with the non-standard size and design of the hood for the new kitchen.
A Czech-made hood was used as the main components for the parts of a homemade kitchen hood. Its body has a pyramid shape and an unprepossessing design, so it was decided to make a new case for it.
Step one: creating sketches.
Before creating the body for the new hood, the author made several sketches of how it should look.


Search for different solutions for assembling a hood:

Step two: base for the hood.
When all the basic technological solutions for creating and assembling a new kitchen hood were found, the author immediately began working on it. Due to the fact that we had to work under normal conditions, and not in a workshop where various special machines and equipment could be used, the work took quite a long time and painstakingly.
To begin with, the base for the hood and its portal were assembled.

Then the portal was framed with purchased baguette and corner strips, respectively.

Step three: creating the hood frame.
In order to give the hood the shape of the unusual design that the author had in mind, he made a carpentry frame according to the previously given sketches.


Step four: cutting and preparing the walls.
Then templates were made for the wall of the future hood. Thin cardboard was used to make them.

After that, using the templates obtained, the walls themselves for the hood were cut out of plywood.

They were carefully sanded and covered with primer.

Step five: installing the walls.

Next, the joints of the walls were taped with sickle tape, the surfaces were puttied and sanded for further painting.

Step six: decorating the outer part of the hood and installing it.


After this, the hood was ready, all that remained was to install it in its rightful place. Tile was laid under the chosen mounting location for the hood. After which the author attached the hood to the wall.