LED strips quickly gained popularity and are firmly integrated into our lives and everyday life. They turned out to be indispensable for decorative or background lighting of residential and office interiors. At the same time, these lighting devices have unique qualities for creating unusual effects when creating architectural lighting design in the exterior of both private houses and administrative buildings or industrial facilities.
But, unlike those equipped with a control circuit and intended for direct connection to the electrical network, LED strips must be switched on through additional driver adapters (power supplies, dimmers, control units). Read more about their characteristics. On the one hand, this creates additional complexity during installation, on the other hand, it allows you to significantly diversify the switching methods, creating unique lighting effects, as well as adjust the brightness control, or dimming.
Features of LED strip control
A semiconductor LED is a specific device. It has a significantly nonlinear current-voltage characteristic (volt-ampere characteristic). The current flowing through it, starting from a certain “threshold” value, grows very strongly, until the LED itself burns out, even with a slight change in the voltage drop across it. Therefore, connecting it directly to the power source will either have no effect if the source EMF is less than the diode “opening” threshold, or otherwise will cause the LED to instantly burn out.
This forces control device circuits to use elements that limit the current through the device, so in circuit design they are called “stable current sources.”
In the simplest case, this function can be performed by a regular resistor, and to ensure this stability, its resistance must be sufficiently large. But at the same time, the EMF of the voltage source must be high.
It would seem that nothing could be simpler! We connect the LED through a damping resistance directly to the electrical network - the voltage is high, a limiting resistor will need a large value: everything is as we wanted! But this scheme has a significant drawback. Eg:
- For an average white LED in operating mode, with a voltage drop of about 3 V, the current is ≈ 20 mA.
- The resistance of the quenching resistor is (220 – 3) / 0.02 ≈ 10.85 κΩ.
- At the same time, the power dissipated on it is 217 × 0.02 ≈ 4.3 Wt.
As can be seen from the example, the limiting resistor will uselessly lose electrical power, greater in magnitude than the LED itself requires for its operation.
In order to compensate for the disadvantages of such a circuit, LED lighting devices must be powered from a special low-voltage source, which provides them with a stable output current. In LED lighting lamps of E27, E14 and other standards, such a circuit is built into their design, similar to how small-sized lamps are controlled. Moreover, depending on the purpose, not only the diode driver is turned on, but also the dimmer circuit.
For LED strips, such a current source is manufactured as a separate module. It has an output voltage of 12 or 24 V with output current limitation. The tape connected to it must have the appropriate input voltage; limiting resistors for it are installed structurally on the tape itself, ensuring its optimal operating mode. The output power of the dimmer power supply and control unit must correspond to the number of LED strip modules.

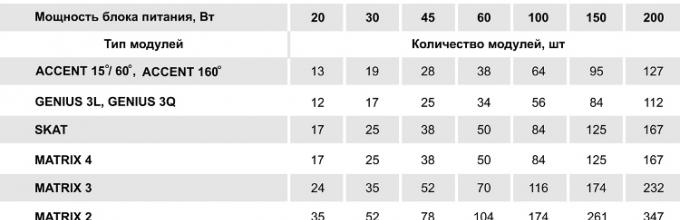
Ratio of block power to number of tape modules
The tape must also have a certain length, not exceeding a certain value - usually 5 m. If a tape of a shorter length is required, it can be shortened, but only at the points indicated for this. When it is necessary to extend the tape, the next piece of it should be connected not to the output of the previous one, but directly to the power supply or to a special amplifier, even if this requires laying an additional pair of wires.
After the correct power supply to these devices is ensured, we are faced with the task of adjusting the brightness of their glow. Read about how the brightness of LED lamps is controlled by dimmers. Now let’s look at what concerns LED strips.
Main types of dimmers for LED strips
To solve this question, you can again use the simplest method of adjustment: a variable resistor - rheostat or potentiometer. But here again the high nonlinearity of the LED’s current-voltage characteristic comes into play: adjustment, even when using potentiometers with a logarithmic resistance change characteristic, occurs on a very small portion of their scale.
In addition, the power losses of such a circuit, although not so significant, still significantly reduce its energy efficiency.
Instead of passive regulators, active dimmer control circuits based on semiconductor devices were developed for this purpose:
Controllable current sources
Analog control circuits that allow you to maintain a stable output current in the required control range with a low voltage drop, and therefore with small power losses on the control element.
However, these devices are not without their disadvantages:
- When the operating current through the LED changes within 20~100 mA, the power dissipated on it changes quite widely, and therefore the temperature of the device.
- When an LED is heated strongly, many of its characteristics change significantly, including color temperature, which is expressed in a change in the spectral composition of the emitted light.
- Prolonged operation at high temperatures reduces the durability of the device and increases the risk of failure.
Pulse dimmers
Most of these disadvantages are absent from pulsed LED brightness controllers, the most commonly used type of which is pulse width modulators (PWM). Moreover, due to the very low inertia of LEDs, such dimmers turned out to be the most effective for them.

Mini PWM dimmer
The essence of their action is to change the duration of the working fraction of the period of the rectangular-pulse current supplied to the device relative to the zero level. This fraction of the period when the maximum voltage acts in it is called latitude. It can vary from 0 to 100%, accordingly causing a change in the effective voltage value on the device.
The output current remains stable at the most optimal level. The spectral composition of the radiation does not change, the dissipated power remains within the range of nominal values. And power losses on the dimmer itself during its pulse mode of operation remain minimal.
In addition, controllers with a pulse control method are most suitable for digital and computer lighting control.
Diagram for connecting a dimmer to an LED strip
Two types of LED emitters are used in the design of LED strips:
- RGB are three-color colors that, when mixed, produce a white glow. When switched on separately, they can be used to create different color effects.
- Phosphor - use secondary radiation from a special yellow phosphor layer, illuminated by a powerful blue LED.
To power them, appropriate designs of drivers and dimmers must be used, the complexity of the circuits of which is determined by the range of tasks and the set of required effects.
For white monocrystal tapes - single-channel dimmers connected after the power supply.

Single-channel dimmer connection diagram
For RGB strips - three-channel controllers with separate control for each channel.

Three-channel dimmer connection diagram
Dimmers also differ in the way they are adjusted:
- using a potentiometer built into a standard wall switch box;
- infrared or radio frequency remote control;
- connecting to a computer network via a wired Ethernet interface or wireless Wi‑Fi or Bluetooth.
In addition to individual dimmer modules, combined devices are also produced, combined in one housing with a driver.
Advantages and disadvantages
The main disadvantage of cheap PWM controllers is increased flicker, especially at low brightness levels, when the eye is especially sensitive to such fluctuations. In addition to unpleasant sensations, with prolonged exposure it can cause psychophysiological effects in the form of headaches, increased fatigue, deterioration of attention and visual acuity.
For high-quality control of LEDs, the industry is now producing specialized microcontrollers. For example, the LM3409 chip allows control in two analog and two pulse modes.
Here it must also be said that a good dimmer must take into account not only the characteristic nonlinearity of a semiconductor LED, but also the nonlinear characteristic of our visual perception at low brightness levels.
The advantages of LED lamps are obvious to everyone today. And the growth in production and continuously falling prices give everyone the opportunity to evaluate them in action. Moreover, they cease to be just lighting fixtures, but also become unique decorative elements.
In contact with
A dimmer for an LED strip is an electrical device that combines a switch and a dimmer in a single housing, installed in the LED strip control circuit. Its operation is based on smooth adjustment, the rheostat principle, of the voltage level supplied to the lighting circuit. Due to this, the brightness of the lighting is adjusted from 0 to 100%. The dimmer is installed and connected to the network in the same way as the switch.
Some manufacturers install a choke in the dimmer chip, which can be used to cut off interference and noise created during operation.

Types and features of dimmer control
Based on their design features, they can be divided into the following options:
- modular - devices of this type are mounted in distribution cabinets;
- monoblock - installed in a mounting box instead of a switch.
According to the method of controlling the lighting system, dimmers are divided into:
- A device with a separate light switch button and a wheel for adjusting the light.
- Sensory. The brightness of the LED strip is adjusted by touching the sensors on the panel or using the remote control.
- With a handle on a turn-and-press mechanism. Switching on is carried out by pressing the control, and setting the required level of illumination is by turning in one direction or another.
- Turning. Almost the same, but the difference is that turning on and regulating is done by turning the knob.
- Devices with keys. Changing the light level is achieved by pressing a key.
- Remote. Controlled using remote controls.
- Acoustic. They are activated by clapping or voice commands.
- Multichannel devices. Help control lighting in several points of the room at once. For example, if necessary, highlight some areas of the room by adding a lighting level and at the same time reduce the brightness in others. As a rule, they are equipped with wireless or remote control via remote control or using a telephone.

Operating principle of pulse width modulators
PWM is a method of influencing a controlled network by changing the amount of power supplied to it. The principle of operation is to regulate the duration of the pulses at a constant frequency. Pulse width modulation can be binary, ternary, digital, analog.
The use of PWM makes it possible to significantly increase the efficiency of electrical converters. Using pulse width modulation, single-cycle, push-pull, half-bridge, bridge, inverse and forward pulse converters are controlled.
For example, PWM is actively used in the production of electronics, such as LCD screens, phone and laptop displays to control the brightness of the light.

Connection diagram
Before you start assembling a circuit with a dimmer, you need to check the power characteristics. The power of the LED strip should not exceed the values indicated on the device body (it is better if these indicators are lower). If the dimmer is designed to control a power of 150 W, the ideal option would be for the LED strip to consume about 147 W. This will help the device last a very long time.
As for the installation itself, it is necessary to follow the generally accepted operating procedure for all electrical networks:
- First of all, you need to turn off the power to the network in which the installation will be carried out. The absence of voltage is checked with a tester or multimeter. It is necessary to make sure that there is no possibility of accidental current supply, and if necessary, post a warning sign.
- An LED strip is installed in the room, and a dimmer is installed in the installation box using appropriate fastening materials and tools.
- The phase and neutral wires must be connected to the terminals marked L and N, respectively. It is necessary to determine the position of the supply conductors before disconnecting the network.
- Upon completion of installation, the functionality of the assembled circuit is checked.
![]()
Single color
The LED strip is powered by a 12 V DC source, and the household network is powered by a 220 V AC source. The dimmable LED strip is powered through a 220/12 V converter. The neutral and phase of the network are connected to the input, and the LED strip is connected to the output.
It is important not to confuse the polarity of the conductors. If connected incorrectly, the tape simply will not work.
To connect an LED strip longer than 5 meters, you can use several installation options:
- Use multiple power supplies. Each tape has a separate power source.
- One power supply. Each tape is connected in parallel to each other to the output of the converter.
Important! The power supply must have enough power to power several LED strips.
RGB
The installation method is exactly the same as with monochrome tape, with a slight difference. After the power supply, an RGB controller is installed, which allows you to control the color of the LED strip. It is important to consider the controller power when selecting the number of RGB strips.
Now about the connection itself. The reduced voltage from the power supply is connected to the V+ and V- terminals. Connect to the pins on the output:
- R (red) - red wire;
- G (green) - green conductor;
- B (blue) - blue wire;
- V+ - yellow common wire.
Each wire, except yellow, is responsible for the corresponding color of the tape. It is necessary to accurately connect each conductor to its socket. Nothing bad will happen, but the colors will not appear correctly.

Advantages and disadvantages
Advantages of dimmers:
- Setting the required level of illumination in the room depending on the requirements of the situation.
- Ability to regulate the amount of electricity consumed by the lighting system.
Disadvantages of dimmers:
- Dimmers are extremely “gentle” in terms of overheating. They have this property because they are based on a microcircuit. Before purchasing, you need to know how much power the dimmer should control.
- The dimmer is also demanding on the minimum load value. If the values indicated on the case are lower, the device will fail very soon.
- Many people still use and are unlikely to part with fluorescent and energy-saving lamps soon. And they, as their manufacturers warn, either cannot be adjusted at all, or they can be adjusted, but this significantly reduces their service life.
DIY dimmer on a chip
You can assemble the dimmer yourself on a simple single-sided printed circuit board made of foil PCB.

A diagram of printed circuit conductors and installation can be found below.
- Assembly sequence:
- First you need to install a connector for mounting external circuits.
- The next components will be resistors and capacitors.
The diodes and the microcircuit must be soldered before installing the field-effect transistor.
After soldering is completed, it is imperative to remove the jumper at the output contact of the transistor, protecting the assembled device from combustion.
The finished device can be placed in any convenient case with a hole for the cable and a variable resistor R1. When changing the position of the handle of the latter, the frequency of the pulses will change, which ranges from 5 to 100%, and the degree of illumination of the room - about 20 times, respectively.
As for the longevity of the lighting system with a dimmer, much will depend on the accuracy and correctness of load calculations and the selection of equipment suitable for the parameters. The ease of use of a particular control option can be determined in an electrical goods store and the most suitable dimmer can be selected. For example, with voice control, so you don’t even have to touch the controls.
A dimmer for an LED strip (also known as a dimmer) is used to adjust the brightness of LED lighting by changing the supplied voltage or current (depending on the method). With its help, you can “dim” the light in the room at any time or make it very bright with literally one click of a button.
The regulator allows you to extend the life of the LED strip, since reducing the intensity of the luminous flux prevents the LEDs from overheating, and it is overheating that negatively affects the life of any LED lamps.
Dimmers used for incandescent lamps () are not suitable for LED strips due to different operating principles.
Any dimmer is connected between the lamp itself (strip) and the power supply. In this case, it is necessary to take into account the rated voltage of the device - if the power supply is designed for 24V (or any other voltage), you cannot use a 12V dimmer with it.
By the way, 12 volt dimmers are considered the most “popular” in everyday life and the most widely used; they are used to adjust the brightness of LED strips.
According to the control method, dimmers are divided into:
- Rotary – the simplest model, nothing superfluous. The brightness of the lighting is adjusted by turning the knob.
- Rotary-push - turned on by pressing the knob, the brightness is adjusted by rotating it.
- Keyboards look like a regular switch. A simple press turns on the light, holding the button adjusts the brightness.
- Touch dimmers do not have moving parts in their design; instead, a touch panel is installed. Otherwise, the operating principle of such a device is no different from simpler models.
- With remote control - adjustment is carried out using the remote control.
Almost all regulators are simple and easy to use, do not have serious drawbacks, but like many electrical appliances, they cannot withstand overheating and voltage surges in the network. Some older models can create electromagnetic interference, including interfering with radio operation (modern dimmers do not have this problem).
Kinds
There are a great variety of dimmers available. If desired, such a device can be selected to suit any tasks and needs. In this article we will briefly talk about only some popular types.


Appearance

Connection diagram
Video
The video shows an interesting example of how a light controller works with an audio input. Implemented color music from . The tape changes colors and light levels to the beat of the music.
By the way: in both of the above cases, dimmers with controllers (microcontrollers) are used. The dimmer itself is not capable of working according to a specific program - it only serves to change the brightness of the diodes. To “force” the dimmer to change brightness in accordance with a given scheme, rgb and audio controllers are used.
Connection to LED strip
Despite the fact that the connection diagrams will also be different for different types of tapes, in any scheme the dimmer is connected on one side to the power supply. If the tape is monochrome, then its connection will be directly through the dimmer; if it is multicolor, then a controller will also be added to the circuit - between the dimmer and the tape itself (unless the controller is not initially combined with the regulator).
Sometimes an amplifier is also included in the circuit - if the power of the connected devices exceeds the power of the power supply element. An example of a typical LED strip connection diagram using a dimmer:

DIY dimmer on a chip
Despite the fact that you can find many types of dimmers on sale, some craftsmen prefer to assemble such devices themselves. As an example for assembly, consider a dimmer on a microcircuit, which is quite easy to configure and has protection functions.

The reference voltage at the control electrode is created using resistor R2. The output value is adjustable from 12V (maximum) to any minimum, down to a tenth of a volt. For optimal cooling of the integral stabilizer (KREN), the installation of an additional radiator is necessary, and this is perhaps the only serious drawback of such a homemade lighting controller.
Should I use a dimmer for LED strip?
Definitely worth it. Even a non-professional can install such a device, but the dimmer itself greatly expands the functions and capabilities of the LED strip. For example, you can refuse a large number of lamps of different power, since the same strip will shine with different brightness, replacing both a large chandelier and a small night light.
Such lighting is very convenient in a children's room - when the child falls asleep, you can simply dim the light to a minimum, without worrying about the wiring or the fact that the child will wake up at night in the dark and get scared.
Fans of home parties will definitely love the lighting effects that can be created using a dimmer with an audio input. And this is only a small part of the ways to use dimmers and LED strips in ordinary apartments and houses.
- Incorrect installation and connection with errors
Here are the main three rules and mistakes that you need to pay attention to first.
1 rule

The LED strip is connected in parallel, in sections of no more than 5 meters each.
It is even sold in reels of this meter. What if you need to connect 10 or 15m? It would seem that you connect the end of the first piece with the beginning of the second and you're done. However, such connection is prohibited. Why is this so accepted?
Because five meters is the estimated length that the current-carrying tracks of the tape can withstand. With a longer length, the load will exceed the permissible one and the tape will definitely fail. In addition, uneven glow will be observed. At the beginning of the strip, the LEDs will shine brightly, and at the end they will be much dimmer.
This is what a parallel connection diagram for LED strips with a length exceeding the permissible length will look like: 
In this case, the tape can be connected both from two sides and from one. Connecting on both sides allows you to reduce the load on the current paths, and also helps to avoid uneven glow at the beginning and end of the tape. 
This is especially important on a powerful tape - over 9.6 W/meter. This is exactly how professionals who have been installing LED products for many years advise connecting. The only big drawback is that you have to drag additional wires along the entire lighting.
Rule 2

The LED strip must be mounted on an aluminum profile, which acts as a heat sink.
During operation, the tape heats up, and this temperature negatively affects the LEDs themselves. They simply overheat and begin to lose brightness, gradually degrading and collapsing.
Thus, a tape that could easily work for 5-10 years without a profile will burn out in a year, and maybe even earlier. Therefore, the use of aluminum profiles in LED lighting is mandatory. 
The only tape where you can do without it is SMD 3528. It is low-power, only 4.8 W per 1 m and is not so demanding on heat dissipation. 
Tapes filled with silicone on top especially need heat removal. In them, heat transfer occurs only through the substrate, from below. And sometimes this is not enough. If you also stick it on some kind of plastic or wood, then there will be no cooling at all.
Rule 3
 The correct choice of power supply is a guarantee of long-term and safe operation of the entire backlight.
The power supply must be 30% more powerful than the LED strip.
Only in this case will it work normally. If you select it closely, exactly according to the power of all LEDs, then the unit will constantly work at its limit. Naturally, such work will affect the duration of operation. So always give him some extra.
Connecting LED strip
To install lighting using LED strip you will need:


Installation of 220V power supply
If you have not completed electrical installation work, then you must first supply 220V voltage to the connection point of the tape. To do this, ditch the wall, or lay a cable channel and stretch a three-core VVGng-Ls 3*1.5 cable along it. Lead it directly to the distribution box where the power supply for the LED strip will be connected. 
You can use the existing junction box where the main lighting is connected. The main thing is that the space allows you to freely connect additional wires and terminal blocks.
It is advisable to install the switch on the LED strip on the 220 Volt wires, and not in front of the strip on the outgoing 12-24V. In this case, the unit will not work continuously. Moreover, it is contraindicated for pulse units to operate without load. In addition, this will increase the level of security. 
Pre-check and do not confuse phase, neutral and ground. Most often, the neutral is blue, the grounding conductor is yellow-green, and the phase conductor is of any other color.
But you can’t trust color coding alone! More details on how to distinguish zero and phase without errors can be found in the article “How to determine phase and zero in electrical wiring.” 
Next, you need to lay a cable from this junction box in a groove, corrugated sleeve or in a cable channel to the future location of the power supply. To place it, install a convenient shelf. It can be made from pieces of plywood or drywall. Place a dimmer nearby. 
Connecting the power supply
Having stretched the cable to the block, you can proceed directly to connecting the wires.
- connect the phase wire to connector L
- blue wire - zero, to terminal N
- yellow-green - to the terminal marked as Pe or with a ground symbol

Dimmer connection
Now you need to connect the dimmer. Here use flexible mounting wire PuGV 1.5mm2 in different colors. For example, black (for negative contacts) and red (for positive ones).
- measure and cut the required wire size
- clean the ends and crimp them with NShVI tips
 First of all, connect the ends from the power supply side. Connect the negative wire (black) to the terminal marked –V. Positive wire (red) with terminal marked as +V.
Both wires must be connected to the dimmer side Power IN(input power). Connect the red wire on the dimmer to the positive terminal DC+, and the other wire to the minus terminal DC-
Next comes the installation work of laying the wire again. Stretch it in a corrugation from the dimmer to the point of connection to the LED strip. Use the same PuGV. If the total length of the LED strip and backlight exceeds 5 meters, the strips are connected in parallel. Moreover, each of them is supplied with separate power. 
Proceed to connect the wires to the dimmer terminals. They usually have an inscription and are designated as Output Led. For reliable contact, it is better to crimp the stripped ends of the cores with tips. 
Installation and soldering of wires on LED strip
You can proceed to installing the tape itself. To do this, you need to measure it and cut it into the required pieces. This can not be done in any place, but only where the dotted line is applied or scissors are drawn. 
After cutting, the wires can be soldered to special contacts on the tape. For the same purposes, as well as for connecting individual pieces of tape to each other, connectors can be used. 
Look for the negative terminal and connect black wires there. Accordingly, another wire goes to the plus contact - red. Do not heat the soldering iron to maximum, otherwise you will easily burn the substrate. Recommended soldering time is up to 10 seconds. 
The opposite ends are also cleaned and NShVI tips are installed on them. 
Remember once again that for better cooling, you only need to lay the LED strip on an aluminum profile. It is installed in advance.
After all this work, all wire strands are brought out to one place and connected to the corresponding supply wires, observing the phasing (positive and negative contacts). 
The connection is best made using Wago terminals.
A dimmer for an LED strip is a device through which the luminous flux is adjusted. Light-emitting diodes are characterized by fairly bright, directional light, so it is recommended to provide the ability to reduce the intensity of the glow of such devices. This type of lighting is easy to install with your own hands, regardless of which control method is chosen (remote control, wall controller, etc.).
Source Control Features
An LED strip will not work normally without additional equipment, the function of which is to limit the amount of current that flows through the strip. A 12/24 volt power supply is used as such devices. Taking into account the features of the lighting system and the requirements of the homeowner, a dimmer is added to the circuit.
With its help, the intensity of the glow and the power of the device change up or down.
It already contains in its design a low-voltage source through which the device is connected to the network, whereas in the case of a strip device based on diodes, the 12-volt power supply and the dimmer are a remote module that is connected separately.
Device structure
The dimmer and power supply must match the power of the LED strip. Depending on what type of lighting device is used, the operation can be controlled by a special remote control.

Dimmer device, purpose of terminal blocks
To do this, another device is introduced into the circuit - a controller; it is used exclusively for the purpose of regulating RGB strips.
Types of dimmers
As an alternative to the 12 volt dimmer, you can imagine the option of including a variable resistor in the circuit. But in this case, there are large power losses, which directly affects the operating efficiency of the lighting device. Therefore, today dimming of strip devices is used.
Main types:
- Controlled (analog) versions. They create normal conditions for operating the lighting device: small power losses and stable output current. However, there are also disadvantages, in particular, the dimmable tape will quickly heat up, and this directly affects the service life of the light source. In addition, an increase in temperature also affects the quality of lighting, as the color temperature changes.
- Pulse analogues. They do not have the obvious disadvantages that characterize controlled dimmers. In addition, models of this type have a number of advantages: the luminescence spectrum does not change, which means the color temperature will remain at the same level; minimal power loss; stable output current.
It is not surprising that dimming today is more often implemented using 12V pulse devices. This option allows you to organize lighting with the possibility of remote control.
 There are different options for such devices, differing in the way they adjust the light intensity:
- built into a wall switch;
- remote control;
- wired or wireless connection to a computer.
The dimmer is selected in the same way as the 12V power supply: the power value of each device corresponds to the characteristics of the LED strip.
In addition, a 12V dimmer should be able to withstand about 20-30% more load than the light source can put on it. The 12V power supply is selected in a similar way.
Connection diagram
Dimmable tape of different types (monochrome, multicolor) is mounted based on a diagram, which will be different for each case. However, common to all options is the need to connect the contacts of the dimmer and the power supply.
In the case of connecting a single-color LED strip, the following devices are present in the circuit: a power supply element, a dimmer, and the strip itself. If you plan to install a multicolor light source, a controller is also added.
In each case, it is necessary to carefully select the power supply and 12V dimmer. In the case when the power of the connected lighting devices exceeds the value of this parameter of the power element, an amplifier is added to the circuit. Tape instruments are usually offered in reels that can hold a 5m strip.
To get a shorter piece, you can cut the tape, for which there are special notches on the body. And in order to connect a much longer strip (for example, several tapes up to 5 m long each), parallel connection of strip devices is used.
 The figure shows a 12V power supply connected in series with a dimmer, to which a dimmable LED strip is already connected. This lighting option does not require complex knowledge and extensive experience in such work, so it can be easily assembled and placed in the right place with your own hands.
Let's look at the pros and cons
The main advantages of installing a dimmer together with LED strips:
- ease of use of the backlight, especially when controlled by remote control;
- wider possibilities, since instead of installing several lighting fixtures with different levels of lighting intensity, you can install a strip based on diodes, which, if necessary, will serve as bright or dim light;
- Easy installation, thanks to which the tape can be installed relatively quickly with your own hands.
The features of using various types of dimmers have already been discussed above.
But impulse performances have one feature that negatively affects not only the perception of lighting, but also well-being (increased fatigue, headache, decreased performance, etc.).
This is explained by the fact that some models (most often these are cheaper versions) of pulse regulators are characterized by flickering, the intensity of which is felt to a greater extent at the minimum brightness levels.
But today microcontrollers are offered that can operate in analog and pulse modes, which solves this problem.
Thus, when choosing a dimmer, you must be guided by its power level. It is important that the value of this parameter matches the load applied to the device. The power supply is also selected exactly.