Reading time ≈ 4 minutes
A circular saw is used to cut wood and plastic. Its cutting base is a flat metal disc with a serrated outer edge. When choosing such a tool, everyone decides for themselves what type they need: tabletop, manual, stationary. Many people prefer the manual option. However, in some situations it is necessary to secure the saw. In this case, you can make a table for a circular saw with your own hands, having the opportunity to secure the tool if necessary.
Preparation of tools and materials
Having decided to make a table for a hand-held circular saw yourself, you need to make sure that you have all the materials necessary for the work:
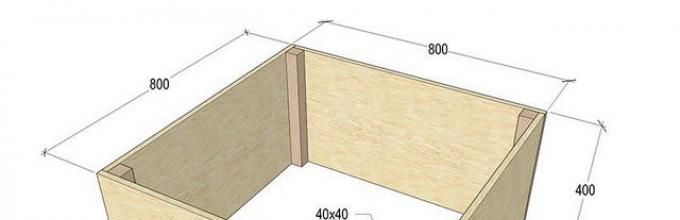
- laminated plywood (9 or 11 mm), size 800 mm by 800 mm;
- 16 mm laminated chipboard or other sheet material suitable for making the body, sheet size 400 by 784 mm - 4 pieces;
- bars 40 by 40 mm (length depends on installation method);
- self-tapping screws;
- bolts.
Any hand-held circular saw will work for this table. It must be remembered that when attached to a table, the cutting depth decreases by 10-20 mm. So saws with small blades are not suitable for such a table.
Step-by-step instructions for assembling a table for a circular saw
1. Manufacturing of the body. Sheet material for the body is cut to size: 400 mm by 800 mm. The parts are fastened using self-tapping screws and bars. It is better to carry out the assembly by first drilling out the external parts of the box. The result is a rectangular box without a bottom or lid. The upper part of the bars is subsequently used to secure the plywood sheet.

2. Preparing and securing the plywood top. Hole slot. First, a piece 800 mm by 80 mm is cut out of a sheet of plywood. Next, measurements are taken of the support shoe of the saw that will be mounted on the tabletop. Markings are made on the back side of the plywood. 2 central axles will be required. Without them, it is impossible to make accurate markings. Then marks are applied to the plywood corresponding to the dimensions of the support shoe. Then they take the measurements that the circular has: the diameter of the lower protective casing, its thickness, the maximum distance from the edges of the support shoe. In accordance with the obtained dimensions, place marks and cut out a rectangular hole using a jigsaw.

3. Attaching the saw to the plywood table top. First, 4 holes are made in the shoe. Diameter - 10 mm. Next, install the tool so that the working part fits into the cut hole. When the saw is level, you need to mark the location of the holes. Marks are made in the central part. In order for the tool to stand securely, you will need plowshare bolts with a countersunk conical head (M8) for fastening. To install them, you will have to take care of the high-quality recess of the cap; it can protrude by a maximum of 1 mm when not tightened.

The plywood is drilled from the outside, the diameter of the resulting holes should be 8 mm, and then a countersink should be made for the head. When the holes are ready, the saw itself is installed on the cutting table for the circular saw, the bolts are tightened from the inside using nuts with plastic locks or spring washers.
4. Fastening the tabletop to the body. Start button. First, holes are made at a distance of 30 mm in the corners of the plywood table top. Then a hole is drilled in the central part of the bars. The parts are connected using an M8 18 mm steel fitting. The usual “Start-start” button is installed on the side. An electrical network is laid inside the case, and the button on the instrument itself is pressed.

5. Making a thrust beam. A simple table for a circular saw will become much more convenient if you equip it with a stop beam. The drawings contain all the necessary dimensions. The beam can be made from plywood and secured using full extension furniture rails. The resulting beam should slide above the surface at an angle of 90° to the cutting plane with a slight gap.

6. Stop for longitudinal cuts. It is made from aluminum cornice. 150 mm from the edges, first drill holes for the bolts, and then draw 2 lines from the place where the bolts are attached to the center line. At the intersection and further towards the bolts, 12 mm holes are made at a distance of 30 mm. The bolts from below are tightened with nuts. And along the drawn lines they make slits in the tonic; their width can be seen in the photo.
A circular saw is a tool that no craftsman can do without. Such a unit is especially necessary in a country house or country house. But working with hand tools is not always convenient, and branded machines are quite expensive. A way out of the situation may be to independently manufacture such a device. The basis of such a home machine can be not only a hand-held circular saw, but also a grinder or even a drill.
Making a table for a circular saw with your own hands will cost much less than a ready-made store-bought version.
It’s not at all difficult to assemble a frame for a circular saw that is quite simple in design with your own hands. To make it you will need the simplest lumber and very little time.
Saw frame design

Before considering the design of the future machine, it is necessary to calculate the load that will fall on it. Because the main thing in such a frame is stability and reliability. For powerful industrial saws, the base is a reinforced welded steel structure. But such a unit is not needed for a home workshop. If you are just planning to assemble your own woodworking machine, then you should take into account the basic parameters of the tool itself. After all, saws are different, and, accordingly, the design of the table should be different.
First of all, you need to consider the power of the tool. Typically, for a home workshop, a unit is chosen whose parameters do not exceed 800 W. But, for example, when building a house or cottage, a fairly large volume of wood has to be cut. At the same time, the power of the circular saw should be greater. But experts do not recommend purchasing saws whose characteristics are higher than 1200 W. There is no justification for installing such a tool in a private workshop. And working on it will only increase energy costs.
Remember: the higher the productivity of your machine, the more stable the base for it should be. For professional circular saws, a base assembled from a metal profile is usually installed. Sometimes such frames are even built into the floor. Because vibration of the machine can lead to situations dangerous to life and health.
Return to contents
Nuances to consider

The second parameter for choosing a saw is the depth of the intended cut. The thickness of the lumber processed on your machine depends on it. This parameter of professional and semi-professional models ranges from 4 to 7 cm. This is enough for sawing boards and even fairly thick plywood. But it will be inconvenient to process logs on such a machine. In addition, it is worth considering that this characteristic of a saw built into the frame with your own hands is reduced. The depth of the cut becomes smaller by about 1 cm. But this can be changed if the design of the table includes the ability to raise or lower the disk.
When choosing a tool, it is necessary to take into account its rotation frequency. If you need a circular saw to prepare building material, then this parameter may be lower. When an even and clean cut is needed, the rotation speed must be quite high. This is necessary, for example, for making furniture. But even this situation has its own nuances. This saw is not suitable for processing plastic materials. Due to too high tool speeds, the disc heats up and the plastic melts. Therefore, it is worth choosing a unit whose rotation speed does not exceed 4000 rpm; in this case, the table for a circular saw can be assembled from wood. The vibration of such a machine is insignificant and additional reinforcement of the frame is not required.
The last thing you need to consider when making your own woodworking machine is the location of the buttons and other controls. When assembling a circular saw with your own hands, remember that access to the controls must be safe. This rule is especially relevant if the tool is installed at the bottom of the tabletop. In this case, it makes more sense to install the panel with switches on the outside of the machine. Or provide a rising tabletop. This design will also help in servicing the unit. After you have taken into account all the little details and nuances, you can proceed directly to making the table.
Return to contents
Preparatory stage of work

The simplest version of a table for a circular saw is a structure assembled from boards and fairly thick plywood from which the tabletop is made. In this case, the tool itself is fixed at the bottom of a stationary (non-rising) tabletop. There is a special slot in the frame cover for the disk. A drawing of such a machine is shown in Fig. 1.
The dimensions for the bed can be changed so that it is convenient for you to work. The average table height is taken as an example. It is 100-115 cm. But much depends on the height of the person who will work with the tool. In addition, the length of the tabletop can also be changed as desired. If you plan to work with boards whose length exceeds 2.5 m, then the table top should be larger. Then it is necessary to make changes to the structure itself and add an additional pair of supports (legs). Otherwise the bed will vibrate too much.
For the countertop, you can take plywood, whose thickness should be at least 50 mm. But you can also use fiberglass slabs and plexiglass. But experts do not recommend using chipboard, since this material is not strong enough.
The table top can be polished and coated with several layers of varnish. This will ensure sufficient sliding of the sawn materials. But it is much wiser to strengthen a sheet of iron on the tabletop. Then the surface of the bed will be much more reliable, and the machine will last you longer.
Return to contents
Required materials and tools
For a woodworking machine, it is necessary to provide guides. They will help you cut the material accurately. This structure is welded from a metal corner and secured to the tabletop with clamps.
It is not recommended to install stationary guides, because in the future you will not be able to change their position.

To make a table you will need the following materials:
- sheet of plywood (countertop made of another material);
- sheet of iron;
- board with a section of 5*10 cm;
- timber with a section of 5*5 cm;
- clamps - 2 pcs;
- metal corner for guides;
- hand circular saw.
In addition, it is wiser to prepare in advance all the tools that will be needed to make the table:
- jigsaw or hacksaw;
- electric drill, screwdriver;
- milling machine or hand cutter (you can do without this tool);
- measuring instruments (ruler, square, tape measure).
When everything you need is ready, you can proceed directly to assembling the table. Some craftsmen make frames from old kitchen or dining tables. But such a design is unlikely to last long enough. Therefore, it is much more reasonable to make all the parts yourself. At the same time, you can take into account your individual needs.
Return to contents
Assembling the saw table

The manufacture of the frame begins with the formation of the tabletop. The plywood sheet is marked so that 2 edges of the cover coincide with the edges of the sheet. The workpiece is cut out using a jigsaw or hacksaw. If desired, the edge of the cut can be processed with a milling cutter. But this operation is not mandatory. Because the main parameter in a table for a circular saw is its reliability, not its beauty. The table top is roughened with sandpaper.
A slot for the disk is marked on the underside of the tabletop. To do this, you first need to measure the dimensions of the unit’s sole. The easiest way to do this is to remove the blade from the tool and simply trace the required part of the saw. These parameters are necessary to form the seat.
Using a hand cutter, wood is selected to a depth of approximately 0.8-1 cm. If you do not have such a tool, then the work can be done using a chisel, but it will take much more time.
After the seat is ready, be sure to try on the saw, adjusting the recess if necessary. Mark the locations for fixing the fasteners and the slots for the disk. If you want the saw blade to lower and rise at your request, then you need to build a pendulum mechanism for the table. In this case, the slot should have the shape of a truncated pyramid. Moreover, the hypothetical top of this figure is directed downward. An example of a drawing of such a design with a belt drive is shown in Fig. 2. It makes more sense to make the frame itself for the lifting mechanism from metal corners that are welded together.
When purchasing a circular saw, the future master does not always imagine the amount of work that he will have to perform with this equipment. This is one side of the problem. On the other hand, the master understands that it is better for him to immediately purchase a circular saw, but it is very difficult to choose a convenient table that would meet all the requirements.
A circular table allows you to make a more accurate and even cut.
Thus, the idea is born to make a table for a hand-held circular saw with your own hands. In this area, real craftsmen have no restrictions.
General requirements for a table for a circular saw

A table for a working saw must meet several basic requirements:
- support rigidity;
- sustainability;
- evenness.
In addition to these requirements, there are several necessary conditions that must be taken into account when creating a machine for a circular saw.
- Safety and reliability of saw fastening.
- Guarding for the saw blade, which very often remains unfulfilled.
- Free access to the on and off button.
The additional set of functions of the devices depends on the requirements of the master himself and his qualifications. This set includes accessories that:
- help to perform an even longitudinal cut;
- same quality cross cut.

The standard table that can be purchased with a circular saw is usually made of stainless steel. The sawing device itself is mounted upside down; an incision or slot is made approximately in the middle to place the saw blade itself into it. Its width must correspond to the width of the saw blades used. This gap should not be allowed to be too wide. In this case, chips and other working debris will often clog the device, rendering it inoperable.
As for the technical parameters of the saw that will be used for machine sawing, its engine power may be greater than that of a conventional hand saw. But still do not exceed 1200 W; experts consider such a risk unjustified. After all, the more powerful the saw, the more durable and reliable the table is needed.
Industrial machines are made, as already mentioned, exclusively from metal, but their support is very often filled with cement for more reliable fastening of the device.
Return to contents
Required material and table assembly for a hand-held circular saw

To make a table, you can take the following materials:
- plywood 20-50 mm thick;
- plexiglass;
- fiberglass slabs.
When choosing saws in a store, the buyer often pays attention to the immersion depth of the device, which means the maximum thickness of the material being processed. It must be assumed that using a hand saw for other purposes will remove approximately 1 cm of the cutting thickness.
Table parameters largely depend on the surfaces being processed.

If the products are expected to be bulky, for example, more than 2.5 m long, then the table will have to be strengthened with additional legs.
The circular table has several features in its assembly. The blank for the table top must be described in a separate paragraph.
So, the legs for the tabletop are made from the same plywood, but of greater thickness. To secure it, clamps are made along the table or crosswise. This will allow the table to be more rigid. The stability will be affected by the correctly selected length of the legs and installation location.
The table can have different sizes; the master determines these parameters independently. For example:
- cover 70x80 cm;
- height 110 cm.
Return to contents
Table cover: how many useful things can it have?

For the saw itself, depending on the selected thickness of the table top, a cut is made with a depth of about 1 cm. The cut is made to secure the working table of the device itself around the perimeter. In order to make it, using a ruler, a simple pencil and the handsaw itself, mark the place where the device will be located.
There are several options for attaching the saw to the table. It all depends on what goal is set. If a person wants the saw to be freely dismantled if necessary, the mount should allow this, but at the same time be reliable.
To do this, limit bars with grooves are installed around the marked perimeter of the working surface of the saw, without forming a closed frame. This secures the hand saw. But this installation is applicable for small volumes of work and low disk speeds.
A more reliable fastening looks similar, but with this fastening the bars are smaller: there are not 4, but 6 or 8, each is fixed near a specific section of the frame, and if necessary, the master will have to unscrew the bolts near each such bar. Some people attach the circular table without wooden beams, screwing it directly to the table, making holes in the frame.
Turning the table cover over, you can see a slot with a saw blade sticking out of it. During installation, the disk platform locking function is used.
You can make a slot on the sawing table for a removable riving knife, which will be attached with a clamp next to the saw on the underside.
Return to contents
Guides for longitudinal and transverse cuts
The table must have guides; aluminum construction U-shaped slats are used for their manufacture. With the open edge they cling to the table. Subsequently, auxiliary fastening parts will move along them, allowing more precise cuts to be made.
The first to be built-in is a guide running along the saw. The parallel rails will run along the edges of the table, perpendicular to the saw itself. The guides themselves are also made of plywood.
Return to contents
How to make cross cuts?

To make cross cuts, a plank that looks like a small table is most often used. It is inverted, has 2 parallel bases and a slot through which the saw blade can pass. If all angles have been observed, the cut will be strictly perpendicular.
Another interesting option could be a solution for the transverse sawing direction. The bars are attached to the plywood (slightly larger than the table) from the bottom side. They should be positioned clearly across the width of the table. 2 parallel plates are attached to the top of the board, which are higher than the saw blade and have slots for its passage. The result is the same, but this solution is easier to implement.
In addition, the table top can be equipped with rulers along both guides.
Stop for longitudinal sawing.
Having perfectly aligned the saw with one of the edges of the table, I attached it with M4 screws. To do this, I had to drill the iron base of the circular in four places.
In general, any circular table is suitable for installation on a table, but if you choose the type of fastening with screws to the base, then it is better to choose a model with an iron base. Cast material may crack.
There is another popular way to attach a circular table to a table without drilling holes in the base - attach it using clamps that fix the base, pressing it to the surface. Only this method did not seem to me to be correct enough in terms of accuracy and reliability of installation, and I did not use it.
Another important parameter of a manual circular saw is the ability to connect a vacuum cleaner. If you cut without a vacuum cleaner, fine wood dust rises into the air.
The disc sawed through to the top side of the tabletop. Height - 40mm (Bosh wood disc 160mm). The table top reduces the cutting depth by 9 mm. The cutting depth is set on the circular saw itself. It’s convenient that the disc can be completely hidden in the table.
UPD: IMPORTANT! On a number of budget circular saws, it may turn out that the disk is at an imperceptible angle. And all the cuts will be beveled. Be sure to check with a tool square that the disk is at 90 degrees relative to the table surface. (before installing the saw, you can check the angle relative to the original platform. If the disk is not at a right angle and it is not possible to set the ideal angle of the site, you can place several strips of tin on one side under the platform, achieving an ideal angle (you can use washers for the screws that secure the saw to the table, but this solution is worse)
Inside the table I placed a socket for the saw, which will now be turned on by the start button.
This is how you can connect a vacuum cleaner to the saw. In general, the table is ready and you can saw. (done in one evening and one morning).
Of course, it is possible to saw without equipment, using slats and clamps, but it is inconvenient.
This structure, pressing against the edges of the table and aligned with them, can move along the saw blade. By pressing the sled against the rail, you can easily saw it at exactly 90 degrees. Thin pieces of wood can be placed inside the sled.
You can even cut the rack like a sausage :) For example, I cut several pieces of different thicknesses.
Sleds solve only part of the problem. For longitudinal sawing you also need a side stop.
I glued together brackets from plywood that will cling to the edge of the table.
It grabs the edges with a death grip.
A circular saw is a dangerous tool. In order not to saw off my fingers, I made a simple pusher from scrap furniture boards.
I have already managed to work with this table, sawing slats, furniture panels, plywood. It became much easier to do all this work than I did with a hand-held circular saw.
In the future I will further improve this table:
- I will remake the side stop for longitudinal sawing, so that when moving, it always remains parallel to the disk
- I will install a removable riving knife to which the disk protection will be attached
- I'll make a dust extraction from the top of the table. (Now when I saw, the blade throws wood dust right in my face)
- I’ll finish the improved pusher. I have already started making a more interesting and convenient version of the pusher, I will write about this in the future.
I will gradually implement this in the future, but for now I will work like this.
Living in a private house forces the owner to acquire skills in related specialties. First of all, agronomic knowledge is needed; you can’t leave your garden plot to the mercy of others. But, in addition, every owner should be a bit of a builder, a welder and, of course, a carpenter. There is a great variety of work on a private yard. Carpentry involves the use of a large number of special tools. Fortunately, the construction market is represented by a huge selection of hand-held power tools. Many owners make do with them. But there are times when it is very difficult, and sometimes simply impossible, to make this or that product by hand. The tool must be secured. This must be done reliably - on a special table, otherwise you may not get the required quality of the product or get injured. The construction market for metalworking equipment offers a large line of tables for a circular saw or router, but their cost is such that not every owner can afford them. In this article we will offer a version of a universal carpentry table for a router and a circular saw.
DIY table for router and circular saw
Where to start making a table? Like any other design, it must start with a working sketch. It is this document that will give a clear idea of what exactly the table will be like and what is needed to make it. The drawing is developed indicating the actual dimensions, which in the process will make it possible to calculate the required amount of materials.
Basic requirements for the working surface of joinery machines
The first thing that a milling machine and a circular saw have in common is the need for a working surface or, in other words, a tabletop. She must be:
- flat and smooth. Otherwise, deformation of the workpieces is possible;
- tough. Deflection of the working surface during use is not allowed. This may lead to a change in the specified processing parameters, which will lead to defective parts;
- made of material that allows you to easily install stops, clamping strips, combs, shields and guard casings to maintain safety during work;
- made in accordance with the dimensions of the workpieces intended for processing. All operations must be carried out without constraint or restrictions.
Basic requirements for table design
 A standard table for a circular saw has dimensions of 1.2x1.2 meters. In certain cases, the size can be changed by the user to accommodate non-standard workpieces. The height of the working surface is 0.85 meters. It may be more or less, depending on the growth of the service personnel.
As a basis for a universal table, you can use the tabletop of a machine for a circular saw. Since the saw blade is located on the left side of the table, the router can be placed on the right. It is installed taking into account the space for the workpieces being processed. It should be remembered that the master performing the milling should be at the end on the right side of the table, and not in front of the router. This requires the installation of maximum guarding of all moving parts to prevent human contact.
Manufacturing of a circular milling table: materials
After the drawing is ready, and all design nuances are taken into account, it is necessary to select materials for making the table. As a base for machines in home workshops, structures made of wood or rolled metal are used. In the first case, the frame can be assembled from a wooden beam, fastened with corners and self-tapping screws. Bolted connections are less commonly used. The second option is to weld or assemble a frame from a metal pipe or angle using bolts, nuts and washers.
The tabletop is usually made of laminated chipboard, thick birch plywood or other materials that have a smooth, even surface and the ability to easily correct slight curvature.
Working plates for mounting equipment are made of metal, plexiglass or textolite.
Making a table for a router and circular saw: tools
To assemble a universal table you will need the following equipment and tools:
- Circular saw with cutting disc
- Manual frezer
- Laminated chipboard or plywood, 20–30 mm thick for work surface
- Bar 50×50 mm or pipe 60×40 for the frame
- paints and varnishes
- Wood glue
- Fasteners in the form of self-tapping screws or bolts with nuts and washers
- Electric drill
- Electric screwdriver
- Jigsaw
- Clamps
- Tape measure, corner, building level and marker
- Electric planer
- Sandpaper
Step-by-step instructions for making a combined table for a router and circular saw
After all the preparatory work is completed, you can begin directly assembling the universal table. It is necessary to divide the process into separate stages:
- From the prepared materials you need to prepare the parts of the future table according to the dimensions indicated in the drawing.
- Make the frame of the future table. Coat the wooden structure with antiseptic and varnish, and the metal structure with primer and paint.
- Install the work surface and secure it to the bed. This can be done using furniture bolts. It should be remembered that all bolted connections must be countersunk and not protrude above the countertop. The working surface must be thoroughly sanded to make it smooth.
- To increase the output of the working tool, it is necessary to install mounting metal plates on the outside of the tabletop. For this purpose, a recess is made in the table surface according to the thickness of the mounting plate. They are attached to the table, and the power tool is mounted on them from below.
- A cut is made in one plate for a saw, and in the other for a cutter of maximum diameter. In addition, mounting holes are drilled.
- At a distance of 200–250 mm along the entire length of the working surface, it is necessary to cut in a T-shaped guide to install the rip fence.
- The next step is to make a parallel stop and upper clamps in the form of combs for the router and a carriage for the circular saw.
- To safely use a power tool, you need to bypass the start and stop keys and move them to a safe place on the side of the table.
A prerequisite when working with electrical equipment is compliance with safety regulations. Ignoring labor safety requirements by operating personnel can result in injury.